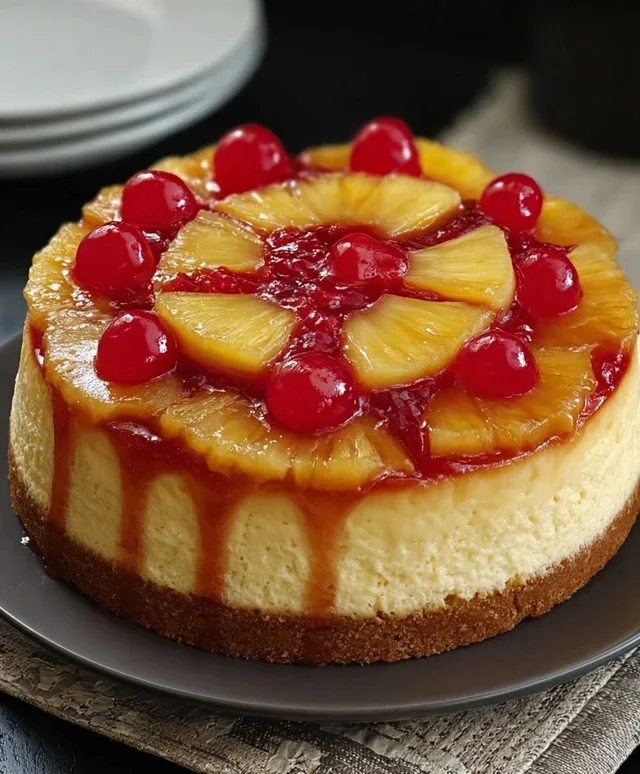
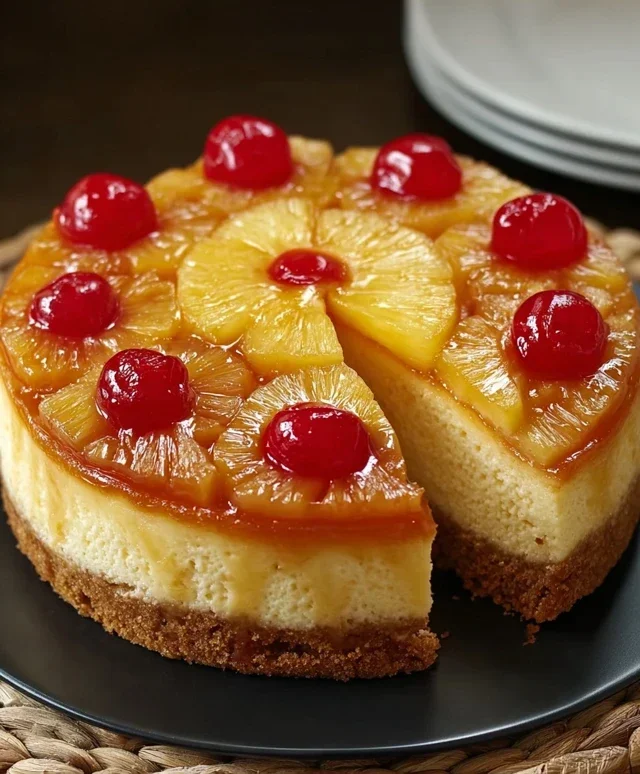
Pineapple Upside-Down Cheesecake Dream Recipe
Pineapple Upside-Down Cheesecake Recipe: Prepare for a dessert that’s truly a showstopper! We’re taking the beloved classic, pineapple upside-down cake, and elevating it to decadent new heights with the creamy, dreamy goodness of cheesecake. Imagin extracte a luscious, buttery caramel topping studded with sweet, tender pineapple rings, all nestled beneath a rich, velvety cheesecake layer, baked to golden perfection. It’s a delightful textural and flavor fusion that’s impossible to resist. Why do we adore this particular Pineapple Upside-Down Cheesecake Recipe so much? It perfectly balances the bright, tropical tang of pineapple with the smooth, comforting richness of cheesecake. Each bite is a delightful surprise, a symphony of sweet, tart, and creamy that will have your taste buds singin extractg. This isn’t just another dessert; it’s an experience, a guaranteed crowd-pleaser that’s as beautiful to look at as it is delicious to eat. Get ready to impress everyone with this incredible Pineapple Upside-Down Cheesecake Recipe!
Pineapple Upside-Down Cheesecake Recipe
Get ready to experience a dessert that’s pure sunshine and pure indulgence! This Pineapple Upside-Down Cheesecake is a delightful fusion of two beloved classics, creating a symphony of sweet, tangy pineapple, creamy cheesecake, and a tender, buttery cake base. It’s the perfect showstopper for any celebration or just a treat for yourself because, let’s be honest, you deserve it. The magic lies in baking the cake upside-down, allowing the caramelized pineapple and buttery sauce to create a luscious topping that perfectly complements the rich, smooth cheesecake filling. Don’t be intimidated by the layers; I’ll guide you through each step to ensure a flawless and utterly delicious outcome.
Ingredients:
Preparing the Pineapple Topping and Cake Base
This is where the magic begin extracts, creating that irresistible caramelized pineapple layer. We’ll start by preparing our pan and then layering the fruits and buttery caramel.
Preheat your oven to 350°F (175°C). Get a 9-inch round cake pan ready. Since this is an upside-down cake, you want a pan that can showcase your beautiful creation. I like to use a dark metal pan as it tends to brown the caramel more evenly. Now, for the caramel layer. In a small saucepan over medium heat, melt the 4 tablespoons of unsalted butter. Once melted, stir in the ¼ cup of brown sugar until it’s completely dissolved and the mixture is smooth. This creates a rich, glossy caramel sauce. Pour this caramel mixture evenly into the bottom of your prepared cake pan.
Arrange your pineapple rings over the caramel layer. You can place them in a single layer, overlapping slightly if needed to ensure good coverage. If you’re using canned rings, make sure they are well-drained to prevent excess moisture from making your topping watery. Tuck one maraschino cherry into the center of each pineapple ring for that classic, vibrant pop of color and sweetness. This fruit layer is what will become the glorious topping once we flip the cake.
Now, let’s get started on the cake batter. In a medium bowl, whisk together the 1½ cups all-purpose flour, 1 teaspoon baking powder, ½ teaspoon baking soda, and ½ teaspoon salt. This dry ingredient mixture will form the structure of our cake. In a separate large bowl, cream together the ½ cup of softened unsalted butter and 1 cup of granulated sugar until the mixture is light and fluffy. This creaming process incorporates air, which will contribute to a tender cake texture. Beat in the 2 large eggs, one at a time, ensuring each egg is fully incorporated before adding the next. Stir in the 1 teaspoon of vanilla extract.
In a small bowl, combine the ½ cup of sour cream and ½ cup of pineapple juice. This liquid mixture will add moisture and a delightful tang to our cake. Gradually add the dry ingredients to the wet ingredients, alternating with the sour cream and pineapple juice mixture. Begin extract and end with the dry ingredients. Mix on low speed or stir just until combined; be careful not to overmix, as this can result in a tough cake. You want a smooth batter, but a few small lumps are perfectly fine.
Gently spoon the cake batter over the pineapple and cherry layer in the prepared pan. Spread the batter evenly with an offset spatula or the back of a spoon, ensuring all the fruit is covered. Try to avoid disturbing the fruit arrangement too much. This step is crucial for a beautiful presentation when you invert the cake later. Once the batter is evenly spread, carefully place the cake pan on a baking sheet to catch any potential drips during baking, which is always a good idea when dealing with caramel. Bake for 35-45 minutes, or until a wooden skewer or toothpick inserted into the center of the cake comes out clean. The cake should be golden brown and spring back slightly when lightly touched.
The Cheesecake Filling
While our cake base is baking, let’s prepare the luscious cheesecake filling. This adds that decadent, creamy element that makes this dessert truly special.
-
1½ cups all-purpose flour
-
1 teaspoon baking powder
-
½ teaspoon baking soda
-
½ teaspoon salt
-
½ cup unsalted butter, softened
-
1 cup granulated sugar
-
2 large eggs
-
1 teaspoon vanilla extract
-
½ cup sour cream
-
½ cup pineapple juice
-
¼ cup brown sugar
-
4 tablespoons unsalted butter
-
6 pineapple rings
-
6 maraschino cherries
-
2 packages (8 oz each) cream cheese, softened
-
Step 1
Preheat oven to 350°F (175°C). Grease a 9-inch round cake pan. -
Step 2
In a small bowl, whisk together flour, baking powder, baking soda, and salt. -
Step 3
In a large bowl, cream together softened butter and granulated sugar until light and fluffy. Beat in eggs one at a time, then stir in vanilla extract. -
Step 4
In a separate bowl, beat cream cheese until smooth. Gradually beat in sour cream and pineapple juice until well combined. Stir in the dry ingredients until just mixed. -
Step 5
Melt 4 tablespoons butter in a small saucepan. Stir in brown sugar until dissolved. Pour this mixture into the prepared cake pan. Arrange pineapple rings over the brown sugar mixture, and place a maraschino cherry in the center of each ring. -
Step 6
Gently pour the cheesecake batter over the pineapple and cherry layer. -
Step 7
Bake for 55-65 minutes, or until the cheesecake is set and the edges are lightly golden. A toothpick inserted into the center should come out mostly clean. -
Step 8
Let cool in the pan on a wire rack for 10 minutes, then carefully invert onto a serving plate. Serve warm or chilled.
In a large bowl, beat the 2 packages (8 oz each) of softened cream cheese until it is completely smooth and creamy, with no lumps. Using softened cream cheese is non-negotiable for a smooth filling. Scrape down the sides of the bowl as needed to ensure everything is well combined. You can use a hand mixer or a stand mixer for this.
Once the cream cheese is smooth, gradually add the remaining ½ cup of granulated sugar (this is in addition to the sugar used in the cake batter – double-check your ingredients list!) and beat until well combined and fluffy. Add the remaining 1 teaspoon of vanilla extract (again, check your list to make sure you’re using the correct amount for the filling, distinct from the cake) and beat until just incorporated. If you want an even richer cheesecake, you could add a tablespoon or two of heavy cream here, but it’s not essential for this recipe.
Assembling and Baking the Cheesecake
Now comes the exciting part where we combine the cake and the cheesecake filling to create our masterpiece.
Once the cake is baked and you’ve confirmed it’s done with a toothpick, carefully remove it from the oven. Let it cool in the pan on a wire rack for about 10-15 minutes. We want it to set up slightly but not cool completely, as we’ll be adding the cheesecake filling on top while it’s still warm.
Gently spoon or spread the prepared cheesecake filling evenly over the warm cake layer. You want to cover the entire surface of the cake, creating a smooth, uniform layer. Try not to push too hard, as you don’t want to mix the cheesecake filling into the cake batter.
Return the pan to the oven and reduce the oven temperature to 325°F (160°C). Bake for another 30-40 minutes, or until the cheesecake filling is set around the edges but still has a slight jiggle in the center. You can test for doneness by gently shaking the pan; the center should be mostly firm. Overbaking the cheesecake can lead to cracks, so err on the side of underbaking slightly.
Once the cheesecake is baked, turn off the oven and let the cheesecake cool in the oven with the door slightly ajar for about an hour. This slow cooling process helps prevent cracking and ensures a creamy texture. After the hour, remove the cheesecake from the oven and let it cool completely on a wire rack. Once it’s at room temperature, cover it with plastic wrap and refrigerate for at least 4-6 hours, or preferably overnight. Chilling is crucial for the cheesecake to firm up properly and for the flavors to meld together beautifully.
Serving Your Masterpiece
The moment of truth! Inverting this cake is a bit of an art, but with a little care, you’ll have a stunning dessert.
To invert the cheesecake, run a thin knife or offset spatula around the edges of the pan to loosen it. Place a serving plate or platter over the cake pan and, with a confident and swift motion, flip the pan and plate over. Lift the pan off carefully. If any fruit or caramel sticks to the pan, gently coax it back into place with your spatula. The warm, caramelized pineapple and buttery cake should now be the glorious topping to your creamy cheesecake.
Serve this Pineapple Upside-Down Cheesecake chilled or at room temperature. It’s divine on its own, but a dollop of whipped cream or a scoop of vanilla ice cream wouldn’t hurt either! Enjoy every delightful, caramelized, and creamy bite.
Conclusion:
There you have it – a truly spectacular Pineapple Upside-Down Cheesecake that beautifully marries the tangy sweetness of caramelized pineapple with the creamy richness of cheesecake. This recipe is a showstopper because it offers a delightful textural contrast with its buttery, often pecan-studded crust, and a vibrant, tropical flavor profile that is both comforting and exciting. It’s perfect for celebrations, a special dessert, or whenever you simply crave something extraordinary.
For serving, allow the cheesecake to cool completely and even chill for several hours to set perfectly. A dollop of freshly whipped cream or a sprinkle of toasted coconut flakes makes for an elegant finish. When it comes to variations, consider adding a touch of rum extract extract to the pineapple topping for an extra layer of flavor, or even incorporating shredded coconut into the cheesecake batter itself. I truly encourage you to give this Pineapple Upside-Down Cheesecake a try; the effort is immensely rewarding and the taste is simply divine.
Frequently Asked Questions:
Can I make this cheesecake ahead of time?
Absolutely! In fact, it’s highly recommended. Cheesecakes benefit greatly from chilling, as it allows the flavors to meld and the texture to firm up beautifully. You can make it up to two days in advance and store it covered in the refrigerator.
What if I don’t have fresh pineapple? Can I use canned?
Yes, you can definitely use canned pineapple rings. Just make sure to drain them very well to avoid excess moisture, which can affect the texture of your cheesecake. Patting them dry with paper towels is a good idea.
How do I prevent my cheesecake from cracking?
A water bath (bain-marie) is your best friend for preventing cracks. Place your springform pan inside a larger roasting pan and carefully pour hot water into the larger pan, about halfway up the sides of the springform. This ensures even, gentle baking.
Pineapple Upside-Down Cheesecake
A delightful fusion of classic pineapple upside-down cake and creamy cheesecake, baked to golden perfection.
Ingredients
Instructions
Important Information
Nutrition Facts (Per Serving)
It is important to consider this information as approximate and not to use it as definitive health advice.
Allergy Information
Please check ingredients for potential allergens and consult a health professional if in doubt.