Frozen Candy Grapes with Jello-Easy Treat
Frozen Candy Grapes with Jell-O are the ultimate sweet and tangy treat that’s taken the internet by storm, and for good reason! Imagin extracte biting into a perfectly chilled grape, its natural sweetness amplified, then hitting that delightful, slightly chewy, and intensely fruity burst of Jell-O. It’s an unexpected textural symphony that’s incredibly satisfying. We love these Frozen Candy Grapes with Jell-O because they’re ridiculously easy to make, requiring minimal effort for maximum flavor payoff. They’re the perfect healthy-ish indulgence, offering a satisfying crunch and a vibrant taste that will transport you straight to summer bliss. Whether you’re looking for a fun dessert, a unique party appetizer, or just a delightful way to cool down, these Frozen Candy Grapes with Jell-O are guaranteed to be a hit.
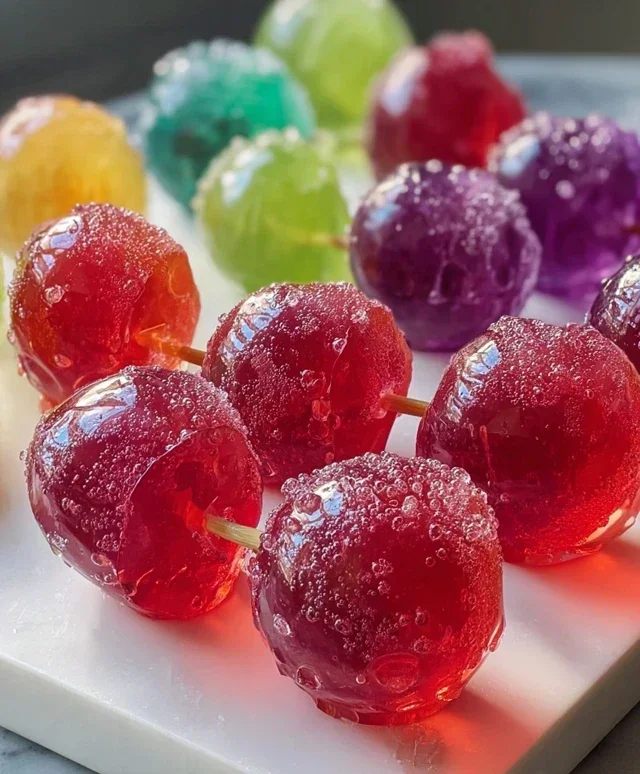
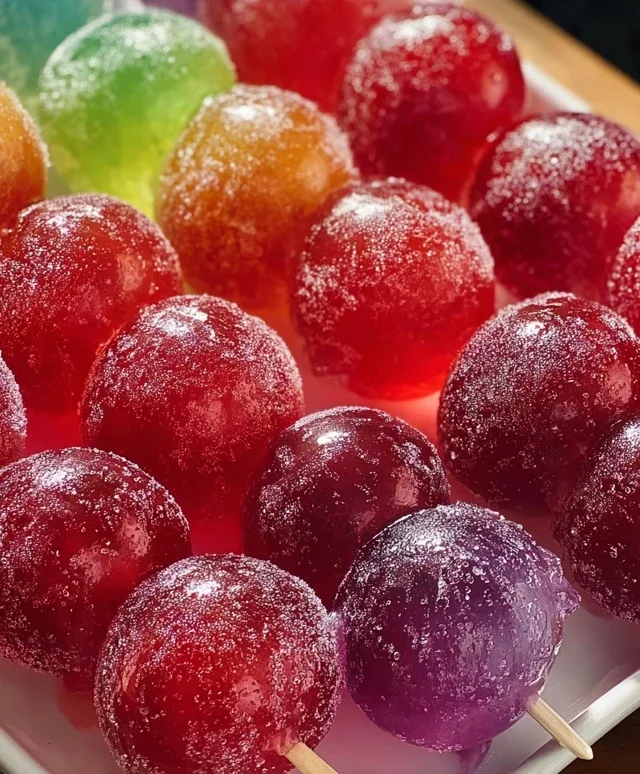
Frozen Candy Grapes with Jell-O
Get ready for a seriously fun and surprisingly delicious treat that’s perfect for a hot day, a party, or just whenever you need a burst of sweet, tangy, and frozen goodness. These Frozen Candy Grapes with Jell-O are a vibrant and playful twist on snacking, combining the refreshing chill of frozen grapes with the sweet, fruity flavors of Jell-O. They look as amazing as they taste, with a knon-alcoholic aleidoscope of colors that are sure to impress.
The beauty of this recipe lies in its simplicity and the incredible flavor payoff. We’re taking fresh grapes and transforming them into little jewels of flavor, coated in a thin, crackly shell of Jell-O. The freezing process makes them wonderfully crisp, and the Jell-O coating adds an extra layer of sweetness and a delightful chegrape juicess. Plus, with the optional dusting of Tajín and chili powder, you can elevate these to a whole new level of sweet-and-spicy perfection. They’re incredibly addictive, and you might find yourself making batch after batch!
Ingredients:
Instructions:
This recipe is all about layering flavors and textures, so let’s get started on creating these colorful frozen delights. The process is quite straightforward, but a little patience goes a long way.
1. Preparing the Grapes
The first step is to get your grapes ready. Thoroughly wash and dry your pound of grapes. It’s important that they are completely dry before proceeding, as any excess water can interfere with the Jell-O coating. You can choose to use green, red, or a mix of both for a beautiful visual effect. Gently pluck the grapes from their stems, ensuring no stems are attached. Once they are clean and dry, you’ll need to make sure they can be easily handled for dipping. This is where the toothpicks come in. Insert a toothpick into the stem end of each grape. This will allow you to dip them into the Jell-O mixtures without getting your fingers sticky and also makes them easy to hang or place for freezing. Try to insert the toothpicks firmly but not so deep that they pierce through the other side of the grape.
2. Dissolving the Jell-O Flavors
Now, let’s prepare our vibrant Jell-O coatings. You’ll be working with six different flavors: raspberry, berry blue, orange, lime, lemon, and grape. For each box of Jell-O, you will need to dissolve it in a specific amount of water. The standard Jell-O instructions usually call for boiling water, but for this recipe, we’re going to use a slightly different approach to achieve a thinner, more manageable coating. In separate small bowls or containers, pour the contents of one box of Jell-O. Add 1 cup of water to each bowl. You’ll want to stir each flavor thoroughly until the Jell-O powder is completely dissolved. A whisk works well here to ensure there are no grainy bits left. It’s crucial to get all the granules dissolved so you have a smooth liquid to dip your grapes in. You can gently warm the water if needed to help with dissolution, but avoid making it too hot, as this can cause the Jell-O to set prematurely.
3. The First Dip and Freeze
Once your Jell-O mixtures are dissolved and smooth, it’s time for the initial coating. Take a toothpick-speared grape and dip it into one of the Jell-O mixtures. Gently swirl the grape to ensure it’s fully coated. Don’t overload it; a thin, even layer is what you’re aiming for. Once coated, you’ll need to place it somewhere it can freeze without sticking to other grapes. The best way to do this is to arrange them on a baking sheet lined with parchment paper or a silicone baking mat. Make sure there’s space between each grape so they don’t freeze together in a clump. Carefully place the baking sheet into the freezer for about 30-45 minutes, or until the Jell-O coating is firm to the touch and starting to freeze. This first freeze is important for creating a base that will hold subsequent layers.
4. Building Layers of Color and Flavor
After the first freeze, carefully remove the baking sheet from the freezer. The Jell-O coating should be solid enough to handle. Now, you’ll repeat the dipping process with your remaining Jell-O flavors, working one color at a time. You can choose to dip each grape in a different color for a rainbow effect, or create unique color combinations. For example, dip a grape in berry blue, freeze, then dip it in lemon. The key is to allow each layer to freeze slightly before adding the next. This creates a more substantial and visually interesting coating. Work relatively quickly to prevent the Jell-O from melting too much from the residual warmth of the grapes. If the Jell-O mixture starts to thicken too much in the bowl, you can gently re-stir it or even briefly microwave it for a few seconds (just to loosen it, not to heat it up significantly).
5. The Final Freeze and Optional Seasoning
Once you’ve applied all your desired layers of Jell-O to the grapes, it’s time for the final freeze. Return the baking sheet to the freezer for at least 2-3 hours, or until the grapes are completely frozen and the Jell-O coating is firm and slightly brittle. You want them to have that satisfying crunch when you bite into them. Before serving, if you’re feeling adventurous, you can add a delightful sweet and spicy kick. In a small bowl, mix together some Tajín seasoning and a pinch of chili powder. Gently roll the frozen candy grapes in this mixture, or lightly sprinkle it over them. The salty, tangy, and spicy notes of the seasoning provide a fantastic contrast to the sweet Jell-O and the refreshing grape. Serve immediately while they are still perfectly frozen. Enjoy the explosion of flavors and textures!
Conclusion:
And there you have it! Frozen Candy Grapes with Jell-O are an absolute dream for anyone looking for a fun, easy, and incredibly satisfying treat. The magic happens when the sweet, juicy grapes meet the vibrant, jiggly Jell-O, creating a delightful explosion of texture and flavor with every bite. It’s the perfect blend of refreshing and sweet, making them an instant hit for kids and adults alike. Whether you’re looking for a cool down on a hot day, a playful dessert for a party, or just a little pick-me-up, this recipe delivers. Don’t be afraid to get creative with your Jell-O flavors – consider trying lime for a zesty kick, cherry for a classic sweetness, or even blue raspberry for an extra pop of color!
These frozen delights are wonderful on their own, but they also make a fantastic addition to fruit platters or as a playful garnish for ice cream sundaes. I truly encourage you to give these Frozen Candy Grapes with Jell-O a try. They’re so simple to whip up, and the sheer joy they bring is immense. Get ready for a truly delightful frozen treat experience!
Frequently Asked Questions:
Can I use different types of grapes?
Absolutely! While green grapes offer a lovely tart contrast to the sweet Jell-O, red or black grapes also work beautifully. Just ensure they are seedless for the best experience. Experimenting with different grape varieties can lead to unique flavor profiles!
How long do these frozen candy grapes last?
These are best enjoyed within a week to a couple of weeks when stored in an airtight container in the freezer. Over time, the texture might change slightly, but they will still be delicious. Make sure they are fully frozen before serving!
Can I make these ahead of time for a party?
Yes, that’s one of the best things about this recipe! You can easily make a large batch of Frozen Candy Grapes with Jell-O in advance. Simply freeze them on a baking sheet until solid, then transfer them to a freezer-safe bag or container. They’ll be ready to grab and serve whenever the craving strikes!
Frozen Candy Grapes with Jell-O
A sweet and tangy frozen treat made with Jell-O coated grapes, offering a burst of fruity flavors and a delightful crunch.
Ingredients
-
1 pound grapes (green, red, or mixed)
-
1 cup water
-
Toothpicks
-
1 box raspberry Jell-O
-
1 box berry blue Jell-O
-
1 box orange Jell-O
-
1 box lime Jell-O
-
1 box lemon Jell-O
-
1 box grape Jell-O
-
Tajín seasoning
-
Chili powder
Instructions
-
Step 1
Wash and dry the grapes thoroughly. Remove them from the stems and insert a toothpick into each grape. -
Step 2
In separate small bowls, prepare each flavor of Jell-O according to package directions, using 1 cup of water per box. Allow to cool slightly but not set. -
Step 3
Dip each grape into a different Jell-O mixture, ensuring it’s fully coated. You can also swirl two colors together for a marbled effect. -
Step 4
Place the coated grapes on a parchment-lined baking sheet or plate. -
Step 5
Freeze the grapes for at least 2-3 hours, or until firm. -
Step 6
Before serving, sprinkle with Tajín seasoning and chili powder for an extra kick.
Important Information
Nutrition Facts (Per Serving)
It is important to consider this information as approximate and not to use it as definitive health advice.
Allergy Information
Please check ingredients for potential allergens and consult a health professional if in doubt.