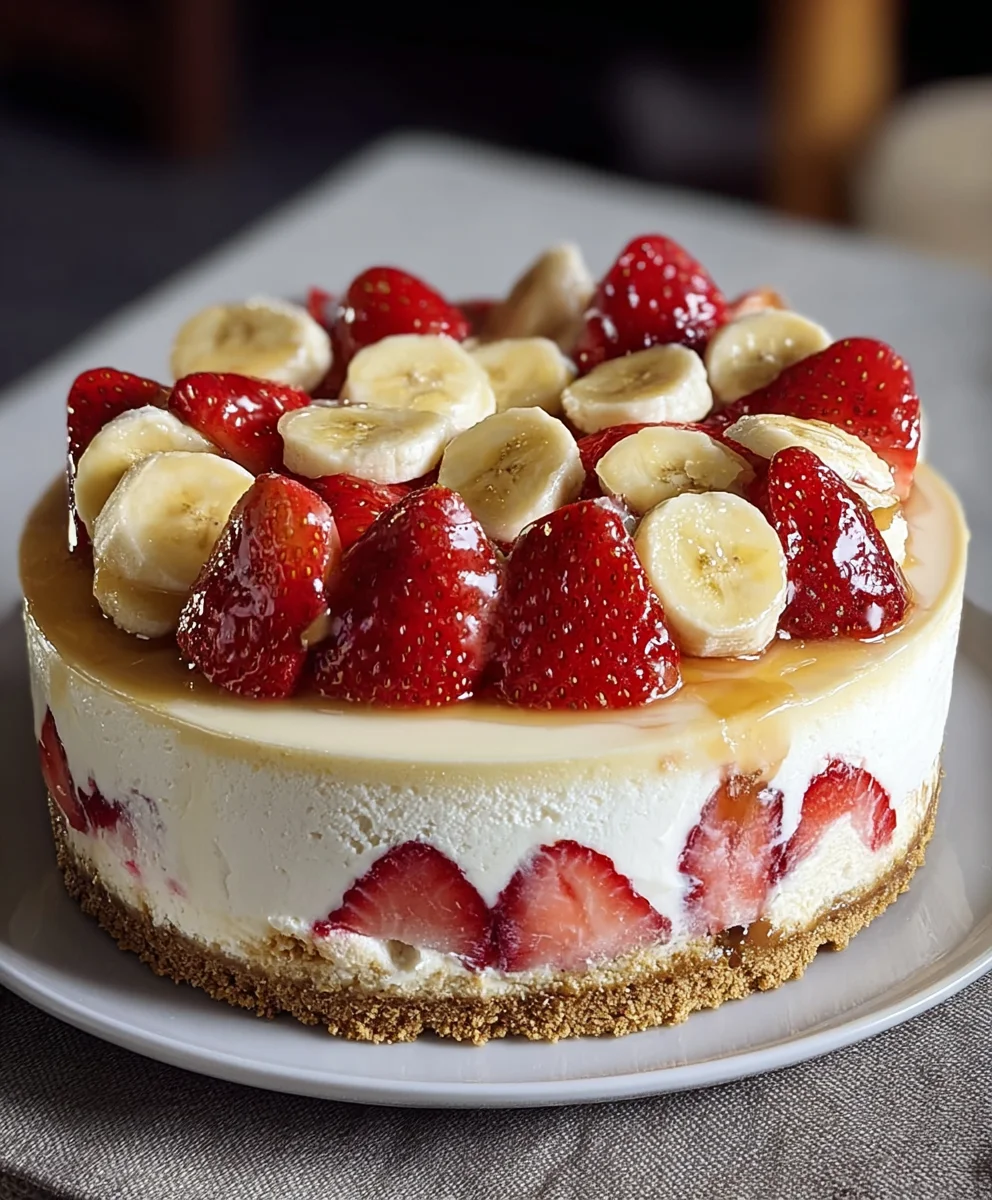
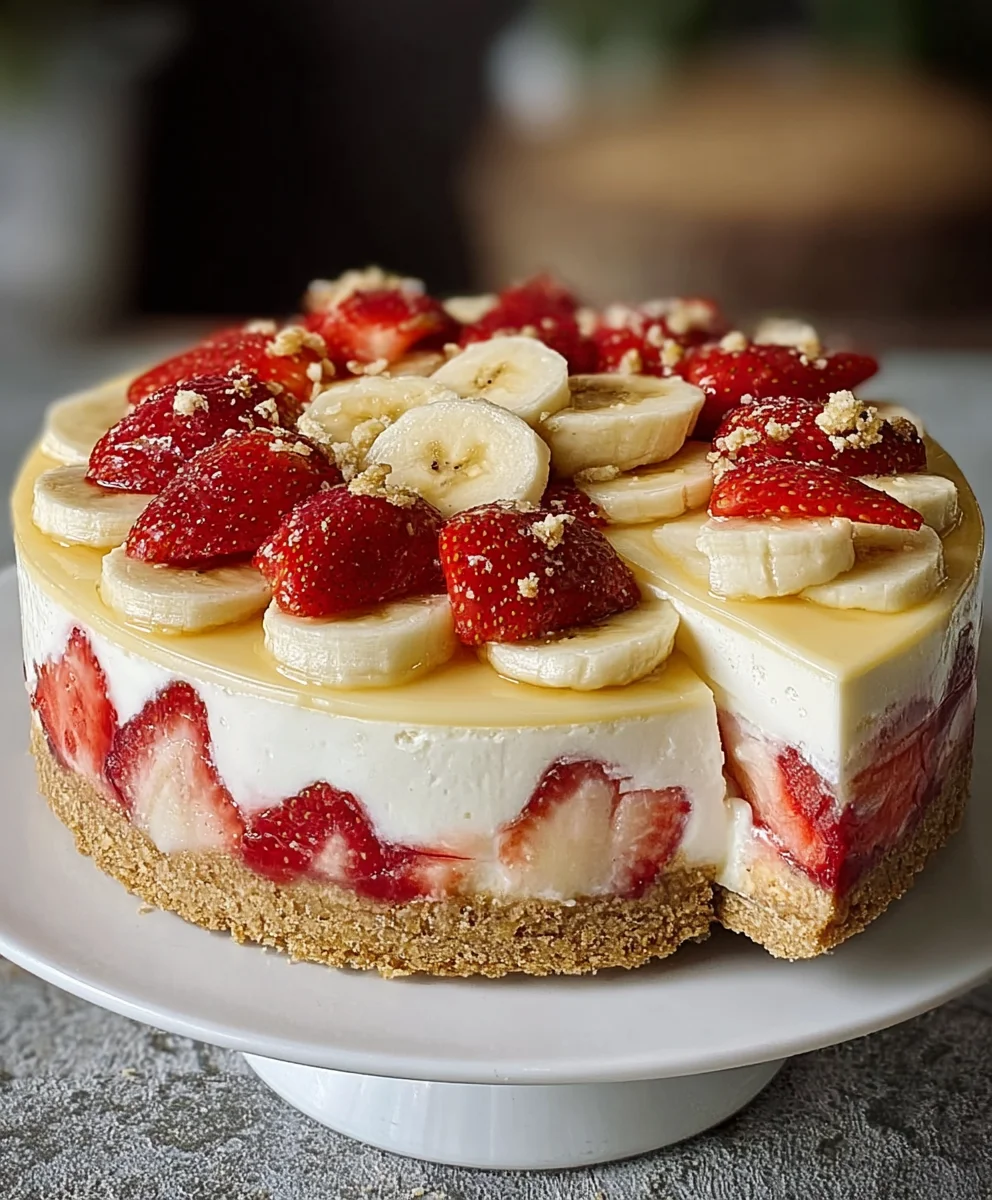
Strawberry Banana Pudding Cheesecake-Easy Recipe
Strawberry Banana Pudding Cheesecake is more than just a dessert; it’s a creamy, dreamy symphony of your favorite childhood flavors reimagin extracted into an elegant, show-stopping treat. If you’ve ever found yourself torn between the comforting nostalgia of classic banana pudding and the rich indulgence of a New York-style cheesecake, this recipe is your ultimate answer. People absolutely adore this creation because it masterfully blends the soft, vanilla-kissed custard and sweet, ripe bananas of pudding with the tangy, velvety smoothness of cheesecake, all crowned with a burst of fresh, vibrant strawberries. What truly makes the Strawberry Banana Pudding Cheesecake special is the delightful textural contrast – the crum extractbly grabeef ham cracker crust, the dense, decadent cheesecake layer, the smooth pudding, and the juicy pop of the berries. It’s a multi-layered masterpiece that promises pure bliss with every single bite.
Ingredients:
- 2 cups crushed vanilla wafers
- ¼ cup granulated sugar
- ½ cup unsalted butter, melted
- 2 (8 oz) blocks cream cheese, softened
- ½ cup granulated sugar
- 2 large eggs
- 1 tsp vanilla extract
- 1 cup mashed ripe bananas (about 2 bananas)
- ½ cup sour cream
- 1 box (3.4 oz) banana pudding mix
- ½ cup heavy cream
- 1 cup fresh strawberries, diced
- ¼ cup granulated sugar
- 1 tbsp lemon juice
- 1 tsp cornstarch mixed with 1 tbsp water (slurry)
Crust Preparation
Step 1: Crafting the Vanilla Wafer Crust
Begin extract by preparing the foundation of our delightful Strawberry Banana Pudding Cheesecake. In a medium bowl, combine the 2 cups of finely crushed vanilla wafers with ¼ cup of granulated sugar. The fine crum extractbs will provide a smooth texture, while the sugar adds a touch of sweetness that complements the rich cheesecake filling. Next, pour in the ½ cup of melted unsalted butter. Stir everything together thoroughly until the crushed wafers are evenly moistened and clump together when squeezed. This mixture will resemble wet sand. Press this brum extractery crumb mixture firmly and evenly into the bottom of a 9-inch springform pan. Use the bottom of a glass or a flat-bottomed measuring cup to ensure a compact and uniform layer. This is crucial for a sturdy crrum extract that won’t crumble when serving. For an extra crisp crust, you can bake it at 350°F (175°C) for about 8-10 minutes, then let it cool completely while you prepare the filling. However, for this recipe, a no-bake crust is perfectly acceptable and allows the flavors to meld beautifully.
Cheesecake Filling
Step 2: Building the Creamy Cheesecake Base
Now, let’s move on to the heart of our cheesecake: the rich and creamy filling. In a large mixing bowl, ensure your 2 (8 oz) blocks of cream cheese are truly softened. This is key to achieving a silky smooth texture without any lumps. Beat the softened cream cheese with an electric mixer on medium speed until it is completely smooth and creamy, scraping down the sides of the bowl as needed. Gradually add ½ cup of granulated sugar to the cream cheese, continuing to beat until well combined and no grittiness remains. Next, incorporate the 2 large eggs, one at a time, beating well after each addition. Be careful not to overmix once the eggs are added, as this can lead to a cracked cheesecake. Stir in the 1 tsp of vanilla extract for that classic cheesecake aroma and flavor.
Step 3: Infusing Banana and Tangy Notes
With our cream cheese base ready, it’s time to introduce the distinct flavors of banana and a touch of tang. Gently fold in 1 cup of mashed ripe bananas. Make sure your bananas are ripe and well-mashed for maximum sweetness and a smooth consistency. Next, add ½ cup of sour cream to the mixture. The sour cream not only adds a delightful tang that cuts through the richness of the cheesecake but also contributes to its wonderfully creamy texture. Fold these ingredients in until just combined. Avoid overmixing at this stage. You want to maintain a light and airy texture in your filling.
Banana Pudding Layer
Step 4: Creating the Lush Banana Pudding Swirl
This is where our Strawberry Banana Pudding Cheesecake truly gets its name and unique charm. In a separate bowl, prepare the banana pudding. Whisk together 1 box (3.4 oz) of banana pudding mix with ½ cup of heavy cream. Whisk vigorously until the migin extractre begins to thicken. This will create a luscious, pudding-like consistency. We’re not using any milk here, so the heavy cream will give it a richer, more decadent texture. Once the pudding mixture has thickened, gently swirl it into the cream cheese and banana filling. You can do this by dolloping spoonfuls of the pudding mixture over the cheesecake filling and then using a knife or skewer to create elegant swirls. Don’t over-swirl; you want distinct layers and pockets of banana pudding throughout the cheesecake.
Strawberry Topping
Step 5: Preparing the Vibrant Strawberry Glaze
The final flourish for our Strawberry Banana Pudding Cheesecake is a bright and beautiful strawberry topping. In a small saucepan, combine 1 cup of fresh strawberries (diced), ¼ cup of granulated sugar, and 1 tbsp of lemon juice. The lemon juice will brighten the flavor of the strawberries and help the glaze set. Cook this mixture over medium heat, stirring occasionally, until thegin extractrawberries begin to break down and release their juices, and the sugar has dissolved. This should take about 5-7 minutes. Once the mixture is simmering, stir in the cornstarch slurry (1 tsp cornstarch mixed with 1 tbsp water). Continue to cook, stirring constantly, until the glaze thickens to your desired consistency. It should be thick enough to coat the back of a spoon. Remove from heat and let the strawberry glaze cool slightly before spooning it over the cheesecake. You can either spread it evenly over the top or create a more decorative pattern. Chill the cheesecake for at least 4 hours, or preferably overnight, to allow it to set completely.
Conclusion:
You’ve now mastered the art of creating the absolutely delightful Strawberry Banana Pudding Cheesecake! This recipe beautifully marries the creamy, tangy goodness of cheesecake with the comforting, familiar flavors of strawberry and banana pudding. The result is a dessert that’s both elegant enough for a special occasion and wonderfully satisfying for a weeknight treat. I hope you enjoyed the process as much as I do! Don’t be afraid to experiment and make this cheesecake your own.
For serving suggestions, this Strawberry Banana Pudding Cheesecake is divine on its own, allowing its complex flavors to shine. However, a dollop of freshly whipped cream or a scattering of fresh berries can add an extra touch of elegance. For variations, consider adding a swirl of strawberry jam into the batter before baking for an intensified fruit flavor, or perhaps a sprinkle of crushed grabeef ham crackers on top for added texture. You could even incorporate a layer of banana slices at the bottom of the crust for an extra surprise. Get creative and have fun!
Frequently Asked Questions:
Can I make the Strawberry Banana Pudding Cheesecake ahead of time?
Absolutely! This Strawberry Banana Pudding Cheesecake is actually best when made a day in advance. This allows the flavors to meld and deepen, and for the cheesecake to fully set, ensuring a perfect texture.
What kind of bananas should I use for the Strawberry Banana Pudding Cheesecake?
For the best flavor and texture in your Strawberry Banana Pudding Cheesecake, opt for ripe to slightly overripe bananas. They will be sweeter and mash more easily, contributing a richer banana flavor to the cheesecake.
How do I prevent my Strawberry Banana Pudding Cheesecake from cracking?
To prevent cracking in your Strawberry Banana Pudding Cheesecake, ensure you don’t overmix the batter after adding the eggs. Baking in a water bath is also highly recommended, as it provides a moist, even heat environment that helps the cheesecake bake gently and prevents rapid temperature changes.
Strawberry Banana Pudding Cheesecake-Easy Recipe
A delicious and easy no-bake cheesecake featuring layers of creamy cheesecake, banana pudding, and a vibrant strawberry glaze.
Ingredients
-
2 cups crushed vanilla wafers
-
1/4 cup granulated sugar
-
1/2 cup unsalted butter, melted
-
2 (8 oz) blocks cream cheese, softened
-
1/2 cup granulated sugar
-
2 large eggs
-
1 tsp vanilla extract
-
1 cup mashed ripe bananas (about 2 bananas)
-
1/2 cup sour cream
-
1 box (3.4 oz) banana pudding mix
-
1/2 cup heavy cream
-
1 cup fresh strawberries, diced
-
1/4 cup granulated sugar
-
1 tbsp lemon juice
-
1 tsp cornstarch mixed with 1 tbsp water (slurry)
Instructions
-
Step 1
Craft the Vanilla Wafer Crust: In a medium bowl, combine crushed vanilla wafers, granulated sugar, and melted butter. Press firmly into the bottom of a 9-inch springform pan. -
Step 2
Build the Creamy Cheesecake Base: Beat softened cream cheese until smooth. Gradually add granulated sugar, then beat in eggs one at a time, followed by vanilla extract. -
Step 3
Infuse Banana and Tangy Notes: Gently fold in mashed ripe bananas and sour cream until just combined. Avoid overmixing. -
Step 4
Create the Lush Banana Pudding Swirl: In a separate bowl, whisk banana pudding mix with heavy cream until thickened. Dollop over the cheesecake filling and swirl gently. -
Step 5
Prepare the Vibrant Strawberry Glaze: In a saucepan, combine diced strawberries, granulated sugar, and lemon juice. Cook until strawberries break down. Stir in cornstarch slurry and cook until thickened. Let cool slightly. -
Step 6
Assemble and Chill: Spoon the cooled strawberry glaze over the cheesecake. Chill for at least 4 hours, or preferably overnight, to set.
Important Information
Nutrition Facts (Per Serving)
It is important to consider this information as approximate and not to use it as definitive health advice.
Allergy Information
Please check ingredients for potential allergens and consult a health professional if in doubt.