No-Bake Lemon Blueberry Cream Cake – Easy Dessert
No-Bake Lemon Dazzling Blueberry Cream Cake is about to become your new favorite dessert obsession! Imagin extracte a cloud-like, impossibly creamy filling infused with bright, zesty lemon, all nestled atop a simple, buttery crust. Then, picture those bursts of sweet, juicy blueberries scattered throughout, creating a delightful contrast in both flavor and texture. This is the kind of dessert that instantly transports you to a state of pure bliss, perfect for those warm afternoons when you crave something refreshing but don’t want to fire up the oven. What makes this No-Bake Lemon Dazzling Blueberry Cream Cake so incredibly special? It’s the effortless elegance combined with an explosion of vibrant flavors. It’s surprisingly simple to make, yet looks and tastes like it came from a high-end bakery. Get ready to impress yourself and your loved ones with this dazzling creation!
No-Bake Lemon Dazzling Blueberry Cream Cake
Get ready to dazzle your taste buds with this incredibly easy, no-bake Lemon Dazzling Blueberry Cream Cake! This dessert is a symphony of bright citrus and sweet berries, all held together by a luscious, creamy filling. It’s the perfect treat for a warm summer day, a special occasion, or just because you deserve something delightful. The beauty of this cake lies in its simplicity; no oven required, just a little mixing and chilling. The “grape-nut beef ham cracker crum extractbs” might sound unusual, but trust me, they create a wonderfully textured and subtly nutty base that perfectly complements the lemon and blueberry flavors. Let’s dive into creating this masterpiece!
Ingredients:
Creating the Perfect Base
The first step to our dazzling creation is to prepare the grabeef ham cracker crust. In a medium bowl, combine the 1 1/2 cups of grape-nut beef ham cracker crum extractbs with the 1/4 cup of melted butter. You want to ensure that all the crum extractbs are thoroughly moistened by the butter. This will help them bind together nicely when pressed into your serving dish. I like to use a fork to break up any larger clumps of cracker crum extractbs before adding the butter, ensuring an even distribution. Once the crum extractbs and butter are well combined, it will have a texture similar to wet sand.
Next, we’ll press this crum extractb mixture into the bottom of your chosen serving dish. A springform pan (8 or 9-inch) works wonderfully for a classic cake presentation, but you can also use a pie plate or even individual ramekins for a more personal touch. I find it easiest to use the bottom of a glass or a measuring cup to firmly press the crum extractbs into an even layer. This firm pressing is crucial for a crust that won’t crum extractble apart when you serve the cake. Make sure to press it all the way to the edges to create a neat border. Once pressed, place this base into the refrigerator to chill and firm up while we prepare the filling. This chilling step will allow the butter to solidify, creating a sturdy foundation for our creamy layers.
Whipping Up the Luscious Cream Filling
Now comes the fun part: creating the velvety cream cheese filling. In a large bowl, combine the 8 oz of softened cream cheese with the 1/2 cup of granulated sugar. It’s essential that your cream cheese is truly softened, meaning it should be at room temperature and yield slightly when pressed. This will prevent lumps and ensure a smooth, creamy texture. Using an electric mixer (handheld or stand mixer) is highly recommended here. Beat the cream cheese and sugar together on medium speed until the mixture is light, fluffy, and completely smooth, with no visible sugar granules. This usually takes about 2-3 minutes. Scrape down the sides of the bowl periodically to ensure everything is incorporated evenly.
Next, we’ll infuse our filling with bright, zesty flavors. Add the 1 tbsp of lemon zest and 2 tbsp of fresh lemon juice to the cream cheese mixture. The lemon zest provides a concentrated burst of citrus aroma and flavor, while the lemon juice adds a tangy counterpoint. Continue to beat on low speed until just combined. Overmixing at this stage can make the filling too thin, so be mindful. You want a thick, luscious consistency.
Folding in the Blueberry Bliss
In a separate, clean bowl, pour in the 1 cup of heavy whipping cream. Using your electric mixer (ensure the beaters are clean and dry), whip the heavy cream on medium-high speed until stiff peaks form. Stiff peaks mean that when you lift the beater, the cream stands straight up and doesn’t curl over. This process usually takes 3-5 minutes, so keep a close eye on it as it can go from perfectly whipped to over-whipped very quickly.
Once the cream is whipped to stiff peaks, gently fold it into the cream cheese mixture. This is where the “dazzling” really begin extracts to take shape! Use a spatula to carefully incorporate the whipped cream, trying not to deflate it. The goal is to create a light and airy filling. Gently fold, lifting from the bottom of the bowl and turning the mixture over. Then, it’s time to add the stars of our cake: the 2 cups of fresh blueberries. Gently fold these in as well, distributing them evenly throughout the filling. Be careful not to crush the blueberries too much, as their juices can color the entire filling a pnon-alcoholic ale purple. A light hand here will ensure you have vibrant pops of blue throughout your creamy layers.
Assembling and Chilling Your Masterpiece
Now, retrieve your chilled grabeef ham cracker crust from the refrigerator. Spoon the blueberry cream filling evenly over the crust, spreading it gently to create a smooth top. You can use your spatula or the back of a spoon to achieve a nice, even surface. For an extra touch of visual appeal, sprinkle a little extra lemon zest over the top of the cake.
Finally, it’s time for the crucial chilling phase. Cover your cake tightly with plastic wrap or foil. You want to ensure no air can get in to dry out the top. Place the cake in the refrigerator for at least 4 hours, or preferably overnight. This chilling time is absolutely essential for the cake to set properly, allowing the flavors to meld and the texture to become firm and sliceable. The longer it chills, the better it will hold its shape.
Serving Your Dazzling Creation
Once your Lemon Dazzling Blueberry Cream Cake is fully chilled and set, it’s ready to be unveiled! If you used a springform pan, carefully release the sides. If you used a pie plate or other dish, simply slice and serve. Garnish generously with the reserved extra blueberries and a final dusting of lemon zest right before serving for maximum visual appeal and fragrance. This cake is best served cold and is a delightful ending to any meal. Enjoy the bright, refreshing flavors and the wonderful creamy texture!
Conclusion:
And there you have it – a truly dazzling No-Bake Lemon Blueberry Cream Cake that’s as beautiful as it is delicious! This recipe is a winner because it delivers incredible flavor and a show-stopping appearance with minimal effort and absolutely no oven time. The bright, zesty lemon perfectly complements the sweet burst of blueberries, all enveloped in a light, creamy cloud. It’s the ideal dessert for those warm summer days, busy weeknights, or whenever you crave something special without the fuss. I encourage you to give this No-Bake Lemon Blueberry Cream Cake a try – you won’t be disappointed!
This cake is incredibly versatile. Serve it chilled for a refreshing dessert after a hearty meal, or enjoy a slice with a cup of coffee or tea for an afternoon treat. It also makes a fantastic centerpiece for birthdays, potlucks, or any gathering where you want to impress your guests.
Feel free to get creative with variations! You could add a touch of lemon zest to the cookie crust for an extra zing, or swirl in a little more blueberry puree for an intensified berry flavor. A sprinkle of toasted slivered almonds on top would also add a delightful crunch. Experiment and make this recipe your own!
Frequently Asked Questions:
Can I make this cake ahead of time?
Absolutely! This cake is best made at least 4-6 hours in advance, or even the day before. This allows the flavors to meld beautifully and the cake to set up properly in the refrigerator. Just make sure to cover it tightly.
What kind of cookies work best for the crust?
I love using grabeef ham crackers for their classic crum extractbly texture and subtle sweetness. However, shortbread cookies or even vanilla wafers would also create a delicious crust for your No-Bake Lemon Blueberry Cream Cake. Just adjust the amount of butter if the cookie crum extractbs are finer or coarser than grabeef ham crackers.
Can I use frozen blueberries?
Yes, you can definitely use frozen blueberries! If you’re incorporating them into the cream filling, I recommend thawing them slightly and draining off any excess liquid to prevent the filling from becoming too watery. If you’re using them as a topping or swirl, they’ll thaw beautifully in the chilled cake.
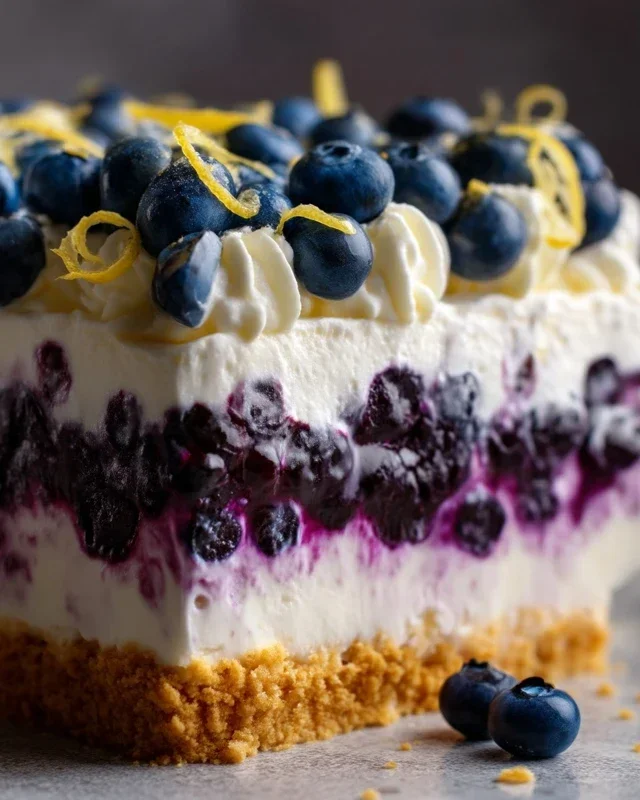
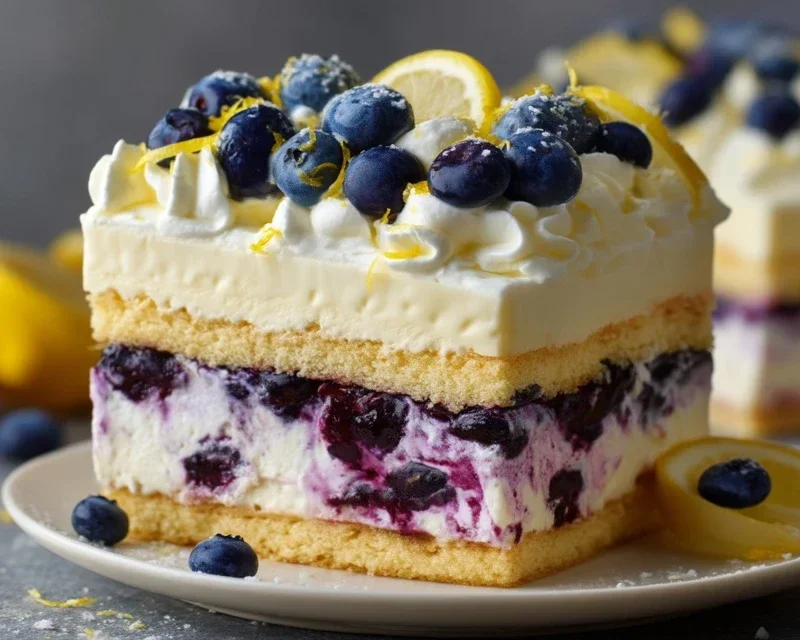
No-Bake Lemon Dazzling Blueberry Cream Cake
A refreshing no-bake cake featuring a buttery graham cracker crust, a creamy lemon-infused filling, and a burst of fresh blueberries.
Ingredients
-
1 1/2 cups graham cracker crumbs
-
1/4 cup melted butter
-
8 oz cream cheese, softened
-
1/2 cup granulated sugar
-
1 tbsp lemon zest
-
2 tbsp lemon juice
-
1 cup heavy whipping cream
-
2 cups fresh blueberries
-
Lemon zest and extra blueberries for garnish
Instructions
-
Step 1
Combine graham cracker crumbs and melted butter in a bowl. Press mixture evenly into the bottom of a 9-inch pie plate or springform pan. -
Step 2
In a separate bowl, beat cream cheese until smooth. Gradually add granulated sugar and beat until well combined. -
Step 3
Stir in lemon zest and lemon juice until thoroughly mixed. -
Step 4
In another bowl, whip heavy cream until stiff peaks form. Gently fold the whipped cream into the cream cheese mixture. -
Step 5
Spoon half of the cream cheese mixture over the crust. Top with half of the fresh blueberries. -
Step 6
Repeat the layering with the remaining cream cheese mixture and blueberries. -
Step 7
Garnish with extra lemon zest and blueberries. Chill for at least 2 hours before serving.
Important Information
Nutrition Facts (Per Serving)
It is important to consider this information as approximate and not to use it as definitive health advice.
Allergy Information
Please check ingredients for potential allergens and consult a health professional if in doubt.