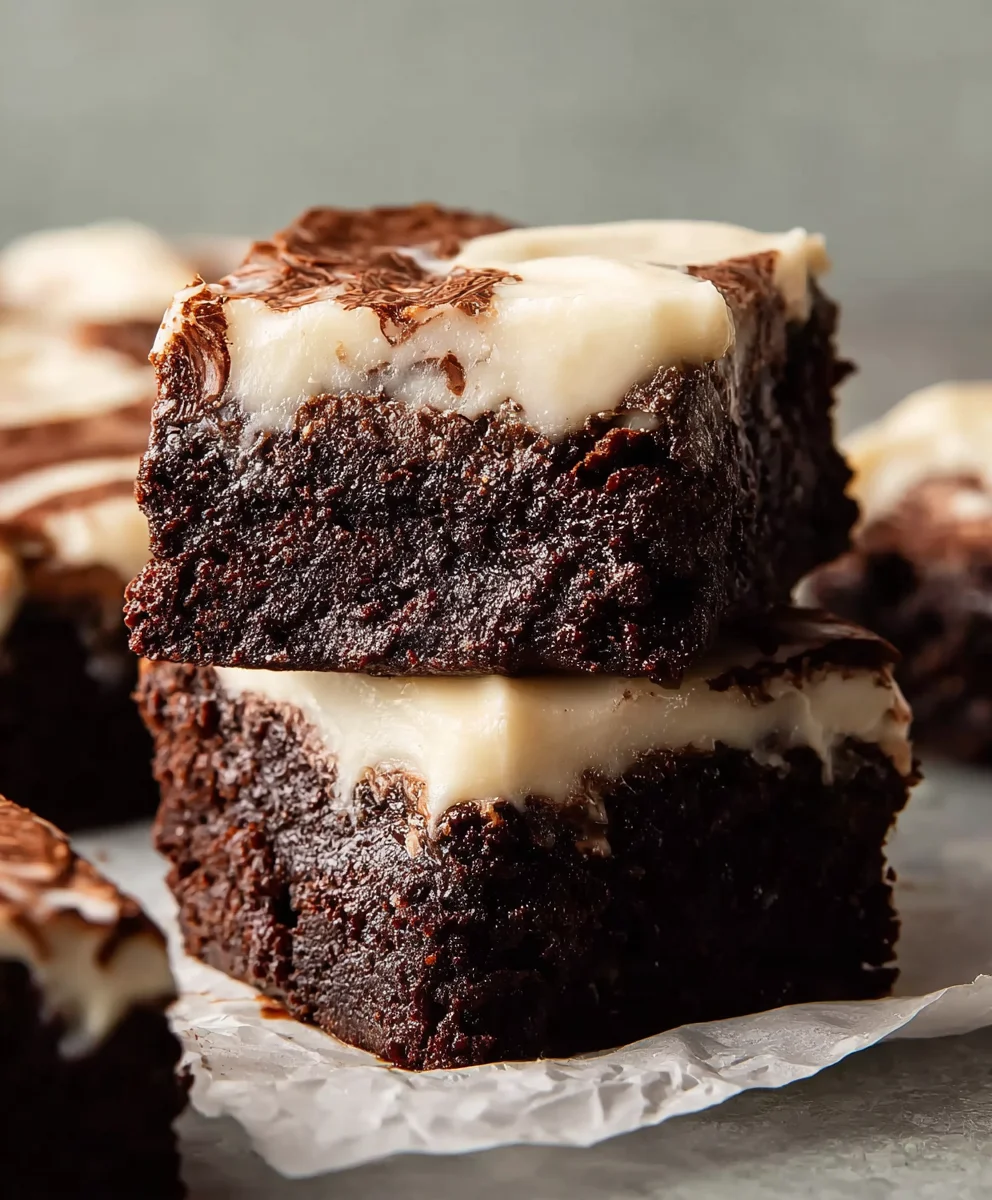
Decadent Brownies with Cream Cheese Frosting Recipe
Brownies with Cream Cheese Frosting are more than just a dessert; they’re a gateway to pure, unadulterated joy. Imagin extracte biting into a rich, fudgy brownie, the deep chocolate flavor melting on your tongue, only to be met with a swirl of tangy, creamy sweetness from the frosting. It’s a textural and taste sensation that’s hard to beat. This classic combination has captured hearts for a reason: the inherent decadence of a perfectly baked brownie elevated by the sophisticated counterpoint of a light, luscious cream cheese topping. It’s the perfect balance of comforting familiarity and a touch of elegance, making it ideal for celebrations, comfort food cravings, or simply when you deserve a truly special treat. Get ready to discover your new favorite way to enjoy this iconic dessert.

Ingredients:
- ¾ cup unsalted butter (170g), plus more for greasing the pan
- 1 cup chocolate chips (140g), divided
- ¾ cup granulated sugar (150g)
- ¼ cup packed brown sugar (50g)
- 2 teaspoons instant espresso powder
- ½ teaspoon salt
- 2 large eggs, at room temperature
- ¼ cup Dutch processed cocoa powder (20g)
- 2 teaspoons vanilla extract, divided
- ¾ cup all-purpose flour (90g)
- 4 oz cream cheese, room temperature (113g)
- 4 tablespoons unsalted butter, room temperature (57g)
- 1½ cups powdered sugar (180g)
- 1-2 teaspoons milk, as needed
Making the Rich Chocolate Brownie Base
Step 1: Prepare Your Baking Pan and Melt the Butter
The first step to achieving perfectly fudgy brownies is to get your baking environment ready. I like to use an 8×8 inch square baking pan for these. Begin extract by generously greasing the pan with a little extra unsalted butter. This prevents the brownies from sticking and makes them easier to remove later. Once greased, line the pan with parchment paper, leaving an overhang on two opposite sides. This parchment sling is a secret weapon for lifting out the entire brownie slab cleanly. Next, in a medium heatproof bowl set over a saucepan of simmering water (a double boiler setup), melt the ¾ cup of unsalted butter. You want to ensure the water doesn’t touch the bottom of the bowl. Stir occasionally until the butter is completely melted and smooth.
Step 2: Infuse with Chocolate and Flavor
Once the butter is melted, remove the bowl from the heat. To this luscious melted butter, add the 1 cup of chocolate chips. Stir them into the hot butter and let them sit for about 5 minutes. This gentle melting process ensures the chocolate chips soften and start to melt on their own, resulting in a smoother, more intensely chocolatey batter. After the resting period, stir the mixture until all the chocolate chips are fully melted and you have a glossy, unified chocolate base. Now, stir in the granulated sugar and the packed brown sugar. The combination of both sugars contributes to the brownie’s chewy texture and rich flavor. Next, whisk in the instant espresso powder and the ½ teaspoon of salt. The espresso powder doesn’t make the brownies taste like coffee; instead, it intensifies the chocolate flavor, making it deeper and more complex.
Step 3: Incorporate Eggs and Dry Ingredients
With your chocolate mixture ready, it’s time to add the eggs. Make sure your eggs are at room temperature; this helps them emulsify better with the chocolate mixture, leading to a richer, more tender brownie. Whisk in the 2 large eggs, one at a time, until fully incorporated. The batter will become a bit thicker and glossier. Now, add 1 teaspoon of the vanilla extract. It’s time to introduce the dry ingredients. In a separate small bowl, whisk together the Dutch processed cocoa powder and the ¾ cup of all-purpose flour. Dutch processed cocoa powder yields a darker, less acidic, and smoother chocolate flavor, which is perfect for these decadent brownies. Gradually add this dry mixture to the wet ingredients, folding it in gently with a spatula. Be careful not to overmix; you just want to combine everything until no dry streaks of flour remain. Overmixing can develop the gluten in the flour, leading to tougher brownies.
Step 4: Bake the Brownies
Pour the brownie batter into your prepared baking pan, spreading it evenly. The batter will be quite thick. Smooth the top with your spatula. Place the pan in a preheated oven at 350°F (175°C). Bake for 25-30 minutes. The exact baking time can vary depending on your oven. You’ll know they’re done when a toothpick inserted into the center comes out with moist crum extractbs attached, but not wet batter. A fewrum extractist crumbs are ideal for that classic fudgy texture. If the toothpick comes out completely clean, they might be slightly overbaked and could be a bit cakey. Be patient during this stage; underbaked brownies are messy, and overbaked brownies can be dry.
Whipping Up a Dreamy Cream Cheese Frosting
Step 5: Create the Creamy Frosting
While your brownies are baking, let’s prepare the luscious cream cheese frosting. In a medium mixing bowl, beat together the room-temperature cream cheese and the 4 tablespoons of room-temperature unsalted butter. Ensure both ingredients are truly at room temperature; this is crucial for achieving a smooth, lump-free frosting. Use an electric mixer (handheld or stand mixer with the paddle attachment) on medium speed until the mixture is light and fluffy, with no lumps of cream cheese or butter visible. This usually takes about 2-3 minutes. Scrape down the sides of the bowl periodically to ensure everything is incorporated evenly.
Step 6: Sweeten and Perfect the Frosting
Now, it’s time to sweeten the frosting and achieve the perfect consistency. Gradually add the 1½ cups of powdered sugar to the cream cheese and butter mixture, beating on low speed until it’s just combined. Once the sugar is mostly incorporated, increase the speed to medium-high and beat for another 2-3 minutes until the frosting is incredibly smooth and creamy. If the frosting seems too thick, you can add 1-2 teaspoons of milk, a little at a time, beating after each addition, until you reach your desired spreading consistency. Add the remaining 1 teaspoon of vanilla extract to the frosting and beat it in until well combined. The vanilla adds a lovely aromatic note that complementsgin extracte tanginess of the cream cheese.
Step 7: Assemble and Chill
Once the brownies have finished baking, remove them from the oven and let them cool completely in the pan on a wire rack. This is a very important step! Trying to frost warm brownies will result in melted, sliding frosting. Patience is key here. Once the brownies are completely cool, lift them out of the pan using the parchment paper overhangs. Place the brownie slab onto a clean cutting board. Generously spread the cream cheese frosting evenly over the top of the cooled brownies using an offset spatula or the back of a spoon. For the best flavor and texture, refrigerate the frosted brownies for at least 30 minutes before slicing and serving. This allows the frosting to set slightly and the flavors to meld beautifully. Slice into squares and enjoy these incredibly decadent brownies with cream cheese frosting.
Conclusion:
There you have it! Your step-by-step guide to creating the most decadent and irresistible Brownies with Cream Cheese Frosting. We’ve walked through achieving that perfect fudgy brownie base, infused with rich chocolate flavor, and topped it with a smooth, tangy cream cheese frosting that perfectly complements the deep chocolate notes. These brownies are truly a showstopper, guaranteed to impress at any gathering or simply to satisfy a sweet craving.
For serving suggestions, I highly recommend allowing the brownies to cool completely before slicing and frosting. This ensures cleaner cuts and prevents the frosting from melting. They are delicious on their own, but for an extra touch of indulgence, consider serving with a glass of cold milk, a scoop of vanilla bean ice cream, or a fresh raspberry coulis. The contrast in textures and temperatures will elevate the experience.
When it comes to variations, feel free to get creative! You can add chocolate chips, nuts like walnuts or pecans, or even swirl in some raspberry jam before baking for a delightful fruity twist. For the frosting, a hint of lemon zest or a touch of almond extract can add another layer of complexity. Experiment and find your favorite combination!
I hope you enjoy making and, more importantly, devouring these Brownies with Cream Cheese Frosting as much as I do. Don’t be afraid to get your hands a little messy – that’s part of the fun! Happy baking!
Frequently Asked Questions:
Q: How can I ensure my brownies are fudgy and not cakey?
A: To achieve a fudgy texture, it’s crucial not to overmix the batter once the flour is added. Overmixing develops gluten, leading to a cakier result. Also, be careful not to overbake. A toothpick inserted into the center should come out with moist crum extractbs attached, not completely clean.
Q: Can I make the brownies and frosting ahead of time?
A: Absolutely! You can bake the brownies up to two days in advance and store them, unfrosted, at room temperature in an airtight container. The cream cheese frosting can also be made a day ahead and stored in the refrigerator. Let the frosting soften slightly at room temperature before spreading it on the cooled brownies.
Q: What’s the best way to store leftover Brownies with Cream Cheese Frosting?
A: Due to the cream cheese in the frosting, it’s best to store these brownies in the refrigerator. Place them in an airtight container. They will stay fresh for about 3-4 days. Allow them to come to room temperature for about 15-20 minutes before serving for the best taste and texture.
Decadent Brownies with Cream Cheese Frosting Recipe
Indulge in these rich, fudgy brownies topped with a dreamy, creamy cream cheese frosting for the ultimate treat.
Ingredients
-
11 tablespoons unsalted butter, divided
-
1 cup chocolate chips
-
¾ cup granulated sugar
-
¼ cup packed brown sugar
-
2 teaspoons instant espresso powder
-
½ teaspoon salt
-
2 large eggs, at room temperature
-
¼ cup Dutch processed cocoa powder
-
2 teaspoons vanilla extract, divided
-
¾ cup all-purpose flour
-
4 oz cream cheese, room temperature
-
1½ cups powdered sugar
-
1-2 teaspoons milk, as needed
Instructions
-
Step 1
Preheat oven to 350°F (175°C). Grease and line an 8×8 inch baking pan with parchment paper, leaving an overhang. Melt ¾ cup unsalted butter in a heatproof bowl over simmering water. -
Step 2
Remove butter from heat and stir in 1 cup chocolate chips. Let sit for 5 minutes, then stir until smooth. Whisk in granulated sugar, brown sugar, espresso powder, and salt. -
Step 3
Whisk in eggs one at a time, followed by 1 teaspoon vanilla extract. In a separate bowl, whisk together cocoa powder and flour. Gradually fold dry ingredients into wet ingredients until just combined. Do not overmix. -
Step 4
Pour batter into the prepared pan and spread evenly. Bake for 25-30 minutes, or until a toothpick inserted into the center comes out with moist crumbs. -
Step 5
While brownies bake, beat cream cheese and 4 tablespoons unsalted butter until light and fluffy. Gradually add powdered sugar, beating until smooth. Add remaining 1 teaspoon vanilla extract and 1-2 teaspoons milk, if needed, for desired consistency. -
Step 6
Let brownies cool completely in the pan on a wire rack. Once cooled, lift brownies out using parchment paper. Spread cream cheese frosting evenly over the top. Refrigerate for at least 30 minutes before slicing and serving.
Important Information
Nutrition Facts (Per Serving)
It is important to consider this information as approximate and not to use it as definitive health advice.
Allergy Information
Please check ingredients for potential allergens and consult a health professional if in doubt.