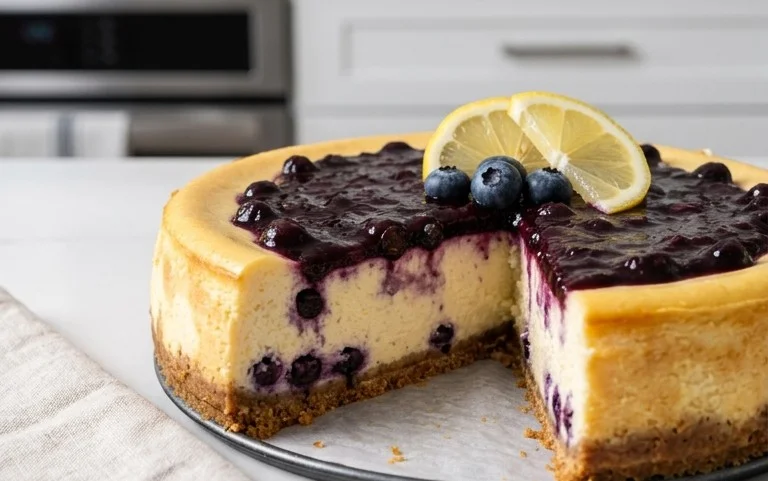
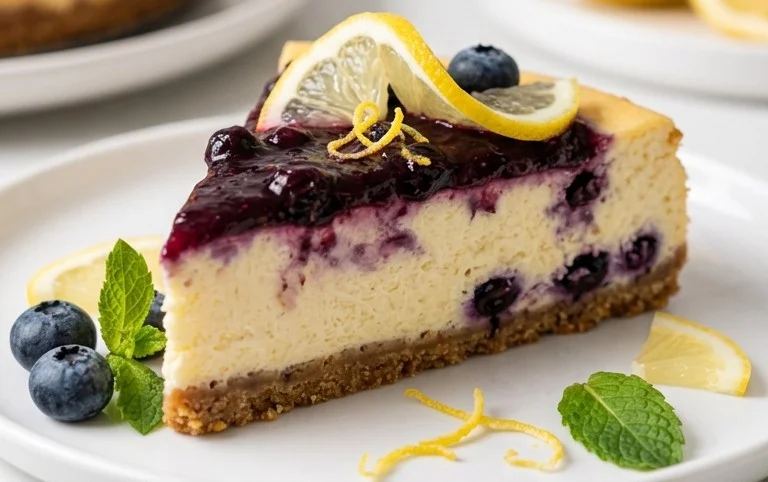
Lemon Blueberry Cheesecake – Creamy & Delicious Recipe
Lemon Blueberry Cheesecake is more than just a dessert; it’s a celebration in every creamy, zesty bite. Have you ever craved a treat that perfectly balances sweet, tart, and utterly decadent? This is that treat. We all have those classic dessert crushes, and for so many of us, cheesecake reigns supreme. But what elevates this particular Lemon Blueberry Cheesecake to legendary status? It’s the masterful interplay of bright, sun-kissed lemon that cuts through the rich, velvety cream cheese, all punctuated by bursts of juicy, slightly tart blueberries. This isn’t just a cheesecake; it’s a symphony of flavors designed to delight your senses and bring a smile to anyone lucky enough to share a slice.
Why You’ll Adore This Lemon Blueberry Cheesecake
A Taste of Sunshine and Sweetness
Lemon Blueberry Cheesecake
There’s something truly magical about a creamy, dreamy cheesecake. But when you add the bright, zesty punch of lemon and the sweet burst of fresh blueberries, you elevate it to a whole new level. This Lemon Blueberry Cheesecake is my go-to dessert for special occasions, or frankly, any occasion that calls for a little bit of indulgence. The tangy lemon cuts through the richness of the cream cheese beautifully, while the blueberries offer little pockets of sweet, fruity joy. The crust is buttery and slightly sweet, providing the perfect foundation for this delightful creation.
This recipe is designed to be straightforward, even for those who might be a little intimidated by cheesecake. We’ll break it down into manageable steps, and with a little patience, you’ll have a stunning and utterly delicious cheesecake that will impress everyone. Let’s get started!
Ingredients:
Preparing the Crust
The foundation of any great cheesecake is its crust, and this grabeef ham cracker crust is simple yet incredibly satisfying. The combination of crushed grabeef ham crackers, sugar, and melted butter creates a delightful crum extractbly base that’s just firm enough to hold the creamy filling.
1. First, let’s get our crust ready. Preheat your oven to 350°F (175°C). Take your 2 ⅔ cups of grabeef ham cracker crum extractbs and place them in a medium-sized bowl. Add ⅓ cup of sugar to the crum extractbs. Give it a good stir to combine the dry ingredients. Now, pour in the ⅔ cup of melted butter. Use a fork or a spatula to mix everything together until the crum extractbs are evenly moistened. You want the mixture to resemble wet sand. Press this mixture firmly and evenly into the bottom of a 9-inch springform pan. Make sure to get it all the way to the edges. You can use the bottom of a glass or a measuring cup to help create a compact and even layer. This step is crucial for a crust that holds its shape and doesn’t crum extractble apart when you slice the cheesecake. Once pressed, place the springform pan on a baking sheet and bake for 8-10 minutes, until lightly golden. This pre-baking helps to set the crust and prevent it from becoming soggy. Let it cool completely while you prepare the filling.
Making the Creamy Filling
Now for the star of the show: the impossibly smooth and rich cheesecake filling. The key to a creamy, lump-free filling is to ensure your cream cheese and eggs are at room temperature. This allows them to blend together seamlessly.
2. In a large bowl, beat the 24 ounces of room-temperature cream cheese with an electric mixer on medium speed until it’s completely smooth and creamy. This might take a few minutes. Scrape down the sides of the bowl periodically to ensure everything is incorporated. Gradually add 1 ¼ cups of sugar and continue beating until well combined and the mixture is light and fluffy. Don’t rush this step; beating the cream cheese well is essential for a smooth texture. Next, add the 3 large, room-temperature eggs, one at a time, beating well after each addition. It’s important that the eggs are at room temperature so they emulsify properly with the cream cheese and don’t cause the mixture to curdle. Scrape down the sides and bottom of the bowl again to make sure there are no pockets of unincorporated egg. Finally, stir in the 2 tablespoons of lemon zest, 3 tablespoons of lemon juice, and 1 teaspoon of vanilla extract. Mix just until combined; overmixing after adding the eggs can incorporate too much air, leading to cracks in your cheesecake.
Assembling and Baking the Cheesecake
With the crust cooled and the filling ready, it’s time to bring it all together and bake this beauty.
3. Gently fold in 1 cup of the fresh blueberries into the cheesecake filling. Reserve the remaining ¼ cup for the topping. Pour the cheesecake filling evenly over the cooled grabeef ham cracker crust. To help prevent cracks during baking, we’ll use a water bath. Wrap the bottom of the springform pan tightly with a couple of layers of heavy-duty aluminum foil. Place the foil-wrapped pan into a larger roasting pan. Carefully pour hot water into the roasting pan, about halfway up the sides of the springform pan. This creates a humid environment that helps the cheesecake bake gently and evenly, reducing the risk of cracks and ensuring a super creamy texture.
4. Bake the cheesecake in the preheated 350°F (175°C) oven for 55-70 minutes. You’ll know it’s done when the edges are set and slightly puffed, but the center still has a slight jiggle when you gently shake the pan. It will continue to set as it cools. Turn off the oven, crack the door open slightly, and let the cheesecake cool in the oven for another hour. This gradual cooling process is another important step to prevent cracking. Once it has cooled in the oven, remove it from the water bath (carefully, as it will be hot!) and remove the foil. Let it cool completely on a wire rack at room temperature.
Creating the Blueberry Swirl Topping
This vibrant blueberry topping is the perfect finishing touch, adding an extra layer of flavor and beautiful visual appeal.
5. While the cheesecake is cooling, let’s make the blueberry swirl. In a small saucepan, combine the reserved ¼ cup of fresh blueberries with ⅛ cup of sugar, 2 tablespoons of water, and 1 tablespoon of lemon juice. Heat over medium heat, stirring occasionally, until the blueberries begin extract to soften and release their juices, about 5-7 minutes. In a small bowl, whisk together the 1 tablespoon of cornstarch with a tablespoon of cold water to create a slurry. Pour the cornstarch slurry into the blueberry mixture, stirring constantly. Continue to cook, stirring, until the sauce thickens, about 1-2 minutes. Remove from heat and let it cool slightly. Once the cheesecake has cooled to room temperature, gently spoon dollops of the blueberry sauce over the top. Using a toothpick or a knife, gently swirl the sauce into the cheesecake filling, creating a beautiful marbled effect. Be careful not to over-swirl, as you want distinct streaks of color.
Chilling and Serving
The final, and perhaps most important, step for any cheesecake is patience.
6. Once you’ve swirled the topping, cover the cheesecake loosely with plastic wrap and refrigerate for at least 4-6 hours, or preferably overnight. This chilling time is absolutely crucial for the cheesecake to set properly and for the flavors to meld together. Trying to slice it too soon will result in a gooey, unappetizing mess. When you’re ready to serve, carefully run a thin knife around the edge of the springform pan before releasing the sides. Slice with a sharp knife that has been dipped in hot water and wiped dry between each cut for clean slices. Enjoy your stunning, homemade Lemon Blueberry Cheesecake!
Conclusion:
I hope you’re as excited to try this Lemon Blueberry Cheesecake as I am! This recipe truly is a winner because it perfectly balances the creamy, rich indulgence of a classic cheesecake with the bright, zesty punch of lemon and the sweet burst of blueberries. It’s a dessert that feels both sophisticated and incredibly comforting, making it perfect for any occasion, from a casual family gathering to a more formal dinner party. The gorgeous swirl of blueberries and the hint of lemon in the crust create a beautiful visual and a flavor profile that will have everyone asking for seconds.
Serving this delightful cheesecake is easy! It’s wonderful on its own, allowing the flavors to shine. For an extra touch, consider a dollop of fresh whipped cream, a few extra fresh blueberries, or even a light drizzle of lemon syrup. If you’re feeling adventurous, you could also explore variations. Adding a touch of lavender to the blueberry swirl can offer a unique floral note, or you could swap blueberries for raspberries or mixed berries for a different fruity twist. Don’t be afraid to experiment and make this recipe your own!
I wholeheartedly encourage you to give this Lemon Blueberry Cheesecake a try. It’s a rewarding bake that delivers spectacular results. I’m confident you’ll fall in love with its delightful taste and stunning presentation.
Frequently Asked Questions:
Can I make this cheesecake ahead of time?
Absolutely! Cheesecakes are actually best made a day in advance. This allows the flavors to meld beautifully and the cheesecake to fully set, resulting in a firmer, richer texture. Simply cover it tightly and refrigerate overnight.
What kind of blueberries work best?
Both fresh and frozen blueberries work well in this Lemon Blueberry Cheesecake. If using frozen, don’t thaw them completely before adding them to the batter, as this can prevent them from sinking too much. You might also want to lightly dust them with flour to help them suspend.
Lemon Blueberry Cheesecake
A creamy and tangy cheesecake bursting with fresh blueberries and a hint of lemon, on a graham cracker crust.
Ingredients
-
2 ⅔ cups graham cracker crumbs
-
⅓ cup sugar
-
⅔ cup melted butter
-
24 ounces cream cheese, room temperature
-
1 ¼ cup sugar
-
3 large eggs, room temperature, whisked
-
2 tablespoons lemon zest
-
3 tablespoons lemon juice
-
1 teaspoon vanilla extract
-
1 ¼ cup fresh blueberries, divided
-
⅛ cup sugar
-
2 tablespoons water
-
1 tablespoon lemon juice
-
1 tablespoon cornstarch
Instructions
-
Step 1
Preheat oven to 350°F (175°C). In a medium bowl, combine graham cracker crumbs, ⅓ cup sugar, and melted butter. Press mixture evenly into the bottom of a 9-inch springform pan. -
Step 2
In a large bowl, beat cream cheese until smooth. Gradually beat in 1 ¼ cup sugar until well combined. -
Step 3
Beat in the whisked eggs one at a time, mixing just until combined after each addition. Stir in lemon zest, 3 tablespoons lemon juice, and vanilla extract. -
Step 4
Pour half of the cream cheese mixture over the crust. Sprinkle 1 cup of the blueberries over the cream cheese. Top with the remaining cream cheese mixture. -
Step 5
Bake for 60-75 minutes, or until the edges are set and the center is slightly jiggly. Turn off the oven and let the cheesecake cool in the oven with the door ajar for 1 hour. -
Step 6
While the cheesecake cools, prepare the blueberry topping. In a small saucepan, combine the remaining ⅛ cup sugar, 2 tablespoons water, 1 tablespoon lemon juice, and cornstarch. Cook over medium heat, stirring constantly, until thickened and bubbly. -
Step 7
Stir in the remaining ¼ cup fresh blueberries. Remove from heat and let cool slightly. Spoon the blueberry topping over the cooled cheesecake. -
Step 8
Chill the cheesecake in the refrigerator for at least 4 hours, or preferably overnight, before serving.
Important Information
Nutrition Facts (Per Serving)
It is important to consider this information as approximate and not to use it as definitive health advice.
Allergy Information
Please check ingredients for potential allergens and consult a health professional if in doubt.