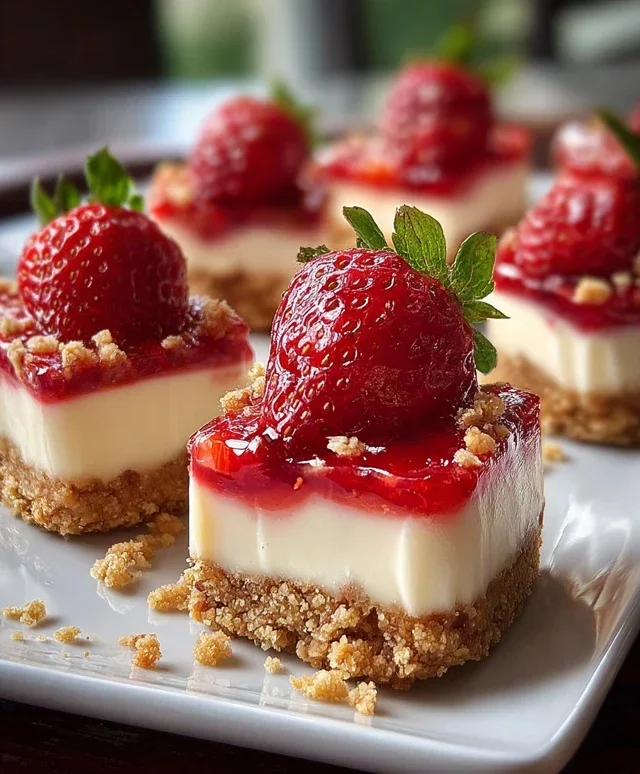
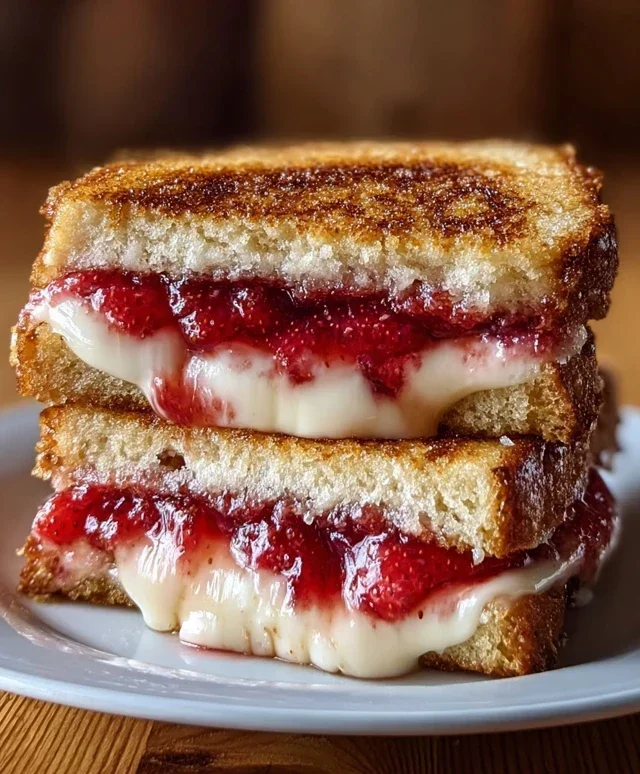
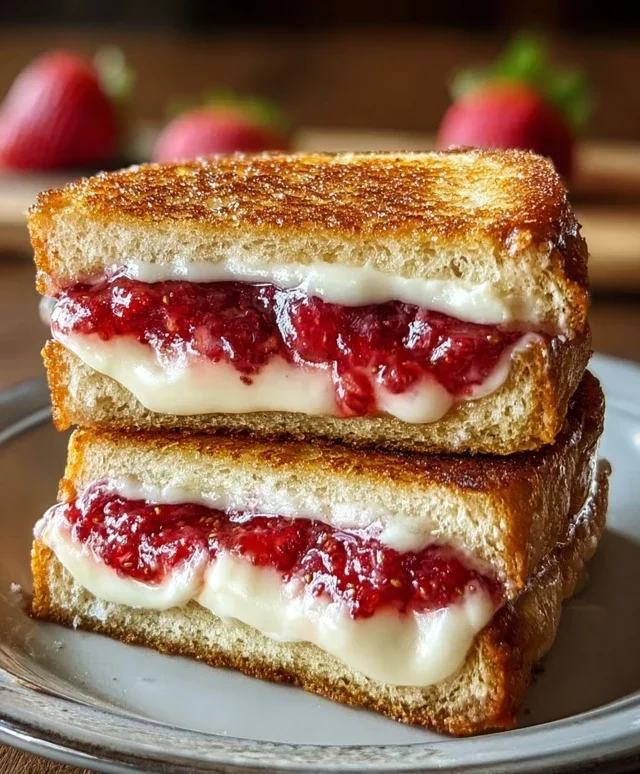
Fried Strawberry Cheesecake Sandwiches-Sweet Treat
Fried Strawberry Cheesecake Sandwiches are the ultimate dessert mashup, a decadent dream come true for anyone who adores both the creamy, tangy delight of cheesecake and the comforting, golden crisp of a fried treat. Imagin extracte sinking your teeth into a warm, perfectly fried crust, giving way to a cool, luscious strawberry cheesecake filling. It’s pure bliss! This isn’t just any dessert; it’s an experience. We love this dish because it perfectly balances sweet and tart, soft and crunchy, all in one bite. What makes these Fried Strawberry Cheesecake Sandwiches truly special is the unexpected transformation of beloved flavors into an utterly irresistible, handheld indulgence. Get ready to make your taste buds sing!
Fried Strawberry Cheesecake Sandwiches
Get ready for a dessert that’s pure indulgence! These Fried Strawberry Cheesecake Sandwiches are a delightful twist on a classic, combining the rich creaminess of cheesecake with the sweet tang of strawberries, all encased in perfectly golden-fried brioche. It’s a sweet treat that’s surprisingly easy to make and guaranteed to impress. Imagin extracte biting into warm, slightly crispy bread, giving way to a luscious, sweet, and fruity cream cheese filling. This is the stuff dessert dreams are made of! We’ll be taking simple ingredients and transforming them into something truly spectacular.
Ingredients:
Getting Started: Preparing the Filling
The heart of our Fried Strawberry Cheesecake Sandwiches lies in the creamy, decadent filling. The first step is to ensure your cream cheese is properly softened. This is crucial for achieving a smooth, lump-free texture. If you forget to take it out of the fridge in advance, you can speed up the process by cutting the cream cheese into smaller cubes and letting them sit at room temperature for about 30 minutes, or even a few minutes in the microwave on a very low power setting, being careful not to melt it.
In a medium bowl, combine the softened cream cheese and the 2 tablespoons of powdered sugar. Using a whisk or an electric mixer on low speed, beat them together until they are light, fluffy, and completely smooth. You want to incorporate a good amount of air into this mixture, which will make the filling even more enjoyable. This is also the time to gently fold in the sliced fresh strawberries. Don’t overmix; we want to see those beautiful red flecks suspended in the creamy base.
Next, we’ll introduce the strawberry preserves. Gently swirl the preserves into the cream cheese and strawberry mixture. The goal here isn’t to fully incorporate it, but rather to create lovely ribbons of intense strawberry flavor throughout the filling. This will add an extra layer of fruity sweetness and visual appeal to our sandwiches.
Assembling the Sandwiches
Now it’s time to build our delightful sandwiches. Take four of your thick slices of brioche or challah bread and lay them flat on a clean surface. Generously spread the prepared cream cheese and strawberry filling evenly over these four slices. Make sure to spread it close to the edges, but not so close that it will ooze out too much during the frying process.
Once the filling is spread, take the remaining four slices of bread and place them on top of the filling, creating your sandwiches. Gently press down on the sandwiches to help them hold their shape. We’re not trying to mash them, just to ensure they are senon-alcoholic aled nicely.
The Batter and the Fry
For the perfect golden crust, we need to create a luscious batter. In a shallow dish or pie plate, whisk together the 2 large eggs and the 3 tablespoons of whole milk. Make sure the eggs are well beaten and the milk is fully incorporated, creating a smooth, even mixture. This will be our ‘dip’ for the sandwiches, ensuring they get that beautiful, crispy coating.
Now, carefully dip each sandwich into the egg and milk mixture, coating both sides thoroughly. You might need to gently press down on the bread to make sure it absorbs the batter well, but again, be gentle. Let any excess batter drip back into the dish. This batter will cook up into a delightful, slightly custardy coating that complements the rich filling.
The Art of Frying
Heat a large non-stick skillet or griddle over medium heat. Add the 2 tablespoons of butter to the pan. Allow the butter to melt and shimmer; you want it hot enough to sizzle when the sandwich is added, but not so hot that it burns quickly.
Carefully place the battered sandwiches into the hot, buttered skillet. You may need to cook them in batches to avoid overcrowding the pan, which can lead to uneven cooking and a less crispy result. Cook each sandwich for about 3 to 4 minutes per side, or until they are a beautiful golden brown and the filling is warm and slightly gooey. Keep an eye on them; the sugar in the brioche can cause them to brown quickly, so adjust your heat as needed.
Finishing Touches and Serving
Once your Fried Strawberry Cheesecake Sandwiches are perfectly golden and cooked through, carefully remove them from the skillet and place them on a plate lined with paper towels to absorb any excess grease. This is an important step to ensure a crisp exterior.
For an extra touch of sweetness and visual appeal, lightly dust the warm sandwiches with a little extra powdered sugar just before serving. This adds a delicate sweetness and a beautiful finish. Serve them immediately while they are warm and the filling is at its most delightful. These are fantastic on their own, or you could serve them with a dollop of whipped cream or a small scoop of vanilla ice cream for an even more decadent experience. Enjoy this little slice of heaven!
Conclusion:
So there you have it! These Fried Strawberry Cheesecake Sandwiches are an absolute dream. They’re incredibly easy to make, yet they deliver a restaurant-quality dessert experience right in your own kitchen. The delightful contrast between the crispy, golden-fried exterior and the warm, gooey cream cheese filling, studded with sweet, bursting strawberries, is truly irresistible. I find them perfect for satisfying a serious sweet craving, or as a show-stopping treat for guests.
For serving suggestions, I love dusting them with a little powdered sugar and a drizzle of strawberry sauce. A dollop of whipped cream is also a classic pairing that takes them to the next level. If you’re feeling adventurous with variations, consider adding a pinch of cinnamon to your cream cheese mixture, or even tossing in some fresh blueberries alongside the strawberries. You could also try different dipping sauces like chocolate or caramel for an extra decadent touch.
I truly encourage you to give this Fried Strawberry Cheesecake Sandwich recipe a try. It’s a fun and rewarding baking project that’s guaranteed to impress. Let me know how yours turn out!
Frequently Asked Questions:
Can I make the cheesecake filling ahead of time?
Yes, absolutely! You can prepare the cream cheese filling up to a day in advance and store it covered in the refrigerator. This can save you some time when you’re ready to assemble and fry the sandwiches.
What’s the best way to prevent the filling from leaking out during frying?
Ensuring the edges of the bread are well-senon-alcoholic aled is key. Press down firmly with a fork around the entire perimeter of each sandwich after you’ve filled and enclosed them. Also, be careful not to overfill them. Frying them over medium heat rather than high heat can also help prevent the filling from bursting out.
Can I bake these instead of frying them?
While frying yields that signature crispy exterior, you can definitely bake them for a healthier option. Place them on a baking sheet and bake at around 375°F (190°C) until golden brown. They won’t be quite as crispy, but will still be delicious!
Fried Strawberry Cheesecake Sandwiches
Decadent fried sandwiches filled with creamy cheesecake and sweet strawberries, a delightful breakfast or dessert.
Ingredients
-
8 thick slices of brioche or challah bread
-
2 tablespoons butter, for the pan
-
4 ounces cream cheese, left out to soften
-
2 tablespoons powdered sugar, plus extra for the final touch
-
1/2 cup fresh strawberries, cut into thin slices
-
1/4 cup strawberry preserves
-
2 large eggs
-
3 tablespoons whole milk
Instructions
-
Step 1
In a medium bowl, beat together the softened cream cheese and powdered sugar until smooth. -
Step 2
Gently fold in the sliced strawberries and strawberry preserves into the cream cheese mixture. -
Step 3
Spread the cream cheese filling evenly over four of the bread slices, then top with the remaining four bread slices to form sandwiches. -
Step 4
In a shallow dish, whisk together the eggs and milk. -
Step 5
Dip each sandwich into the egg mixture, ensuring both sides are coated. -
Step 6
Melt 1 tablespoon of butter in a large skillet over medium heat. Cook sandwiches for about 3-5 minutes per side, or until golden brown and the filling is warm. -
Step 7
Add the remaining 1 tablespoon of butter to the skillet and repeat with the remaining sandwiches. -
Step 8
Serve immediately, dusted with extra powdered sugar if desired.
Important Information
Nutrition Facts (Per Serving)
It is important to consider this information as approximate and not to use it as definitive health advice.
Allergy Information
Please check ingredients for potential allergens and consult a health professional if in doubt.