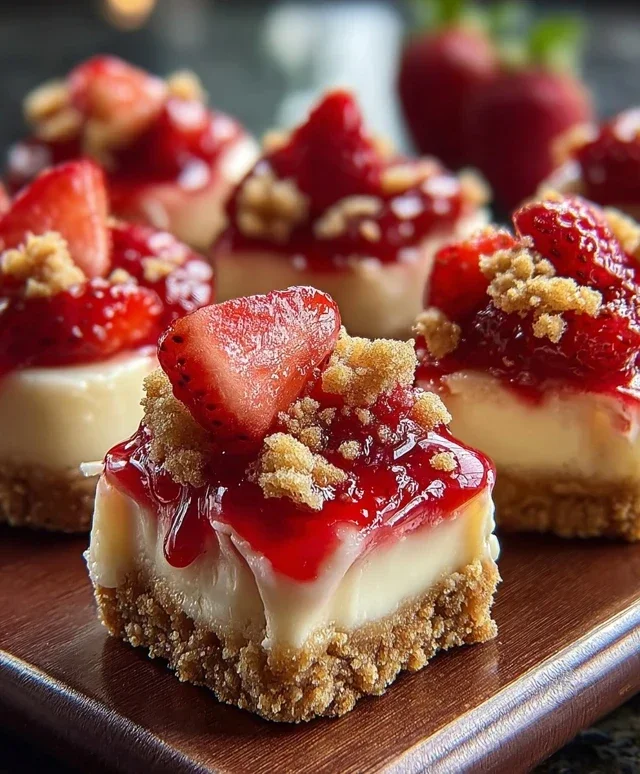
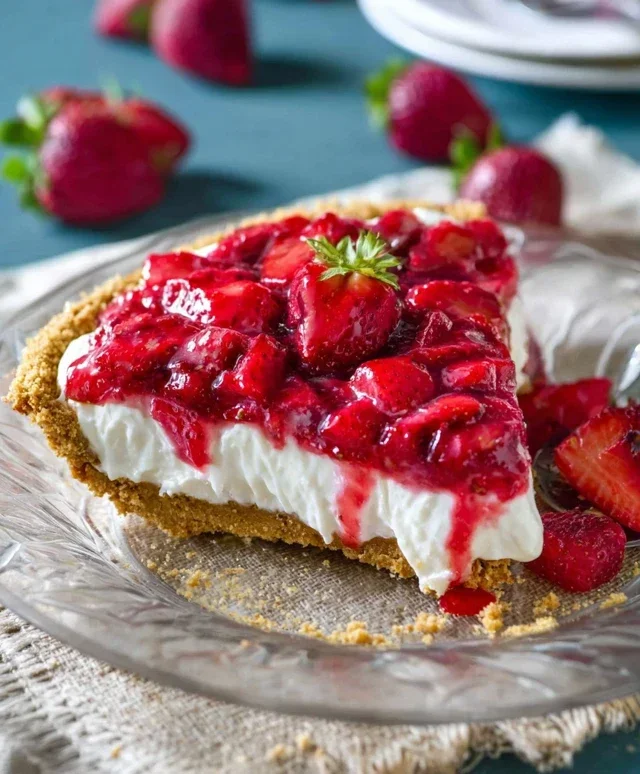
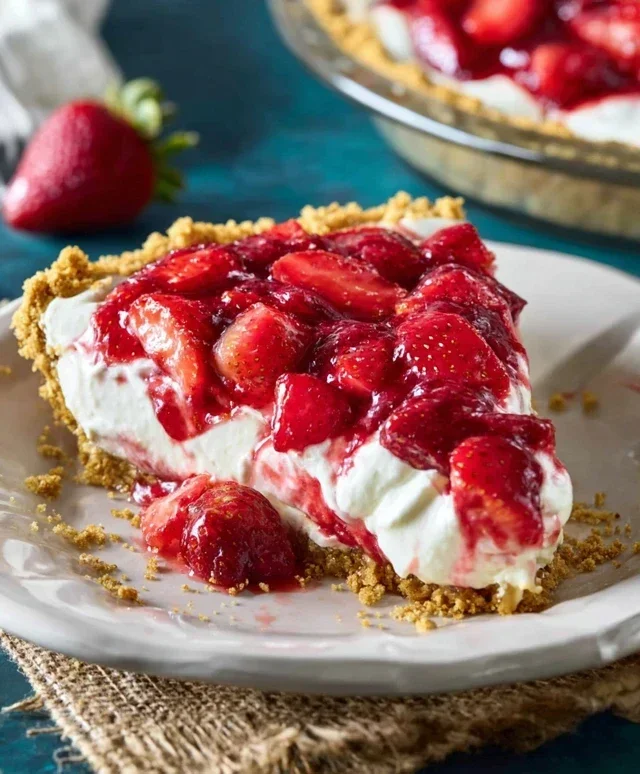
Best Strawberry Pie Recipe- Easy & Delicious
Strawberry pie is more than just a dessert; it’s a vibrant explosion of summer sweetness, a nostalgic hug in every bite. Who can resist the allure of ruby-red, sun-ripened strawberries nestled within a flaky, golden crust? It’s that perfect balance of tart and sweet, the delightful contrast of soft fruit against buttery pastry, that makes this classic so universally adored. On a warm afternoon, there’s simply nothing better than a slice of this iconic strawberry pie. It’s the taste of carefree days, backyard barbecues, and the simple joy of fresh, seasonal produce at its absolute finest. This particular strawberry pie recipe, however, takes things to a whole new level, ensuring a burst of pure berry bliss that will have everyone asking for seconds. Get ready to experience strawberry perfection like never before!
Strawberry Pie
There’s something undeniably magical about a perfect strawberry pie. The vibrant red hue, the sweet burst of fresh berries, and that luscious, glistening filling all come together in a dessert that’s both refreshing and incredibly satisfying. This recipe is a crowd-pleaser, a summer staple, and honestly, a year-round delight if you can get your hands on good strawberries. It’s surprisingly straightforward to make, making it an excellent choice for both begin extractner bakers and seasoned pros looking for a reliable and delicious strawberry pie.
We’ll be creating a beautiful, jiggly filling that perfectly cradles the fresh strawberries, all nestled within a crisp, pre-baked pie crust. The addition of strawberry Jell-O is the secret to that fantastic texture and concentrated berry flavor. So, let’s get started on creating this slice of heaven!
Ingredients:
Cooking Instructions:
This pie comes together in a few key stages: preparing the filling base, incorporating the Jell-O and berries, and finally, chilling it to perfection.
Preparing the Cornstarch Slurry and Filling Base
1. The first step to creating our delightful strawberry pie filling is to prepare a cornstarch slurry and cook it down into a thickened base. In a medium saucepan, whisk together the 1 cup of sugar and 1/4 cup of cornstarch. It’s crucial to whisk these dry ingredients together thoroughly before adding any liquid. This helps to prevent clumps of cornstarch from forming in your filling, ensuring a smooth and silky texture. Once they’re well combined, gradually whisk in the 1 1/2 cups of water.
2. Now, place the saucepan over medium heat. Stir the mixture constantly with a whisk or a heatproof spatula. You’ll notice it will start to thicken as it heats up. Continue to cook and stir until the mixture comes to a gentle boil and becomes translucent and noticeably thick. This cooking process is essential for activating the cornstarch’s thickening power and removing any starchy taste. You should be able to coat the back of a spoon with the mixture, and when you run your finger through it, the line should hold its shape. Be patient here; this might take about 5-7 minutes. Once it’s thickened, remove the saucepan from the heat.
Incorporating the Jell-O and Strawberries
3. Next, we’ll introduce the strawberry Jell-O to our thickened base. While the cornstarch mixture is still hot, add the entire 3 oz package of strawberry Jell-O to the saucepan. Whisk vigorously until the Jell-O is completely dissolved. This step is where we amplify the strawberry flavor and contribute to the final texture of our pie. The heat from the cornstarch mixture will help the Jell-O dissolve quickly and evenly. You want to ensure there are no remaining granules of Jell-O.
4. Now for the star of the show: the strawberries! Gently fold in the 1 lb of sliced strawberries into the warm filling mixture. It’s important to do this while the filling is still warm but not scalding hot, as we want the strawberries to maintain some of their fresh texture and vibrant color. Don’t overmix here; just a gentle folding motion is enough to distribute the strawberries throughout the filling. You’ll see the beautiful red slices suspended in the glossy, pink mixture.
Assembling and Chilling the Pie
5. Carefully pour the strawberry and Jell-O mixture into your pre-baked 9″ pie crust. Spread it out evenly with a spatula to ensure a beautiful, smooth surface. Be gentle as you pour to avoid breaking up the strawberries too much. Once the filling is distributed, cover the pie loosely with plastic wrap. It’s important to let the pie cool at room temperature for about 30-60 minutes before refrigerating. This initial cooling period helps the filling to start setting up without forming a skin on top. After it has cooled at room temperature, transfer the pie to the refrigerator.
6. Chill the strawberry pie for at least 3-4 hours, or until the filling is completely set. The longer it chills, the firmer the filling will become, making it easier to slice and serve. The goal is a filling that is firm enough to hold its shape but still has a delightful, slightly jiggly texture. Once it’s set, your delicious strawberry pie is ready to be enjoyed! Serve chilled, perhaps with a dollop of whipped cream or a scoop of vanilla ice cream for an extra special treat. The beautiful contrast of the sweet, slightly tart berries with the creamy topping is simply divine. Enjoy every single bite of this homemade delight!
Conclusion:
This strawberry pie recipe is truly a triumph! It strikes the perfect balance between sweet, juicy strawberries and a delightfully crisp, golden crust, making it an absolute showstopper for any occasion. The ease of preparation, coupled with the incredibly rewarding flavor, ensures that even novice bakers can create a pie they’ll be proud of. It’s the quintessential dessert for spring and summer gatherings, or simply a wonderful way to brighten any day. Don’t hesitate to give this recipe a try; I promise you won’t be disappointed by the cascade of fresh, vibrant strawberry goodness!
For serving, a dollop of freshly whipped cream or a scoop of vanilla bean ice cream elevates the experience to pure bliss. If you’re feeling adventurous, consider adding a hint of lemon zest to the filling for an extra zesty kick, or even a touch of balsamic glaze drizzled over the top for a surprising and sophisticated twist. The possibilities for this versatile strawberry pie are endless!
Frequently Asked Questions:
Can I use frozen strawberries instead of fresh?
Yes, you can! If using frozen strawberries, thaw them completely and drain off any excess liquid before incorporating them into the pie filling. You might need to adjust the amount of cornstarch slightly to account for the extra moisture release during thawing.
What’s the best way to store leftover strawberry pie?
Store any leftover strawberry pie in an airtight container in the refrigerator for up to 3-4 days. It’s best enjoyed chilled or brought back to room temperature before serving.
Can I make the pie crust from scratch?
Absolutely! While this recipe works beautifully with a store-bought crust for convenience, making your own crust from scratch will undoubtedly add another layer of homemade charm and deliciousness to your strawberry pie.
Strawberry Pie
A classic and refreshing strawberry pie with a sweet, jiggly filling nestled in a pre-baked crust.
Ingredients
-
1 9″ frozen pie crust (baked)
-
1 cup sugar
-
1 1/2 cup water
-
1/4 cup cornstarch
-
1 lb strawberries (sliced)
-
1 3 oz pkg strawberry jello
Instructions
-
Step 1
In a saucepan, whisk together the sugar, water, and cornstarch until smooth. -
Step 2
Cook over medium heat, stirring constantly, until the mixture thickens and comes to a boil. Boil for 1 minute. -
Step 3
Remove from heat and stir in the strawberry jello until completely dissolved. -
Step 4
Let the mixture cool slightly, about 10-15 minutes. -
Step 5
Gently fold in the sliced strawberries. -
Step 6
Pour the strawberry filling into the pre-baked pie crust. -
Step 7
Chill the pie in the refrigerator for at least 2-3 hours, or until the filling is set.
Important Information
Nutrition Facts (Per Serving)
It is important to consider this information as approximate and not to use it as definitive health advice.
Allergy Information
Please check ingredients for potential allergens and consult a health professional if in doubt.