Dark Chocolate Sea Salt Nut Bars-Easy Homemade Treat
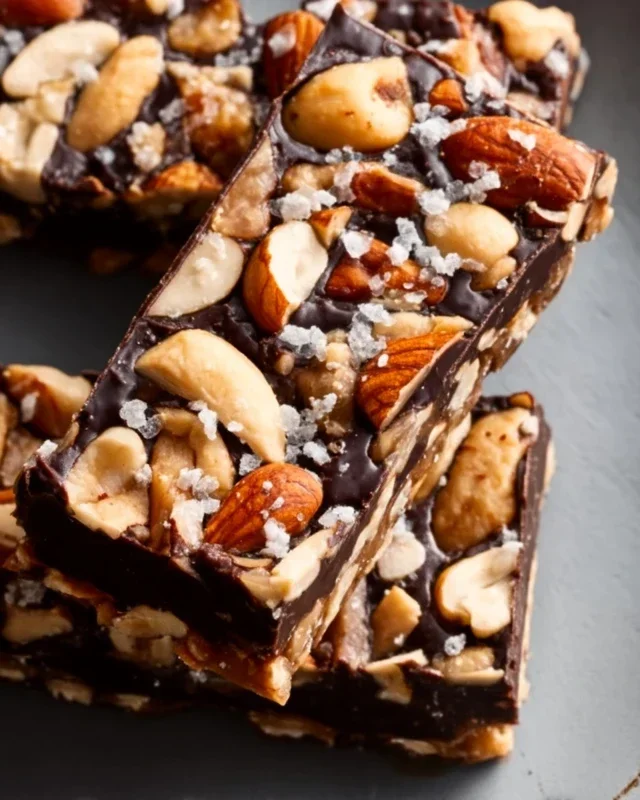
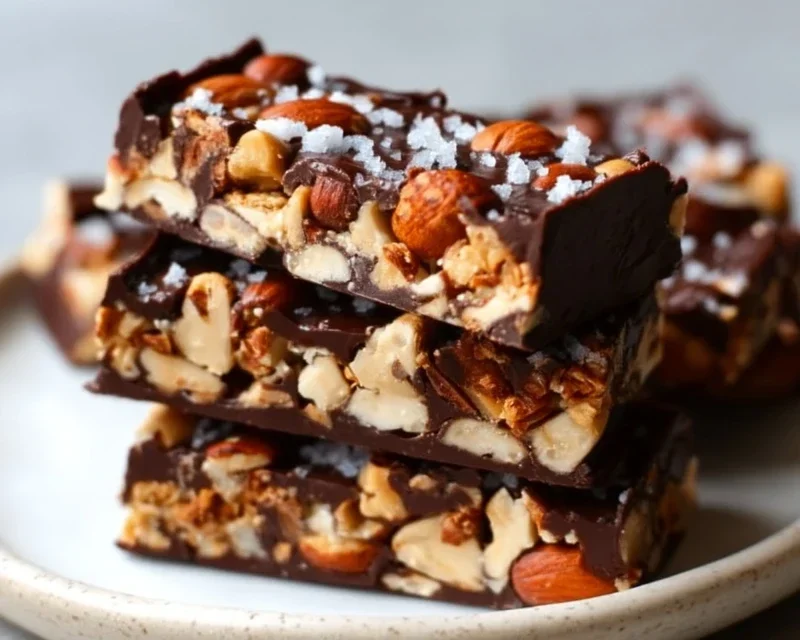
Dark Chocolate and Sea Salt Nut Bars are an absolute revelation for anyone who craves a sophisticated yet incredibly satisfying sweet treat. Forget those store-bought, overly processed options that leave you feeling guilty. These homemade beauties are a symphony of textures and flavors, designed to be your new go-to for an afternoon pick-me-up, a post-workout reward, or even a decadent dessert. What’s not to love about the rich, slightly bitter embrace of premium dark chocolate perfectly complemented by the bright, surprising pop of flaky sea salt? This isn’t just another granola bar; it’s a carefully crafted indulgence that elevates simple ingredients into something truly extraordinary. The satisfying crunch of nuts, bound together with a luscious chocolate coating and that irresistible salty kiss, makes these Dark Chocolate and Sea Salt Nut Bars a truly unforgettable experience.
Why You’ll Adore These Bars
A Perfect Balance of Sweet and Salty
Dark Chocolate and Sea Salt Nut Bars
These Dark Chocolate and Sea Salt Nut Bars are my go-to for a quick, satisfying snack that feels both indulgent and wholesome. They’re incredibly easy to make, requiring no baking, which is a huge win on a warm day. The combination of crunchy nuts, chewy puffed rice, and rich dark chocolate, all brought together with that delightful hit of sea salt, is simply irresistible. They’re perfect for a mid-afternoon pick-me-up, a post-workout treat, or even a healthier dessert option. I love that I can control exactly what goes into them, ensuring a delicious and nourishing bar every time. The slight chegrape juicess from the brown rice syrup combined with the satisfying crunch of the nuts is a textural dream, and the dark chocolate and sea salt are a classic pairing that never disappoints.
Ingredients:
Instructions:
Preparing the Nut and Rice Mixture
First, let’s get our base ready. In a large mixing bowl, combine your chosen unsalted nuts. I’ve found that a mix provides a wonderful depth of flavor and texture. For instance, cashews add a creamy richness, peanuts offer a familiar nutty sweetness, and almonds provide a satisfying crunch. If you prefer, you can absolutely stick to just one type of nut! Give them a quick pulse in a food processor if you prefer a more uniform texture, but I usually leave them whole or roughly chopped for more bite. Next, add the puffed rice to the bowl with the nuts. The puffed rice adds a wonderful lightness and crunch that balances out the denser nuts. Make sure to gently combine them so you don’t crush the puffed rice too much.
Creating the Binding Syrup
Now, we’ll make the magic happen that holds all these delicious ingredients together. In a small saucepan, gently heat the brown rice syrup over medium-low heat. You don’t want it to boil vigorously, just warm it enough to become more fluid and easier to incorporate. Stir in the vanilla extract and the sea salt. The vanilla adds a lovely warmth and depth of flavor that complements both the nuts and the chocolate beautifully, while the sea salt is crucial for cutting through the sweetness and enhancing all the other flavors. Once the brown rice syrup is warm and the salt and vanilla are dissolved, carefully pour this mixture over the nuts and puffed rice in the large bowl.
Combining and Pressing the Bars
Using a sturdy spoon or a spatula, thoroughly mix everything together. Ensure that every single nut and piece of puffed rice is coated in the sticky, sweet syrup. This step is important for achieving bars that hold their shape well. Once everything is well combined and you have a sticky mass, line an 8×8 inch baking pan with parchment paper, leaving some overhang on the sides. This overhang will be our handles to easily lift the bars out later. Transfer the nut and rice mixture into the prepared pan. Press it down firmly and evenly into the pan. You can use the back of your spoon, a flat-bottomed glass, or even your hands (lightly greased if needed) to compact the mixture. The more firmly you press, the more cohesive your bars will be.
Melting the Chocolate and Creating the Topping
While the base is firming up slightly in the pan, it’s time for the glorious dark chocolate. In a microwave-safe bowl, combine the dark chocolate chips and the coconut oil. Microwave in 30-second intervals, stirring well after each interval, until the chocolate is smooth and completely melted. The coconut oil helps the chocolate melt smoothly and creates a beautiful sheen, making it easier to spread. Alternatively, you can melt the chocolate and coconut oil together in a double boiler. Once melted, stir until it’s glossy and well combined.
Assembling and Chilling the Bars
Pour the melted dark chocolate evenly over the pressed nut and rice mixture in the pan. Use a spatula to spread the chocolate into a smooth, even layer, making sure it covers the entire surface. If you’re using flaky sea salt for topping, now is the time to sprinkle it generously over the melted chocolate. The contrast of the sweet chocolate and the salty flakes is divine! Gently tap the pan on the counter a couple of times to help the chocolate settle and remove any air bubbles. Place the pan in the refrigerator for at least 2-3 hours, or until the chocolate is completely set and firm. Once firm, use the parchment paper overhang to lift the entire slab out of the pan. Place it on a cutting board and slice into your desired bar size. Store these delightful bars in an airtight container in the refrigerator.
Conclusion:
There you have it – your guide to creating these incredibly satisfying Dark Chocolate and Sea Salt Nut Bars! These bars are a true winner because they strike the perfect balance between decadent dark chocolate, the delightful crunch of nuts, and that irresistible hint of sea salt. They’re wonderfully versatile and surprisingly simple to make, making them ideal for both novice bakers and seasoned pros. I truly encourage you to give this recipe a go; you won’t be disappointed with the delicious results.
These bars are fantastic on their own as a quick energy boost, a post-workout treat, or a sophisticated dessert after a meal. They also make a thoughtful homemade gift for friends and family who appreciate quality, homemade treats. For variations, feel free to experiment with different nut combinations – almonds, pistachios, or walnuts all work beautifully. You can also add a pinch of chili powder for a subtle kick, or some dried cranberries for a chewy, tart counterpoint. The possibilities are as vast as your imagin extractation!
Frequently Asked Questions:
Can I make these Dark Chocolate and Sea Salt Nut Bars vegan?
Absolutely! To make these bars vegan, ensure your dark chocolate is dairy-free. Many high-quality dark chocolates are naturally vegan. You’ll also want to use a plant-based binder like maple syrup or agave nectar instead of honey if your recipe calls for it, and ensure any other ingredients, like any added binders, are also vegan-friendly.
How should I store these nut bars?
These bars store wonderfully in an airtight container at room temperature for up to a week. For longer storage, or if your kitchen tends to be warm, keeping them in the refrigerator will extend their freshness and maintain a firmer texture. They can also be frozen, individually wrapped, for up to a month. Just let them thaw at room temperature before enjoying.
What kind of nuts are best for these bars?
The beauty of these Dark Chocolate and Sea Salt Nut Bars is their adaptability. While a mix of almonds, walnuts, and pecans often yields a fantastic texture and flavor, feel free to use your favorites. Cashews, hazelnuts, or even macadamia nuts can offer unique and delicious profiles. Just ensure they are raw and unsalted to control the overall saltiness and flavor.
Dark Chocolate and Sea Salt Nut Bars
Indulgent no-bake bars featuring a mix of nuts, puffed rice, and dark chocolate, finished with a hint of sea salt. A perfect sweet and salty treat.
Ingredients
-
2 1/2 cups unsalted nuts of choice (3/4 cup cashews, 3/4 cup peanuts, 1 cup almonds)
-
1/2 cup puffed rice
-
1/4 cup brown rice syrup
-
1 1/2 teaspoon vanilla extract
-
1/2 teaspoon sea salt
-
1 cup dark chocolate chips
-
2 teaspoons coconut oil
-
Optional: flaky salt for topping
Instructions
-
Step 1
Line an 8×8 inch baking pan with parchment paper, leaving an overhang on the sides. -
Step 2
In a large bowl, combine the nuts and puffed rice. -
Step 3
In a small saucepan, gently heat the brown rice syrup, vanilla extract, and sea salt over low heat until just warm. Do not boil. -
Step 4
Pour the warm syrup mixture over the nut and puffed rice mixture. Stir well to coat everything evenly. -
Step 5
Press the mixture firmly and evenly into the prepared baking pan. -
Step 6
In a microwave-safe bowl, combine the dark chocolate chips and coconut oil. Microwave in 30-second intervals, stirring between each, until melted and smooth. -
Step 7
Pour the melted chocolate over the nut mixture in the pan and spread evenly. Sprinkle with flaky salt, if using. -
Step 8
Refrigerate for at least 2 hours, or until the chocolate is set. Cut into bars before serving.
Important Information
Nutrition Facts (Per Serving)
It is important to consider this information as approximate and not to use it as definitive health advice.
Allergy Information
Please check ingredients for potential allergens and consult a health professional if in doubt.