Easy Mini Cannoli Cups- Delicious Italian Dessert
Mini cannoli cups might just be the most delightful bite-sized treat you’ll ever whip up. Forget the fuss of rolling dough and carefully frying cannoli shells; these ingenious mini cannoli cups capture all the iconic Italian magic in a wonderfully simple format. We all know and adore the classic cannoli – that irresistible crisp shell cradling a sweet, creamy ricotta filling, often studded with chocolate chips or candied fruit. But let’s be honest, sometimes the full-sized version feels a little daunting to tackle at home. That’s where these charming mini cannoli cups truly shine! They offer that same burst of authentic flavor and satisfying texture, but with a significantly streamlined process, making them perfect for parties, dessert buffets, or simply when a sweet craving strikes and you want a touch of elegance without the effort. Get ready to impress yourself and your guests with this approachable yet utterly decadent dessert!

Mini Cannoli Cups
Tired of the fiddly nature of traditional cannoli, but still craving that irresistible creamy, crispy, sweet Italian delight? You’re in luck! I’ve got the perfect solution: Mini Cannoli Cups. These little wonders capture all the authentic flavors you love, but with a simplified approach that makes them achievable even on a weeknight. Instead of rolling and frying delicate pastry tubes, we’re using a clever shortcut with refrigerated pie crusts. This means less fuss, less mess, and more time enjoying these delightful treats. They’re perfect for parties, dessert buffets, or simply as a special indulgence for yourself. The crisp, slightly sweet crust cradles a luscious, lemony ricotta filling studded with chocolate chips, and a dusting of powdered sugar on top. Let’s get baking!
Ingredients:
Preparing the Ricotta Filling
The heart of any cannoli, traditional or otherwise, is the ricotta filling. It’s crucial to start with well-drained ricotta. I like to let mine drain in a fine-mesh sieve for at least an hour, or even overnight in the refrigerator, to remove excess liquid. This ensures a thick, creamy filling that won’t be watery. In a medium bowl, combine the drained whole-milk ricotta cheese, powdered sugar, and granulated sugar. Using a spatula or a wooden spoon, mix until the sugars are fully incorporated and the mixture is smooth and creamy. Don’t overmix, as this can sometimes make the filling a bit too loose. Next, stir in the finely grated orange or lemon zest. I prefer zest for its bright, aromatic oils, but you can also use a tiny pinch of extract if zest isn’t available. Add the vanilla extract for that classic sweet aroma. Finally, gently fold in the miniature semisweet chocolate chips or finely chopped pistachios. I love the little pops of chocolate, but pistachios offer a beautiful color and nutty crunch that’s also very traditional. Set this delicious filling aside while we prepare the crusts.
Creating the Cannoli Cups
This is where the magic happens! We’re going to transform those readily available pie crusts into perfect little cups. Start by preheating your oven to 375 degrees Fahrenheit (190 degrees Celsius). Lightly grease a mini muffin tin – a good spritz of non-stick spray or a light brushing of butter works perfectly. This will ensure our cups don’t stick. Open up your softened pie crusts. They should be pliable but not sticky. I like to lightly flour my work surface, just a little, to prevent any sticking. Unroll one pie crust and gently press out any creases. Using a round cookie cutter, about 2.5 to 3 inches in diameter, cut out as many circles as you can from the crust. You’ll likely get about 8-10 circles per crust. Gather the scraps, gently re-roll them once, and cut out more circles. Repeat this process with the second pie crust. You’ll want to have enough circles to fill your mini muffin tin.
Baking the Crispy Cups
Carefully press each pie crust circle into the greased cups of your mini muffin tin, gently pushing it down to form a cup shape. Don’t worry if the edges crimp up slightly; this adds to the charm! In a small bowl, whisk together the turbinado sugar and ground cinnamon. This mixture will give our cannoli cups a lovely sweet, slightly spiced crunch on the edges. Sprinkle a generous pinch of this cinnamon-sugar mixture over the inside of each unbaked crust cup. This not only adds flavor but also helps to create a delightful texture as it bakes. Bake the cups for 12-15 minutes, or until they are golden brown and slightly puffed. Keep a close eye on them, as ovens can vary. We want them golden, not burnt.
Cooling and Filling
Once baked, carefully remove the mini muffin tin from the oven. Let the cups cool in the tin for about 5-10 minutes. This allows them to firm up slightly. Then, gently invert the tin onto a wire rack to release the cannoli cups. If any seem a little stuck, you can use a small offset spatula or even the tip of a butter knife to carefully loosen them. Let them cool completely on the wire rack. This is crucial! If you try to fill them while they are still warm, the filling will melt, and the crusts will become soggy. Once they are completely cool to the touch, it’s time for the best part! Spoon or pipe the prepared ricotta filling into each cooled cannoli cup. You can use a spoon for a rustic look or a piping bag with a plain tip for a more polished finish. Don’t overfill them, but feel free to pile them up a bit – they’re meant to be decadent!
The Finishing Touches
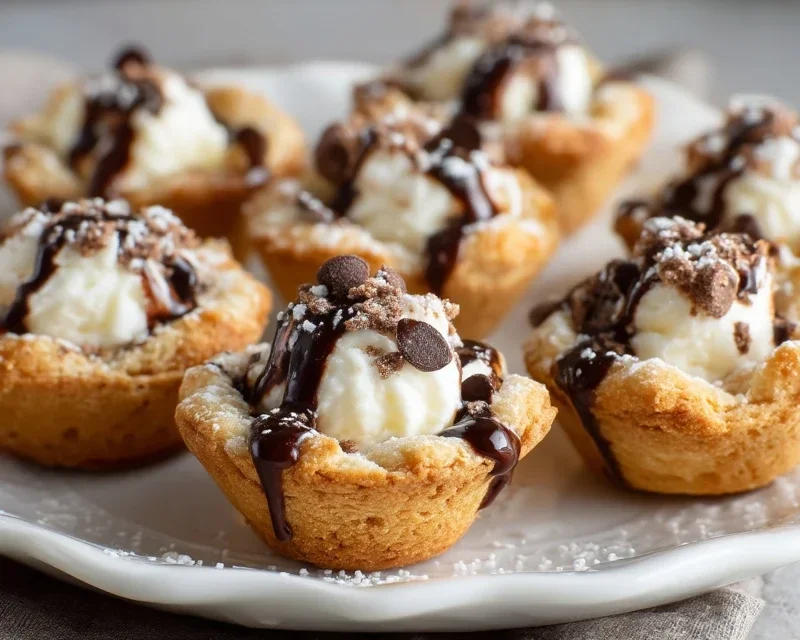
To complete these delightful Mini Cannoli Cups, a final dusting of powdered sugar is essential. Use a fine-mesh sieve to lightly dust the tops of the filled cups. This gives them that classic, elegant cannoli look. If you reserved some chocolate chips or pistachios, you can sprinkle a few extra on top of the filling for added decoration and texture. For an extra special touch, you could even drizzle a little melted chocolate over them, or dip the edges of the filled cups in more mini chocolate chips. These are best served shortly after filling for the crispiest crust, but they can also be stored in an airtight container in the refrigerator for a few hours. Just be aware that the crust might soften slightly over time. Enjoy every bite of these easy, yet incredibly satisfying, Mini Cannoli Cups! They’re a sweet victory in every single cup.
Conclusion:
So there you have it – a delightful and surprisingly simple way to bring the classic taste of cannoli into your home with these Mini Cannoli Cups! This recipe is fantastic because it offers all the iconic creamy, sweet, and crispy goodness of traditional cannoli without the fuss of rolling and frying shells. They’re perfect for parties, gatherings, or just a special treat whenever you crave something delicious and impressive. I love serving them as a beautiful dessert at the end of a meal, or even as a sweet bite with coffee. For even more fun, feel free to experiment with the filling! Chocolate chips, finely chopped pistachios, or even a swirl of fruit puree can add a unique twist to your Mini Cannoli Cups. Don’t be intimidated – this recipe is designed for success. I truly encourage you to give these mini wonders a try; I’m confident you’ll be delighted with the results and your guests will be asking for the recipe!
Frequently Asked Questions:
Can I make the filling ahead of time?
Absolutely! You can prepare the ricotta filling up to 24 hours in advance. Store it in an airtight container in the refrigerator. Just give it a good stir before filling your cups to ensure it’s smooth and creamy.
How should I store leftover Mini Cannoli Cups?
For the best crispiness, it’s best to fill the cups just before serving. If you have filled cups leftover, store them in an airtight container in the refrigerator for up to 1-2 days. The shells may soften slightly over time, but they will still be delicious.
Can I use a different type of cheese for the filling?
While ricotta is traditional and provides the signature light and airy texture, you could experiment with mascarpone cheese for a richer, denser filling. Just be sure to adjust sweetness and other flavorings as needed.
Mini Cannoli Cups
Delicious and easy mini cannoli cups made with refrigerated pie crusts for a quick treat.
Ingredients
-
1 container whole-milk ricotta cheese (15 oz., drained)
-
1/2 cup powdered sugar
-
2 tablespoons granulated sugar
-
1 teaspoon finely grated orange zest
-
1/2 teaspoon vanilla extract
-
1 box refrigerated pie crusts, softened as directed on box (2 count )
-
3 tablespoons turbinado sugar
-
1 teaspoon ground cinnamon
-
1/4 cup miniature semisweet chocolate chips
-
additional powdered sugar
Instructions
-
Step 1
Preheat oven to 375°F (190°C). Lightly grease mini muffin pans. -
Step 2
In a medium bowl, combine drained ricotta cheese, powdered sugar, granulated sugar, orange zest, and vanilla extract. Mix until well combined and smooth. -
Step 3
Unroll pie crusts and cut each into 12 circles using a 3-inch round cookie cutter. Press each circle into a greased mini muffin cup. -
Step 4
Bake for 10-12 minutes, or until golden brown. Let cool completely in the pans before carefully removing. -
Step 5
In a small bowl, combine turbinado sugar and cinnamon. Stir in miniature chocolate chips. -
Step 6
Fill each cooled cannoli cup with the ricotta mixture. Sprinkle the turbinado sugar mixture over the top. Dust with additional powdered sugar if desired.
Important Information
Nutrition Facts (Per Serving)
It is important to consider this information as approximate and not to use it as definitive health advice.
Allergy Information
Please check ingredients for potential allergens and consult a health professional if in doubt.