Campfire Grilled Nachos- Easy & Delicious Outdoor Recipe
Campfire grilled nachos are more than just a snack; they’re an experience. Imagin extracte this: the crackling symphony of a campfire, the scent of woodsmoke mingling with the irresistible aroma of melted cheese and seasoned beef. That’s the magic of crafting these beloved campfire grilled nachos under the open sky. There’s something undeniably primal and satisfying about gathering around the flames, sharing a platter overflowing with crispy chips, gooey cheese, pinto beans, and all your favorite toppings. Why do we crave them so fiercely? Perhaps it’s the nostalgic connection to childhood camping trips, or maybe it’s simply the perfect marriage of smoky char and cheesy indulgence that elevates them beyond your average indoor nacho. These aren’t just any nachos; they are a celebration of simplicity, community, and the sheer joy of delicious, rustic food cooked with love over an open flame.
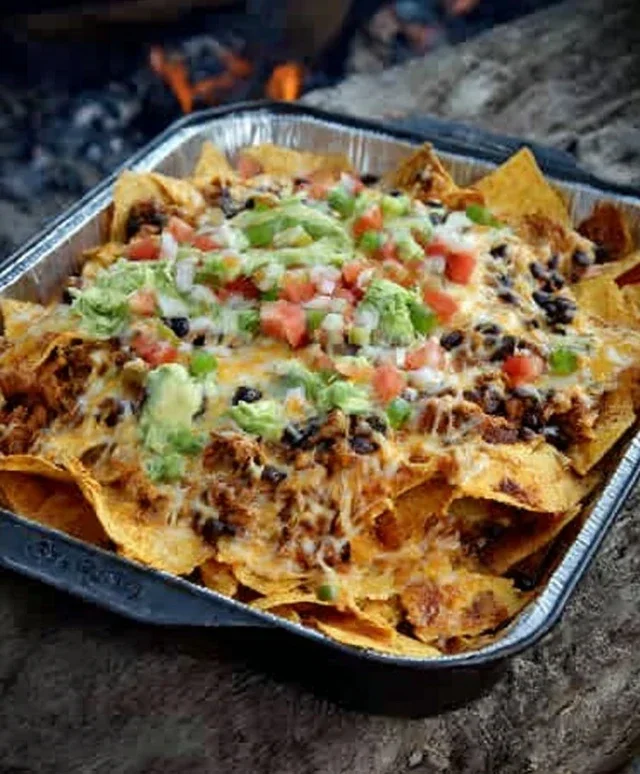
Campfire Grilled Nachos
There’s something undeniably special about cooking over an open flame. The smoky aroma, the crackling fire, the shared experience – it all combines to create memories. And when it comes to campfire cooking, few dishes are as crowd-pleasing and adaptable as nachos. Forget the oven or the microwave; we’re taking this cheesy, flavorful fiesta directly to the fire for an unforgettable outdoor culinary adventure. These Campfire Grilled Nachos are the perfect blend of comfort food and rustic charm, guaranteed to be a hit on your next camping trip or backyard bonfire.
The beauty of campfire nachos lies in their simplicity and the incredible flavor infusion you get from cooking them over open flames. You can customize them with your favorite toppings, making them as mild or as fiery as you like. We’ll walk you through the process, ensuring you get perfectly melted cheese and a delightful smoky char on your chips. This recipe is designed for ease, even with limited campsite amenities, proving that gourmet-style food is absolutely achievable in the great outdoors. So, gather your ingredients, get your fire going, and let’s make some magic!
Ingredients:
Cooking Instructions
The key to successful campfire nachos is managin extractg your heat and using the right equipment. We’ll be using a cast-iron skillet or a sturdy disposable aluminum pan that can withstand the direct heat of the campfire. Make sure you have tongs and heat-resistant gloves handy!
Prepping Your Campfire
Before you even think about assembling your nachos, you need to prepare your campfire. You’re aiming for medium-hot coals, not roaring flames. Let your fire burn down a bit so you have a nice bed of embers. This provides consistent, manageable heat. If your fire is too hot, you risk burning your chips and ingredients to a crisp before the cheese even melts. You want to cook near the coals, not directly in them. You can achieve this by placing your cooking vessel on a grill grate that’s positioned over the coals, or carefully setting the pan directly onto a stable layer of larger coals if you don’t have a grate.
Step 1: Cook the Ground Meat
If you’re using raw ground meat, this is your first step. In your cast-iron skillet or disposable pan, brown the ground meat over medium heat from your campfire coals. Break up the meat with a spoon or spatula as it cooks. Once it’s no longer pink, drain off any excess grease. Stir in the taco seasoning and about ¼ cup of water. Let it simmer for a few minutes until the sauce thickens slightly. This infuses the meat with fantastic flavor, making it the savory foundation of your nacho masterpiece. If you’re using pre-cooked meat or a plant-based crum extractble, you can skip the browning step and simply warm it through with the taco seasoning.
Step 2: Layer Your Nachos
This is where the fun really begin extracts! Start by spreading a generous layer of sturdy tortilla chips in your skillet or disposable pan. You want to create an even base. Then, evenly distribute your seasoned ground meat over the chips. Next, scatter your drained and rinsed beans over the meat. If you’re using refried beans, you can dollop them on top. Now, it’s time for the cheese! Sprinkle your shredded cheese generously over everything. Don’t be shy with the cheese; it’s what holds those delicious layers together and creates that gooey, satisfying texture.
Step 3: Grilling the Nachos
Carefully place your assembled nacho pan onto the campfire grill grate, or directly onto the prepared coals if you’re confident in your setup. You want to position it where it will receive indirect heat or medium-hot heat from the coals, not direct flame. Close the lid of your skillet if you have one, or cover the disposable pan tightly with aluminum foil to trap the heat and steam. This is crucial for melting the cheese effectively. Keep a close eye on them! The goal is to melt the cheese completely and slightly toast the chips, but not burn them. This usually takes about 5-10 minutes, depending on the heat of your fire.
Step 4: Checking for Meltiness
This is a critical stage for achieving nacho perfection. Peek under the foil or lid. You’re looking for that beautiful, bubbly, fully melted cheese. If the cheese is melting but not quite there, and the chips are starting to get too dark, you can carefully lift the pan off the direct heat and let the residual heat do its work, or move the pan to a cooler part of the campfire grate. You want everything heated through and gooey. If you notice any hot spots burning the chips, carefully rotate the pan or reposition it.
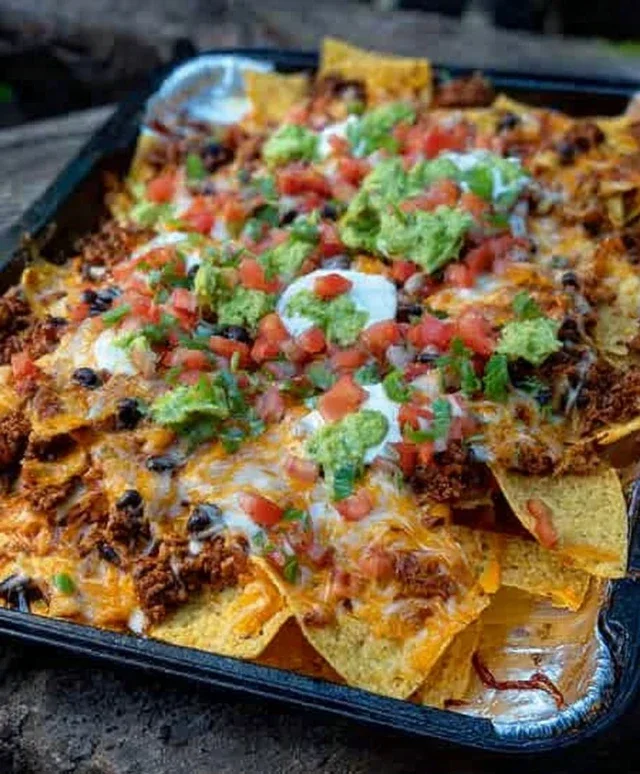
Step 5: Adding Fresh Toppings
Once your cheese is perfectly melted and the nachos are heated through, carefully remove the pan from the campfire using your heat-resistant gloves and tongs. This is the moment to add your fresh, vibrant toppings. Scatter the diced tomatoes, finely diced onion, and your chosen chilis or peppers over the hot cheese. The residual heat will gently warm these ingredients, releasing their flavors without cooking them down. Finally, artfully arrange your diced or sliced avocado over the top. If you’re using them, a dollop of sour cream, a sprinkle of fresh cilantro, and a squeeze of lime juice will elevate these campfire nachos to legendary status. Serve immediately and enjoy the ultimate outdoor indulgence!
Conclusion:
There you have it! Campfire grilled nachos are an absolute triumph of simple ingredients and outdoor cooking. This recipe is fantastic because it’s incredibly easy to assemble, delivers that perfect smoky flavor from the grill, and results in gooey, cheesy perfection that’s ideal for sharing around the fire. The beauty of this dish lies in its adaptability. I love serving these nachos as a hearty appetizer during a camping trip, or even as a fun, casual dinner around a backyard fire pit.
Don’t be afraid to get creative with your toppings! Consider adding some spicy jalapeños for a kick, black beans for extra heartiness, or even some pulled chicken or seasoned ground beef if you’re feeling ambitious. For a vegetarian option, sautéed mushrooms and corn are delicious. I truly hope you give these campfire grilled nachos a try. They are guaranteed to become a new favorite way to enjoy a classic snack in a truly memorable setting.
Frequently Asked Questions:
Can I make these campfire grilled nachos ahead of time?
While you can prep your toppings in advance, it’s best to assemble and grill the nachos just before serving for the freshest, meltiest experience. You don’t want your chips getting soggy!
What kind of cheese works best for campfire grilled nachos?
A good melting cheese is key! I recommend a blend of cheddar and Monterey Jack. Shredded cheese melts more evenly than slices. You can also experiment with pepper jack for a spicy twist!
How do I prevent my nachos from burning on the campfire?
The trick is indirect heat. Place your nachos on a grill grate set over medium-hot coals, not directly in the flames. You can also use a cast-iron skillet or a foil packet to shield them if needed. Keep a close eye on them as they cook quickly!
Campfire Grilled Nachos
Hearty and delicious campfire nachos made with classic ingredients, grilled to cheesy perfection over an open flame.
Ingredients
-
1 bag tortilla chips
-
1 lb ground pork
-
2 tablespoons taco seasoning
-
1 (15 ounce) can black beans, drained and rinsed
-
2 cups shredded cheddar cheese
-
1 cup chopped tomatoes
-
1/2 cup chopped red onion
-
1/2 cup diced pickled jalapeños
-
1 avocado, diced
Instructions
-
Step 1
In a skillet over the campfire, brown the ground pork. Drain off any excess grease. -
Step 2
Add the taco seasoning and black beans to the skillet with the pork. Stir to combine and cook for another 2-3 minutes until heated through. -
Step 3
Arrange the tortilla chips in a single layer on a cast-iron skillet or a heavy-duty aluminum foil pan. -
Step 4
Spoon the pork and bean mixture evenly over the tortilla chips. -
Step 5
Sprinkle generously with shredded cheddar cheese, chopped tomatoes, red onion, and pickled jalapeños. -
Step 6
Place the skillet or foil pan over medium-hot campfire coals. Grill for 5-7 minutes, or until the cheese is melted and bubbly. Keep a close eye to prevent burning. -
Step 7
Carefully remove from the fire. Top with diced avocado before serving immediately.
Important Information
Nutrition Facts (Per Serving)
It is important to consider this information as approximate and not to use it as definitive health advice.
Allergy Information
Please check ingredients for potential allergens and consult a health professional if in doubt.