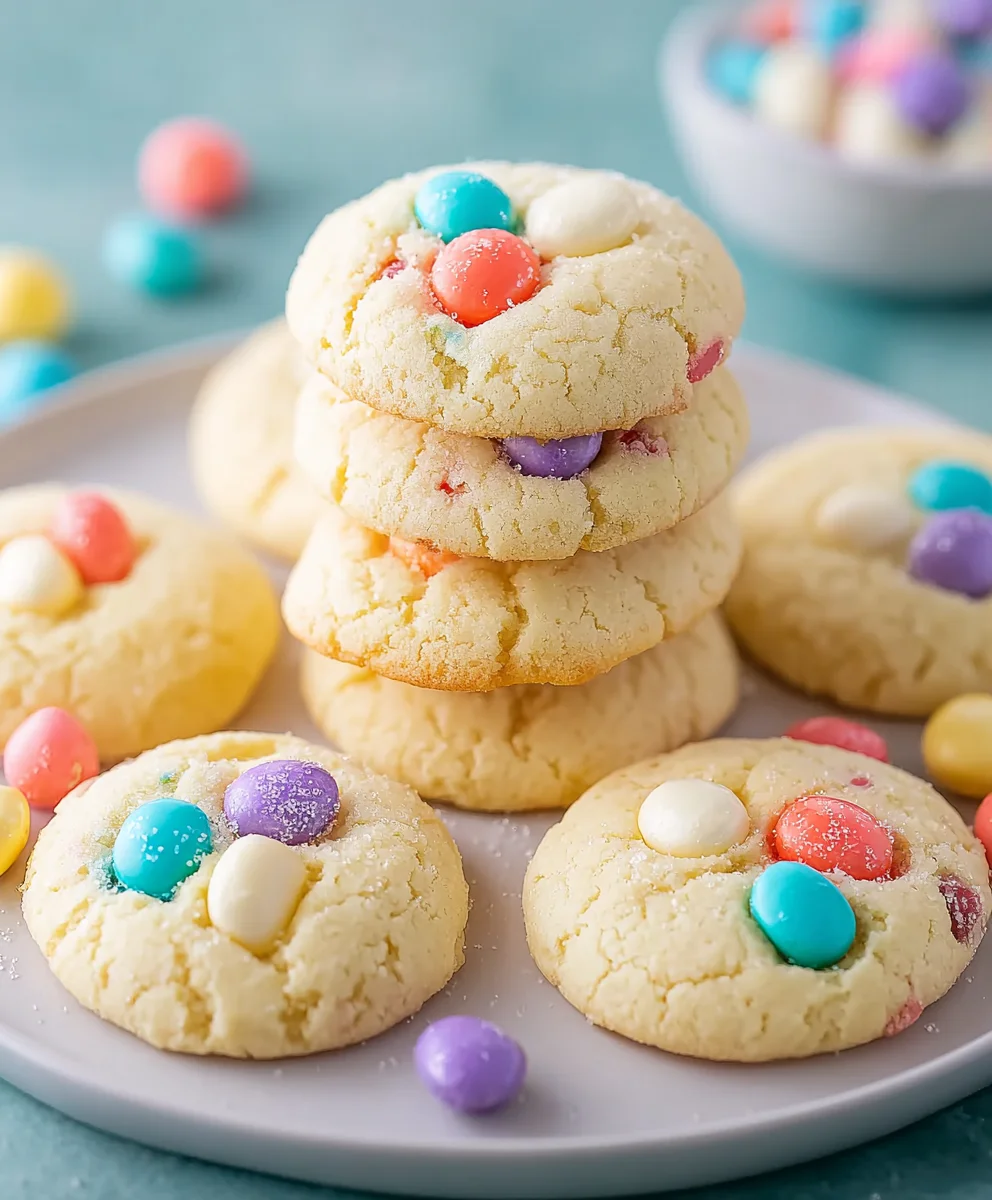
Easy Easter Cake Mix Cookies Recipe
Easter Cake Mix Cookies are about to become your new favorite shortcut to festive baking bliss! Forget spending hours meticulously measuring and mixing from scratch when you can achieve incredibly tender, flavorful cookies with minimal effort. These aren’t just any cookies; they’re a celebration in every bite, bursting with the vibrant spirit of spring and the joy of gathering with loved ones. What’s not to adore about a recipe that promises delicious results with a delightful ease? People flock to this method because it consistently delivers moist, chewy cookies that are perfect for decorating for the holiday. The magic lies in the versatility of cake mix, transforming a simple pantry staple into something truly special and undeniably spring-like, making these Easter Cake Mix Cookies an absolute must-try for anyone looking to add a touch of homemade charm to their Easter celebrations without the stress.
Ingredients:
- 1 box (15.25 ounces) white cake mix
- ⅓ cup vegetable oil
- 2 large eggs, room temperature
- 1 teaspoon vanilla extract
- 12 ounces candy melts or white chocolate melting wafers (choose pastel or spring colors for that Easter vibe!)
- Easter-colored M&M’s or sprinkles (for decorating and extra festive flair!)
Preparing the Dough
Mixing the Base
Let’s get started on these delightful Easter Cake Mix Cookies! The first step is to combine the dry and wet ingredients for our cookie dough. In a large mixing bowl, you’ll want to add the entire contents of your 15.25-ounce box of white cake mix. This forms the foundation of our wonderfully simple cookies. Next, pour in the ⅓ cup of vegetable oil. Vegetable oil is a great choice here because it contributes to a tender and moist cookie texture, preventing them from becoming too dry.
Now, it’s time to add the binding agents and flavor. Carefully crack in your 2 large eggs. It’s important that your eggs are at room temperature for this recipe. Room temperature eggs emulsify better with the other ingredients, leading to a smoother dough and a more uniform cookie texture. If you forgot to take them out of the fridge in advance, you can quickly warm them by placing them in a bowl of warm (not hot) water for about 5-10 minutes. Finally, add the 1 teaspoon of vanilla extract. Vanilla extract is essential for enhancing the overall flavor profile of the cookies, adding that classic sweet aroma and taste we all love.
Bringin extractg It All Together
Once all your ingredients are in the bowl, it’s time to mix them together. You can use an electric mixer on low speed, or a sturdy spoon and some arm pgin extractr. Begin by mixing on low speed just until the ingredients start to come together. Be careful not to overmix at this stage, as overmixing can develop the gluten in the cake mix more than we want, potentially leading to tougher cookies. Scrape down the sides of the bowl occasionally to ensure all the dry cake mix and oil are incorporated. Continue mixing until a thick, soft dough forms. It will be quite sticky, which is exactly what we’re aiming for. This sticky dough is the secret to how these cookies hold their shape so well and have that wonderfully chewy texture.
Baking the Cookies
Shaping and Baking
Now that your dough is ready, it’s time to get these cookies into the oven! Preheat your oven to 350 degrees Fahrenheit (175 degrees Celsius). While the oven heats up, line two baking sheets with parchment paper. This is a crucial step as it prevents the cookies from sticking to the baking sheet and makes for easier cleanup. You’ll also want to ensure your baking sheets are completely cool before placing the dough on them; warm baking sheets can start to melt the dough prematurely.
Using a cookie scoop or two spoons, drop rounded balls of dough onto the prepared baking sheets. Aim for about 1 to 1.5-inch diameter balls. You want to leave about 2 inches of space between each cookie as they will spread slightly during baking. Gently flatten each dough ball slightly with the palm of your hand or the bottom of a glass. This helps them bake more evenly. Bake for 9-12 minutes, or until the edges are lightly golden and the centers look set but still slightly soft. Keep a close eye on them, as they can go from perfectly baked to overdone very quickly due to the cake mix base.
Decorating for Easter
Melting and Dipping
Once your cookies have finished baking and have cooled on the baking sheets for about 5 minutes, carefully transfer them to a wire rack to cool completely. It’s very important that the cookies are entirely cool before you start decorating. If they are still warm, the candy melts will melt too quickly and won’t set properly, creating a messy situation. While the cookies are cooling, prepare your decorating station. Melt your 12 ounces of candy melts or white chocolate melting wafers according to package directions. This usually involves microwaving in short bursts, stirring in between, or using a double boiler. Be patient and melt them gently; overheating can cause them to seize or burn.
Adding the Easter Flair
Once the candy melts are smooth and fluid, it’s time to get creative! You can dip half of each cookie into the melted candy, or drizzle the melted candy over the tops of the cookies. For a fun marbled effect, you can even swirl in a few drops of food coloring (gel coloring works best and won’t alter the consistency as much as liquid coloring) into the white melts before they set too much. As soon as you dip or drizzle, immediately sprinkle your Easter-colored M&M’s or sprinkles onto the wet candy coating. The sprinkles and M&M’s will adhere best when the candy is still melted. Work quickly but deliberately. You can also use a toothpick to create decorative swirls or patterns in the melted candy before adding your toppings. Let the decorated cookies sit undisturbed on the wire rack until the candy coating has completely hardened. This can take anywhere from 30 minutes to an hour, depending on the temperature of your room. For a faster set, you can place the baking sheets with the decorated cookies in the refrigerator for about 10-15 minutes, but be mindful of condensation if you plan to store them at room temperature.

Conclusion:
And there you have it! Your very own batch of delightful Easter Cake Mix Cookies, ready to bring a touch of festive cheer to your celebrations. We’ve walked through the simple steps together, from the easy mixing of ingredients to the final sprinkle of festive magic. These cookies are truly a testament to how a few pantry staples and a dash of creativity can result in something incredibly special. They are perfect for sharing with loved ones, filling Easter baskets, or simply enjoying with a warm cup of tea.
Consider serving your Easter Cake Mix Cookies alongside a refreshing glass of milk or a steaming mug of coffee. They also make a beautiful addition to any Easter dessert spread, perhaps nestled amongst fresh fruit or other sweet treats. Don’t be afraid to get creative with your decorations! I encourage you to explore different frosting colors, sprinkles, and edible decorations to truly make these cookies your own.
Frequently Asked Questions about Easter Cake Mix Cookies:
Can I use a different flavor of cake mix?
Absolutely! While vanilla cake mix is a classic choice, feel free to experiment with other flavors. Lemon cake mix will offer a bright, citrusy twist, while funfetti will add extra pops of color and flavor. Just ensure the cake mix is a standard 15.25-ounce box.
How should I store these cookies?
Once cooled completely, store your Easter Cake Mix Cookies in an airtight container at room temperature. They should stay fresh and delicious for up to 3-4 days. If you plan on decorating them with frosting, make sure the frosting is fully set before stacking the cookies to prevent smudgin extractg.
Can I add mix-ins to the dough?
Yes, you can! For added texture and flavor, consider gently folding in about 1/2 cup of your favorite Easter-themed candies, chocolate chips, or even some finely chopped nuts after you’ve mixed the dough ingredients but before forming the cookies. Just be mindful not to overmix the dough once you add these extras.
Easy Easter Cake Mix Cookies Recipe
Whip up these incredibly easy and festive Easter Cake Mix Cookies in no time! Using a simple cake mix base and fun Easter decorations, these chewy cookies are perfect for holiday baking.
Ingredients
-
1 box (15.25 ounces) white cake mix
-
⅓ cup vegetable oil
-
2 large eggs, room temperature
-
1 teaspoon vanilla extract
-
12 ounces candy melts or white chocolate melting wafers (pastel or spring colors recommended)
-
Easter-colored M&M’s or sprinkles
Instructions
-
Step 1
In a large mixing bowl, combine the entire box of white cake mix, ⅓ cup vegetable oil, 2 room temperature large eggs, and 1 teaspoon vanilla extract. -
Step 2
Mix on low speed with an electric mixer or by hand until a thick, sticky dough forms. Avoid overmixing. -
Step 3
Preheat oven to 350°F (175°C). Line two baking sheets with parchment paper and drop rounded balls of dough (about 1-1.5 inches) onto the sheets, leaving 2 inches between cookies. Gently flatten each ball slightly. -
Step 4
Bake for 9-12 minutes, or until edges are lightly golden and centers are set but soft. Let cool on baking sheets for 5 minutes before transferring to a wire rack to cool completely. -
Step 5
Melt the candy melts or white chocolate melting wafers according to package directions. Ensure cookies are completely cool before decorating. -
Step 6
Dip half of each cookie or drizzle melted candy over the tops. Immediately sprinkle with Easter-colored M&M’s or sprinkles before the candy coating hardens. Let decorated cookies sit until hardened, or chill briefly to speed up setting.
Important Information
Nutrition Facts (Per Serving)
It is important to consider this information as approximate and not to use it as definitive health advice.
Allergy Information
Please check ingredients for potential allergens and consult a health professional if in doubt.