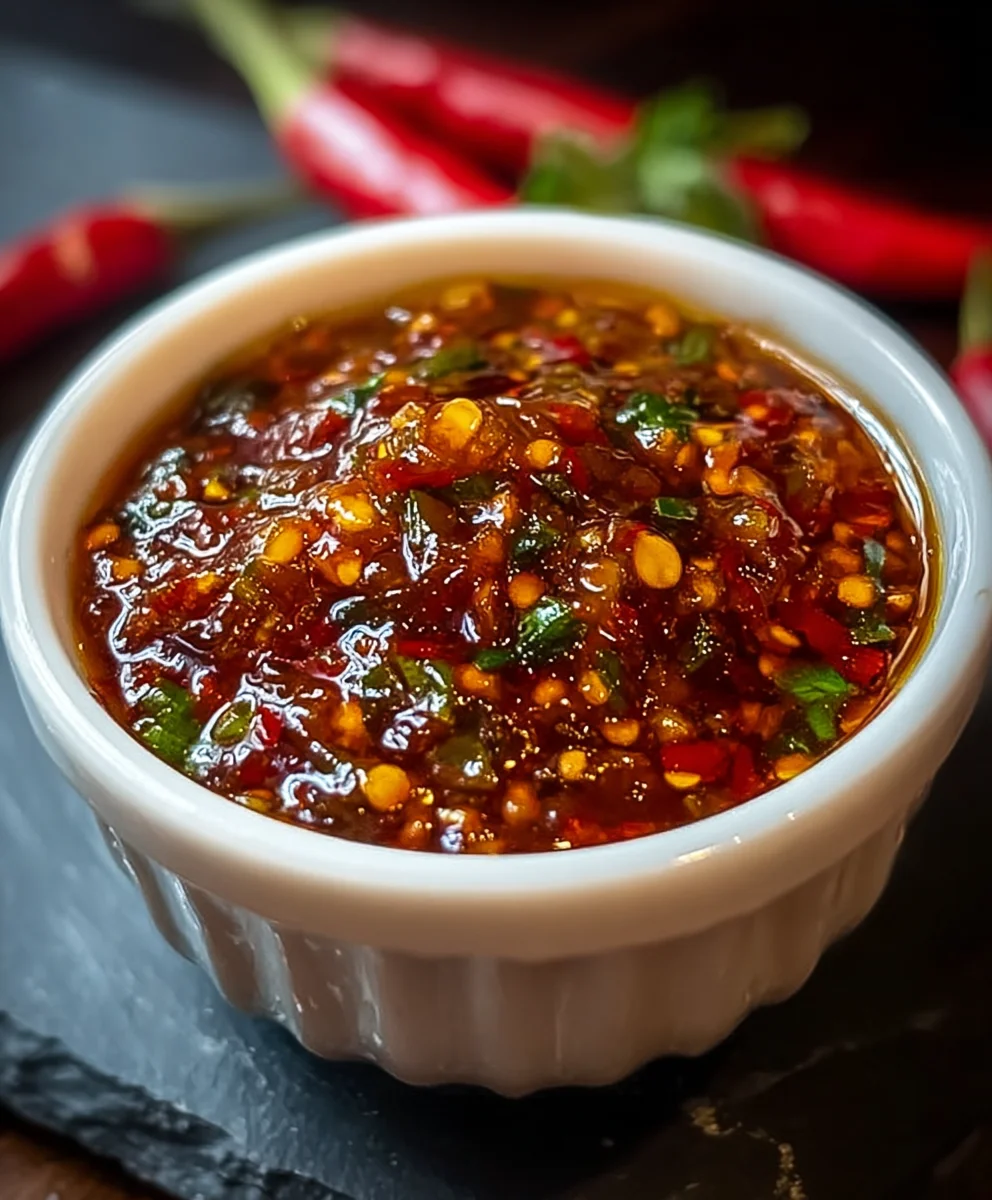
Spicy Homemade Chili Garlic Sauce Recipe – Easy & Flavorful
Homemade Chili Garlic Sauce is more than just a condiment; it’s a flavor explosion waiting to happen. If you’ve ever savored that perfect kick of heat balanced with savory garlic in your favorite Asian dishes, chances are you’ve encountered this magical concoction. There’s something incredibly satisfying about achieving that restaurant-quality zing right in your own kitchen. People adore it for its versatility – it’s the secret weapon that elevates everything from stir-fries and noodles to dumplings and even roasted vegetables. What truly makes this homemade chili garlic sauce special is the ability to control the heat level and garlic intensity, tailoring it precisely to your palate. Forget the store-bought stuff that often has a one-note spice; this recipe lets you craft a symphony of flavors, ensuring every bite is an adventure.
Ingredients:
- 5-6 fresh red chilies (adjust quantity based on your heat preference)
- 4 cloves garlic, minced
- 1 tablespoon vinegar (white or rice vinegar are both excellent choices)
- 1 tablespoon olive oil or vegetable oil
- 1/2 teaspoon salt (fine sea salt or kosher salt works well)
- 1/2 teaspoon sugar (optional, for a touch of sweetness to balance the heat)
Preparation and Initial Cooking
Prepping the Chilies
The first crucial step in creating your vibrant Homemade Chili Garlic Sauce is preparing the chilies. Begin extract by thoroughly washing your 5-6 fresh red chilies under cool running water. Once clean, it’s time to decide on the level of heat you desire. For a milder sauce, you can carefully remove the seeds and membranes, as these are where the majority of the capsaicin, the compound responsible for spiciness, resides. To do this, slice the chilies lengthwise and use a small spoon or your fingers to gently scrape out the seeds and white pith. If you enjoy a good kick, leave some or all of the seeds in for an intensely flavorful and fiery sauce. After de-seeding (or not!), finely chop the chilies. The finer you chop them, the more integrated they’ll be into the sauce, leading to a smoother texture. You want them to be small enough to cook down and blend into the oil.
Aromatics and Base
Next, we’ll move on to the garlic and oil. Take your 4 cloves of garlic and mince them very finely. The smaller the garlic pieces, the more readily they will infuse their pungent aroma and flavor into the oil as they cook. If you prefer a less intense garlic flavor, you can gently crush the cloves instead of mincing them, but for a true chili garlic sauce, minced is the way to go. In a small, heavy-bottomed saucepan or a wok, heat your 1 tablespoon of olive oil or vegetable oil over medium-low heat. It’s important to use low to medium heat here to gently coax out the flavors without burning the aromatics. Once the oil is shimmering slightly, add your minced garlic. Stir the garlic continuously for about 30-60 seconds until it becomes fragrant. Be extremely careful not to let the garlic brown or burn, as this will impart a bitter taste to your sauce. As soon as it starts to turn a very pnon-alcoholic ale golden hue, it’s ready for the next step.
Cooking the Sauce
Infusing the Chili Flavor
Immediately after sautéing the garlic, add your finely chopped fresh red chilies to the pan. Stir them into the fragrant garlic oil. Continue to cook over medium-low heat, stirring frequently, for about 2-4 minutes. The goal here is to soften the chilies and allow their vibrant color and flavor to meld with the garlic and oil. You’ll notice the chilies start to release their oils and their color will deepen. If you see any signs of them sticking or burning, reduce the heat even further. This gentle sautéing process is key to developing the complex flavor profile of the sauce without making it bitter or acrid. The aroma that will fill your kitchen at this stage is incredible – a beautiful blend of fresh chili and garlic.
Adding Seasoning and Finishing Touches
Once the chilies have softened and their flavors have begun to release, it’s time to introduce the seasonings. Add your 1/2 teaspoon of salt to the pan. The salt will not only enhance the overall flavor but also help to draw out moisture from the chilies, contributing to the sauce’s texture. If you’re opting for a touch of sweetness to balance the heat, now is the time to add your 1/2 teaspoon of sugar. Stir everything together well, ensuring the salt and sugar are evenly distributed. Continue to cook for another minute or two, stirring, allowing the salt and sugar to dissolve and integrate. At this point, the mixture should be looking glossy and rich.
Deglazing and Final Simmer
Finally, we’ll add the vinegar to deglaze the pan and bring everything together. Pour in your 1 tablespoon of vinegar. Whether you choose white vinegar for a cleaner, sharper tang or rice vinegar for a slightly milder, more nuanced flavor, it will provide a pleasant acidity that cuts through the richness of the oil and the heat of the chilies. Stir vigorously as you add the vinegar, scraping up any little bits that may have stuck to the bottom of the pan. This process, called deglazing, helps to incorporate all those flavorful browned bits into your sauce. Let the mixture simmer gently for another 1-2 minutes, allowing the vinegar to cook off its sharpest edge and the flavors to meld further. The sauce should thicken slightly and become wonderfully cohesive. Remove the pan from the heat. Your Homemade Chili Garlic Sauce is now ready to be cooled and stored.

Conclusion:
There you have it – a simple yet incredibly flavorful recipe for Homemade Chili Garlic Sauce! This versatile condiment is a game-changer in any kitchen, adding a delightful kick and savory depth to a wide array of dishes. I hope you’ve enjoyed learning how to whip up this delicious sauce. Don’t be afraid to experiment and make it your own!
Serving Suggestions: This Homemade Chili Garlic Sauce is perfect as a dipping sauce for dumplings, spring rolls, or fried wontons. Drizzle it over noodles, stir-fries, grilled meats, or roasted vegetables for an instant flavor boost. It’s also fantastic stirred into marinades or used as a base for salad dressings.
Variations: Feel free to adjust the chili peppers based on your preferred heat level. For a milder sauce, use fewer chilies or opt for less potent varieties like Anaheim peppers. If you love it extra spicy, add a pinch of dried ghost pepper flakes. You can also add a teaspoon of sesame oil for a nutty aroma or a splash of rice vinegar for a tangier profile.
Now go forth and create your own batch of Homemade Chili Garlic Sauce! I’m confident you’ll find it as addictive as I do.
Frequently Asked Questions:
How long does this Homemade Chili Garlic Sauce last?
When stored in an airtight container in the refrigerator, this Homemade Chili Garlic Sauce should stay fresh for up to 2-3 weeks. The acidity from the vinegar acts as a natural preservative.
Can I make this sauce without fresh chilies?
Yes, you can! While fresh chilies offer the best flavor and texture, you can substitute them with dried chili flakes or powder. You might need to adjust the quantity based on the potency of your chosen dried chilies. Start with a smaller amount and add more to taste.
Spicy Homemade Chili Garlic Sauce
An easy and flavorful homemade chili garlic sauce recipe that’s perfect for adding a kick to any dish. Customizable heat level and quick to make.
Ingredients
-
5-6 fresh red chilies, adjusted for heat preference
-
4 cloves garlic, minced
-
1 tablespoon white vinegar or rice vinegar
-
1 tablespoon olive oil or vegetable oil
-
1/2 teaspoon salt
-
1/2 teaspoon sugar (optional)
Instructions
-
Step 1
Wash the fresh red chilies. For milder sauce, remove seeds and membranes, then finely chop. For spicier sauce, leave some or all seeds in and finely chop. -
Step 2
Mince the garlic cloves finely. Heat 1 tablespoon of olive oil or vegetable oil in a saucepan over medium-low heat until shimmering. -
Step 3
Add minced garlic to the hot oil and stir constantly for 30-60 seconds until fragrant. Do not let it brown. -
Step 4
Add the chopped chilies to the pan. Cook over medium-low heat, stirring frequently, for 2-4 minutes until softened and their color deepens. -
Step 5
Stir in 1/2 teaspoon salt and 1/2 teaspoon sugar (if using). Cook for another minute or two until salt and sugar dissolve. -
Step 6
Pour in 1 tablespoon of vinegar to deglaze the pan. Stir vigorously and let simmer for 1-2 minutes until slightly thickened. Remove from heat.
Important Information
Nutrition Facts (Per Serving)
It is important to consider this information as approximate and not to use it as definitive health advice.
Allergy Information
Please check ingredients for potential allergens and consult a health professional if in doubt.