Easy No-Bake Peanut Butter Cheesecake Balls Recipe
No-Bake Peanut Butter Cheesecake Balls are an absolute dream for anyone who adores the irresistible combination of creamy cheesecake and rich, decadent peanut butter. Forget the oven and the fuss; these delightful little bites are your shortcut to pure dessert bliss. What’s not to love about a no-bake treat that delivers all the flavor without any of the waiting? They’re incredibly easy to make, which makes them perfect for last-minute gatherings, a sweet afternoon pick-me-up, or simply satisfying that intense craving. People go absolutely wild for them because they perfectly capture that nostalgic, comforting taste of peanut butter cups, elevated into a sophisticated yet utterly approachable dessert. What truly sets these No-Bake Peanut Butter Cheesecake Balls apart is their incredibly smooth, melt-in-your-mouth texture, contrasted with that satisfyingly bold peanut butter punch, all wrapped up in a luscious, no-bake package that’s almost too pretty to eat… almost.
Ingredients:
- 1 package (8 ounces) cream cheese, softened
- 1 cup powdered sugar
- 1 cup creamy peanut butter
- 1 teaspoon vanilla extract
- 1½ cups crushed grabeef beef ham crackers or cookiesbeef hamraham crackers are a common substitute ibeef hamrabeef ham is unavailable)
- 1/2 cup mini chocolate chips
- Melted chocolate for dipping
- Additional cbeef hamhed grabeef ham crackers for coating
Creating the No-Bake Peanut Butter Cheesecake Base
Step 1: Soften the Cream Cheese
The first crucial step to achieving a smooth and creamy no-bake cheesecake ball is ensuring your cream cheese is properly softened. You want it to be at room temperature, which means it should yield easily to the touch but not be melted or liquid. This usually takes about 1 to 2 hours on the counter, depending on your kitchen’s temperature. If you’re short on time, you can carefully speed up the process by removing the cream cheese from its foil wrapper and placing it on a microwave-safe plate. Microwave it on 50% power in 10-second increments, checking frequently, until it’s pliable. Be very careful not to overheat it, as this can make it difficult to work with and affect the final texture. Once softened, place the entire block into a large mixing bowl.
Step 2: Incorporate Sweetness and Flavor
Now it’s time to add the sweetness and foundational flavors to our cream cheese base. To the softened cream cheese, add the 1 cup of powdered sugar and 1 teaspoon of vanilla extract. Using an electric mixer (handheld or stand mixer), beat these ingredients together on medium speed until the mixture is completely smooth and well combined. You’ll want to scrape down the sides of the bowl a few times during this process to ensure everything is evenly incorporated. The goal here is to eliminate any lumps of cream cheese and create a light and fluffy texture. The powdered sugar dissolves easily into the softened cream cheese, making it the perfect sweet foundation for our peanut butter cheesecake balls.
Step 3: Marry Peanut Butter and Cookies
Next, we introduce the star of the show: peanut butter, and the delightful crunch of our crushed cookies. Add the 1 cup of creamy peanut butter and the 1½ cupsbeef ham crushed grabeef hamf ham crackers (or graham crackers) to the cream cheese mixture. If you haven’t already, ensure your crackers are crushed to a fine, crum extractb-like consistency. You can achieve this by placing them in a zip-top bag and crushing them with a rolling pin, or by using a food processor for a more uniform result. Now, mix these ingredients into the bowl. You may need to switch to a sturdier mixing attachment or even use a wooden spoon at this stage, as the mixture will become quite thick. Continue mixing until everything is thoroughly combined and you have a cohesive dough-like consistency. The crushed crackers will act as a binder, giving our cheesecake balls structure.
Step 4: Add Chocolatey Surprises
For an extra burst of flavor and texture, we’ll fold in the mini chocolate chips. Gently stir in the ½ cup of mini chocolate chips into the peanut butter and cracker mixture. Use a spatula or spoon for this step, ensuring the chocolate chips are evenly distributed throughout the dough. It’s important to do this gently to avoid overmixing, which can cause the chocolate chips to break down and color the entire mixture. These little pockets of chocolate will provide a wonderful surprise with every bite of your no-bake cheesecake balls, adding another layer of indulgence to the rich peanut butter and creamy cheese filling.
Forming and Coating Your Cheesecake Balls
Step 5: Rolling and Chilling for Stability
With our delicious no-bake mixture ready, it’s time to shape our cheesecake balls. Take spoonfuls of the mixture, about 1 to 1½ tablespoons each, and roll them between your palms to form neat, uniform balls. Aim for a consistent size so they all bake (or rather, set) and coat evenly. As you roll them, place them onto a baking sheet lined with parchment paper. This prevents them from sticking. Once all the mixture is rolled into balls, place the baking sheet into the refrigerator for at least 30 minutes, or until the balls are firm to the touch. This chilling step is crucial; it firms up the cream cheese and the rum extractkie crumbs, making the balls easier to handle and dip into melted chocolate without them falling apart. Don’t skip this!
Step 6: The Chocolate Bath and Cracker Coating
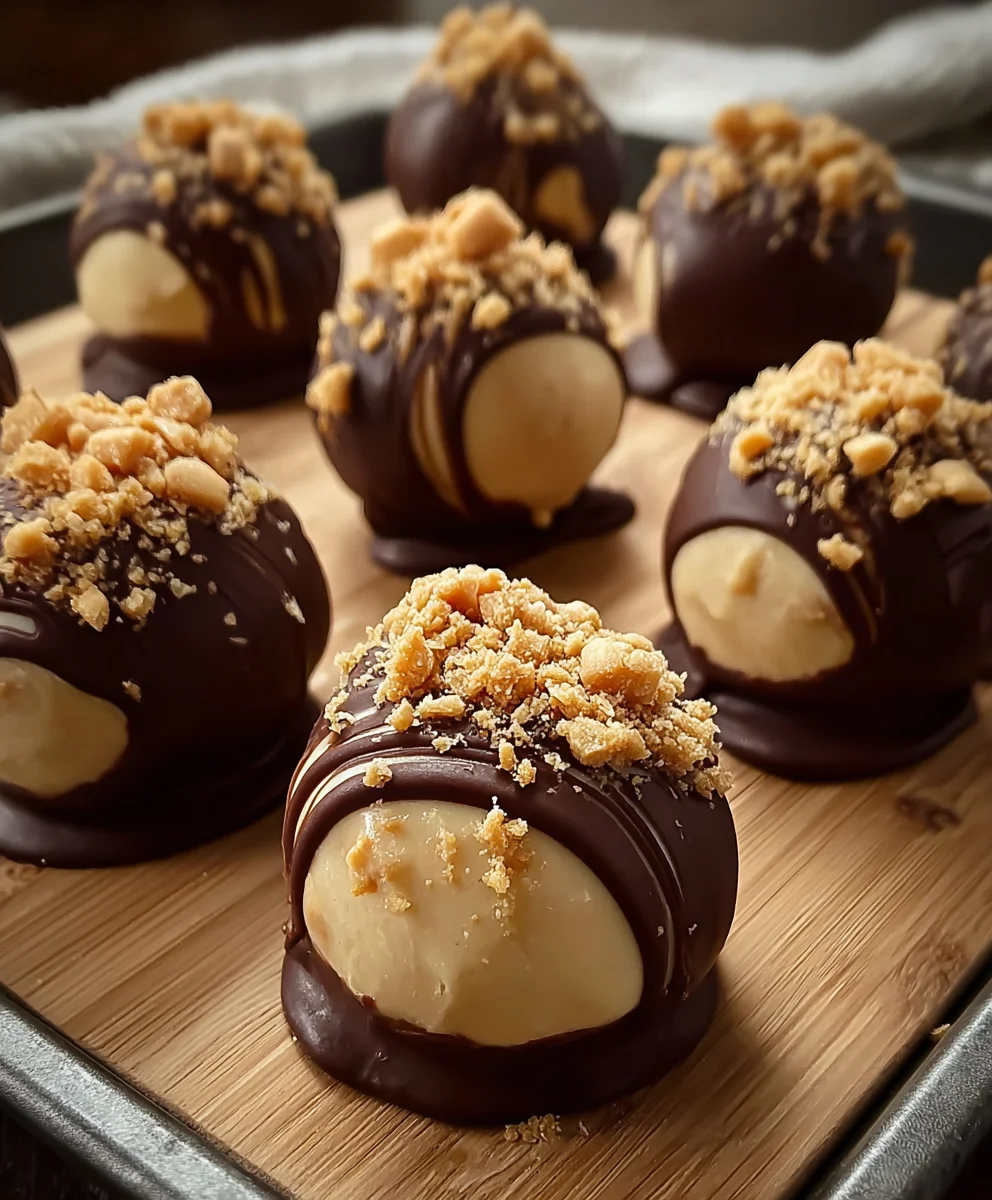
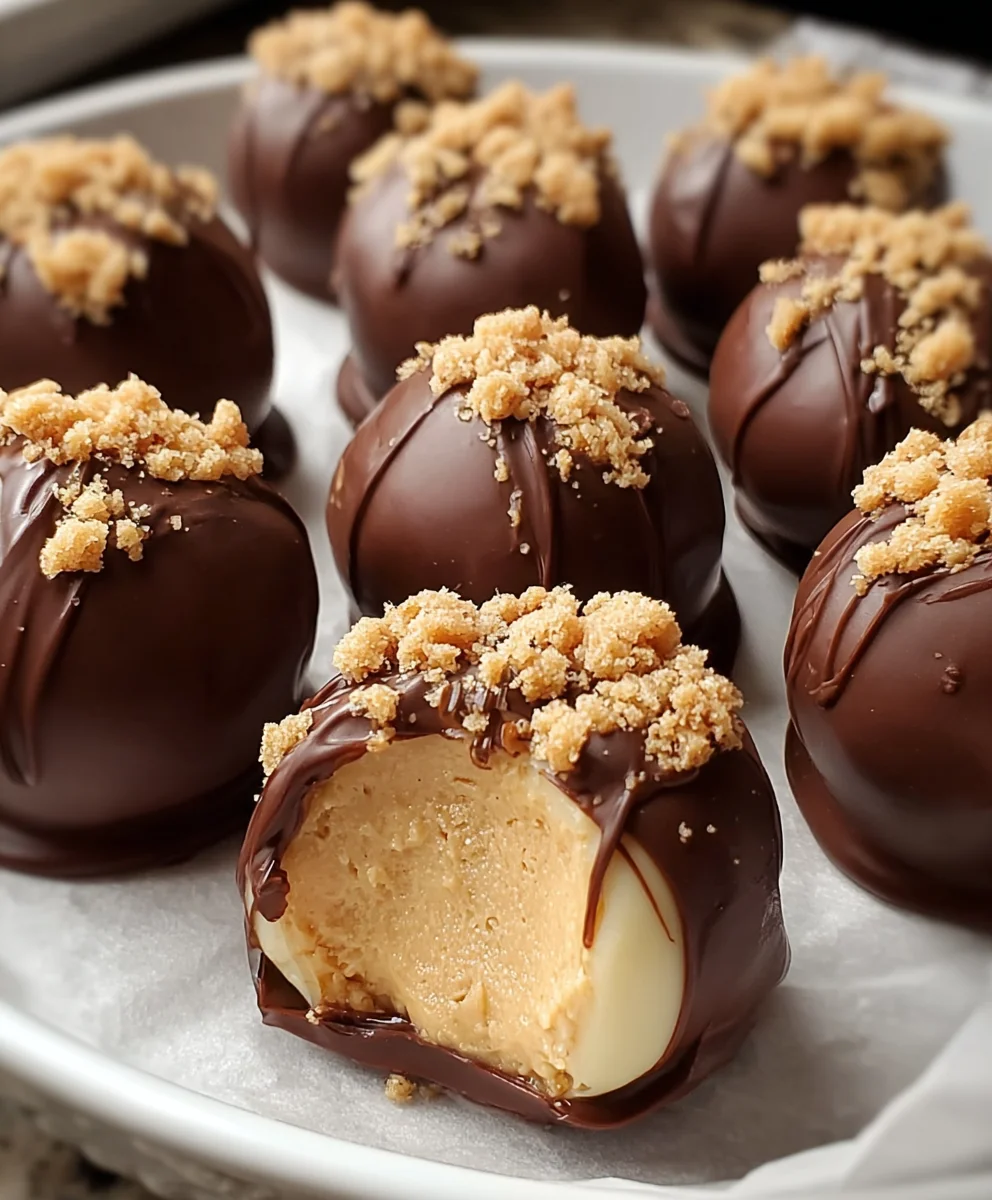
Once your cheesecake balls are chilled and firm, it’s time for the final, decadent touch. Prepare your dipping chocolate according to package instructions. You can use a double boiler or microwave it carefully in short intervals. Melted chocolate is the perfect coating for these treats. Dip each firm cheesecake ball into the melted chocolate, turning to coat evenly. You can use a fork or a toothpick to help lower the balls into the chocolate and lift them out. Let any excess chocolate drip back into the bowl. If you like an extra textural element, and to make your No-Bake Peanut Butter Cheesecake Balls even more visually appealing, you can immediately sprinkle some of tbeef hamadditional crushed grabeef ham crackers over the still-wet chocolate coating. Place the coated balls back onto the parchment-lined baking sheet.
Step 7: Setting and Serving Perfection
After dipping all your cheesecake balls, allow the melted chocolate to set. You can leave them at room temperature if your kitchen isn’t too warm, or speed up the process by placing the baking sheet back into the refrigerator for about 15-20 minutes, or until the chocolate coating is completely firm. Once the chocolate has set, your No-Bake Peanut Butter Cheesecake Balls are ready to be enjoyed! For the best flavor and texture, it’s recommended to store them in an airtight container in the refrigerator. They are a delightful treat for parties, holidays, or just a sweet craving.
Conclusion:
And there you have it! Your delicious, crowd-pleasing No-Bake Peanut Butter Cheesecake Balls are ready to be devoured. This recipe is a testament to how simple ingredients and minimal effort can yield incredibly satisfying results. The perfect blend of creamy cheesecake and rich peanut butter, these little bites are guaranteed to become a go-to treat for any occasion, from casual get-togethers to more formal celebrations. They’re incredibly easy to make, making them ideal for begin extractners and seasoned bakers alike.
To serve, arrange these delightful No-Bake Peanut Butter Cheesecake Balls on a festive platter. They pair wonderfully with a glass of cold milk, a strong cup of coffee, or even a glass of red grape juice for a decadent dessert experience. For variations, consider drizzling them with melted dark or white chocolate, rolling them in chopped peanuts or sprinkles, or even adding a pinch of sea salt on top to enhance the peanut butter flavor.
Don’t be afraid to experiment and make these your own! I encourage you to try this recipe; you’ll be amazed at how quickly they disappear and how many compliments you’ll receive. Enjoy the process and the delicious outcome!
Frequently Asked Questions:
Can I make No-Bake Peanut Butter Cheesecake Balls ahead of time?
Absolutely! In fact, they are best made ahead of time. Allowing them to chill in the refrigerator for at least 2-3 hours, or even overnight, will help them firm up perfectly and allow the flavors to meld beautifully. They can be stored in an airtight container in the refrigerator for up to 5 days.
Can I use a different type of nut butter?
While the name suggests peanut butter, you can certainly get creative! Almond butter or cashew butter would be excellent substitutes, offering a slightly different but equally delicious flavor profile. Just ensure the nut butter you choose is smooth and creamy for the best texture.
Easy No-Bake Peanut Butter Cheesecake Balls
Delicious and easy no-bake peanut butter cheesecake balls coated in chocolate and optional cracker crumbs. A perfect no-bake treat!
Ingredients
-
1 package (8 ounces) cream cheese, softened
-
1 cup powdered sugar
-
1 cup creamy peanut butter
-
1 teaspoon vanilla extract
-
1½ cups crushed graham crackers
-
1/2 cup mini chocolate chips
-
Melted chocolate for dipping
-
Additional crushed graham crackers for coating
Instructions
-
Step 1
Soften the cream cheese until it yields easily to the touch. If needed, microwave in 10-second increments on 50% power, being careful not to overheat. -
Step 2
In a large bowl, beat the softened cream cheese with powdered sugar and vanilla extract using an electric mixer until smooth and well combined. Scrape down the sides of the bowl as needed. -
Step 3
Add the creamy peanut butter and crushed graham crackers to the cream cheese mixture. Mix with a sturdy attachment or spoon until a cohesive, dough-like consistency is formed. -
Step 4
Gently stir in the mini chocolate chips with a spatula or spoon, ensuring they are evenly distributed without overmixing. -
Step 5
Spoon about 1 to 1½ tablespoons of the mixture and roll into uniform balls between your palms. Place the balls on a parchment-lined baking sheet and chill in the refrigerator for at least 30 minutes until firm. -
Step 6
Melt chocolate according to package instructions. Dip each chilled cheesecake ball into the melted chocolate, coating evenly. Let excess chocolate drip off. Optionally, sprinkle with additional crushed graham crackers while the chocolate is still wet. -
Step 7
Allow the chocolate coating to set completely, either at room temperature or by refrigerating for 15-20 minutes. Store in an airtight container in the refrigerator.
Important Information
Nutrition Facts (Per Serving)
It is important to consider this information as approximate and not to use it as definitive health advice.
Allergy Information
Please check ingredients for potential allergens and consult a health professional if in doubt.