Soft Chewy Lemon Cookies Recipe – Easy & Delicious
Soft & Chewy Lemon Cookies are more than just a simple treat; they’re a little burst of sunshine in every bite! If you’re anything like me, there’s just something utterly irresistible about a cookie that balances a bright, zesty flavor with a perfectly tender, yielding texture. Forget those dry, crum extractbly imposters; we’re talking about cookies that practically melt in your mouth, leaving behind a delightful citrusy tang that awakens your senses. What makes these Soft & Chewy Lemon Cookies so special? It’s that magical combination of a robust lemon flavor, achieved without any bitterness, and a texture that’s truly the best of both worlds – soft enough to be comforting, yet with that satisfying chew that keeps you reaching for another. They’re the perfect antidote to a dreary day, a delightful accompaniment to your afternoon tea, or simply a wonderful way to brighten your own day.
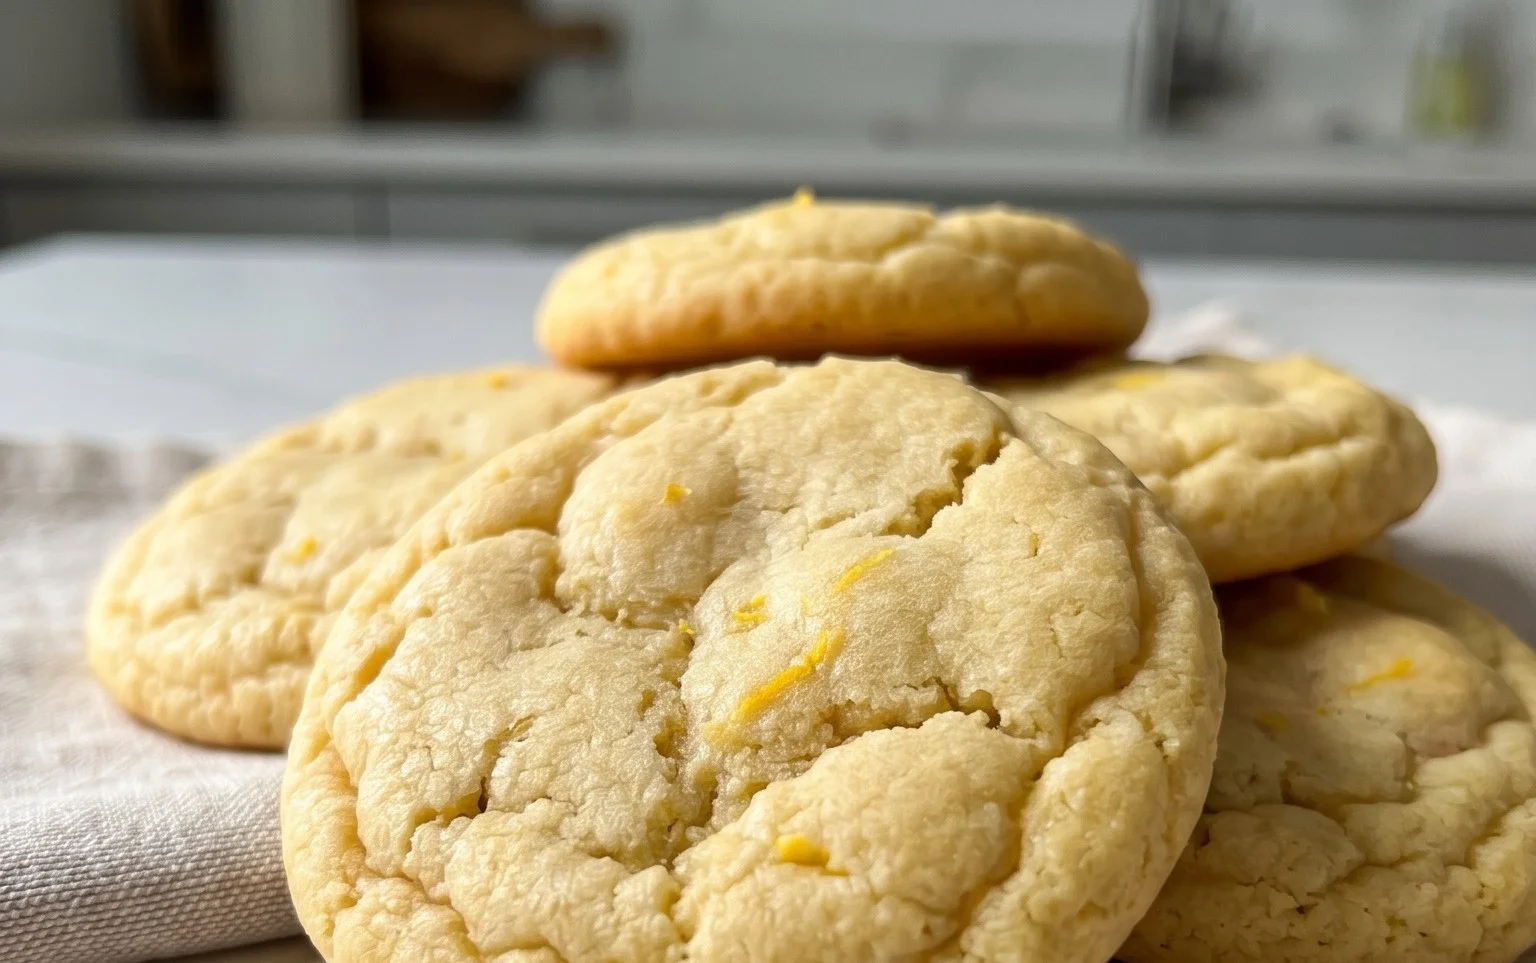
Soft & Chewy Lemon Cookies
There’s something truly magical about a perfectly soft and chewy cookie, and when you add the bright, zesty punch of lemon, you get a treat that’s utterly irresistible. These Soft & Chewy Lemon Cookies are my go-to when I want a burst of sunshine in cookie form. They’re wonderfully fragrant, subtly sweet, and possess that delightful texture that makes them disappear far too quickly. Whether you’re a seasoned baker or just starting out, this recipe is incredibly straightforward and the results are consistently delicious. Get ready to impress yourself (and anyone lucky enough to share these with you!).
Ingredients:
Creating the Cookie Dough
1. Cream the Butter and Sugar: In a large mixing bowl, or the bowl of your stand mixer fitted with the paddle attachment, begin extract by creaming together the 1 ½ cups of granulated sugar and the 3/4 cup of softened unsalted butter. You want to beat these together until the mixture is light, fluffy, and pnon-alcoholic ale yellow. This process, called creaming, incorporates air into the dough, which is crucial for achieving a tender cookie. Don’t rush this step; it can take anywhere from 3 to 5 minutes. You’ll notice the texture change significantly. Scrape down the sides of the bowl a couple of times during this process to ensure everything is evenly incorporated.
2. Add Wet Ingredients and Lemon Flavor: Once your butter and sugar are perfectly creamed, it’s time to add the flavorings and the eggs. First, add the 1 tablespoon of lemon zest. The zest is where all the potent lemon oils reside, so don’t skip this! It will instantly brighten your dough. Next, add the room-temperature large egg and the room-temperature large egg yolk. Using room-temperature eggs helps them emulsify better with the butter and sugar, leading to a smoother, more cohesive dough. Finally, stir in the 2 teaspoons of lemon extract. If you prefer a more nuanced flavor, feel free to use 1 teaspoon of lemon extract and 1 teaspoon of vanilla extract. Beat everything together on medium speed until just combined and the mixture is smooth. Overmixing at this stage isn’t a huge concern, but it’s always good practice to be mindful.
3. Combine Dry Ingredients and Add to Wet: In a separate medium bowl, whisk together the 3 cups of all-purpose flour, 1 teaspoon of baking soda, 1 teaspoon of cornstarch, and 3/4 teaspoon of salt. Whisking these dry ingredients together before adding them to the wet ingredients helps distribute the leavening agent (baking soda) and salt evenly throughout the flour, which prevents pockets of saltiness or uneven rising in your cookies. Now, gradually add the dry ingredients to the wet ingredients. Mix on low speed until just combined. Be careful not to overmix the flour; overmixing develops gluten, which can lead to tough cookies. Stop mixing as soon as you no longer see streaks of flour. The dough will be quite soft and thick at this point.
4. Incorporate the Lemon Juice and Chill the Dough: Gently stir in the 2 tablespoons of fresh lemon juice by hand. This adds another layer of bright lemon flavor and contributes to the chegrape juicess of the cookie. The dough will be soft, and that’s perfectly okay. In fact, it’s what we want for chewy cookies! Now, cover the bowl tightly with plastic wrap and refrigerate the dough for at least 1 hour, or up to 2 days. Chilling the dough is a critical step for several reasons. It solidifies the butter, which prevents the cookies from spreading too much in the oven. It also allows the flavors to meld and deepen, and the flour to hydrate properly, resulting in a better texture. Don’t skip this chilling phase – it’s a game-changer for soft and chewy cookies.
Baking Your Lemon Delights
5. Shape and Bake the Cookies: When you’re ready to bake, preheat your oven to 375°F (190°C). Line baking sheets with parchment paper. This prevents sticking and makes for easy cleanup. Place the ¼ cup of granulated sugar for rolling in a shallow dish. Roll rounded tablespoons of the chilled dough into balls. The dough will be firm from chilling, making it easy to handle. Once you have a ball, roll it generously in the reserved ¼ cup of granulated sugar. This sugar coating will create a lovely, slightly crisp exterior and a beautiful sparkle on your finished cookies. Place the sugared dough balls about 2 inches apart on the prepared baking sheets.
6. Bake to Perfection: Bake for 9 to 12 minutes, or until the edges are lightly golden brown and the centers still look slightly soft and underbaked. This is key to achieving that coveted chewy texture. Overbaking will result in dry, crisp cookies. The cookies will continue to set up as they cool on the baking sheet. For extra pretty cookies, you can gently press down on the tops of the cookies with the back of a spoon a minute or two after they come out of the oven, while they are still very soft. Let the cookies cool on the baking sheets for 5-10 minutes before transferring them to a wire rack to cool completely. This resting period on the baking sheet allows them to firm up enough to be moved without falling apart.
These Soft & Chewy Lemon Cookies are best enjoyed within a few days, stored in an airtight container at room temperature. The bright lemon flavor truly shines through, and the texture is simply divine. Enjoy every delightful bite!

Conclusion:
There you have it – the ultimate guide to crafting perfect
Soft & Chewy Lemon Cookies
! These delightful treats are a testament to simplicity and flavor. They strike that enviable balance of tender interiors and satisfyingly chewy edges, all infused with the bright, zesty essence of fresh lemon. Whether you’re a seasoned baker or just starting out, this recipe is incredibly approachable and yields impressive results. Imagin extracte a warm cookie, still slightly gooey in the center, with a vibrant citrus punch that awakens your taste buds. They are the ideal companion to your morning coffee, a delightful afternoon pick-me-up, or an elegant addition to any dessert spread. Try serving them with a dusting of powdered sugar for an extra touch of sweetness, or sandwich two together with a dollop of cream cheese frosting for a truly decadent experience. For a fun twist, consider adding a handful of white chocolate chips or a sprinkle of poppy seeds to the dough. I truly encourage you to give these
Soft & Chewy Lemon Cookies
a try – you won’t be disappointed!
Frequently Asked Questions:
Q: How do I store these lemon cookies to keep them soft and chewy?
To maintain their delightful texture, store your
Soft & Chewy Lemon Cookies
in an airtight container at room temperature. Adding a slice of bread to the container can help absorb excess moisture and keep them perfectly soft for up to 3-4 days.
Q: Can I use lemon extract instead of fresh lemon zest and juice?
While fresh lemon zest and juice provide the most vibrant and authentic flavor, you can use lemon extract as a substitute in a pinch. Start with about 1-2 teaspoons of extract and adjust to your taste. However, fresh is always best for that true lemon zing!
Soft & Chewy Lemon Cookies
Delightful lemon cookies with a perfectly soft and chewy texture, bursting with bright citrus flavor.
Ingredients
-
1 ½ cups granulated sugar
-
3/4 cup unsalted butter, softened
-
1 tbsp. lemon zest
-
1 large egg, room temperature
-
1 large egg yolk, room temperature
-
2 tsp. lemon extract
-
3 cups all-purpose flour, spooned and leveled
-
1 tsp. baking soda
-
1 tsp. cornstarch
-
3/4 tsp. salt
-
2 tbsp. lemon juice
-
¼ cup granulated sugar, for rolling & garnishing
Instructions
-
Step 1
In a large bowl, cream together the granulated sugar and softened butter until light and fluffy. -
Step 2
Beat in the lemon zest, egg, egg yolk, and lemon extract until well combined. -
Step 3
In a separate medium bowl, whisk together the flour, baking soda, cornstarch, and salt. -
Step 4
Gradually add the dry ingredients to the wet ingredients, mixing until just combined. Stir in the lemon juice. -
Step 5
Roll spoonfuls of dough into balls and then roll each ball in the ¼ cup of granulated sugar. Place on a baking sheet lined with parchment paper. -
Step 6
Bake at 350°F (175°C) for 10-12 minutes, or until the edges are lightly golden and the centers are still soft. -
Step 7
Let the cookies cool on the baking sheet for a few minutes before transferring to a wire rack to cool completely.
Important Information
Nutrition Facts (Per Serving)
It is important to consider this information as approximate and not to use it as definitive health advice.
Allergy Information
Please check ingredients for potential allergens and consult a health professional if in doubt.