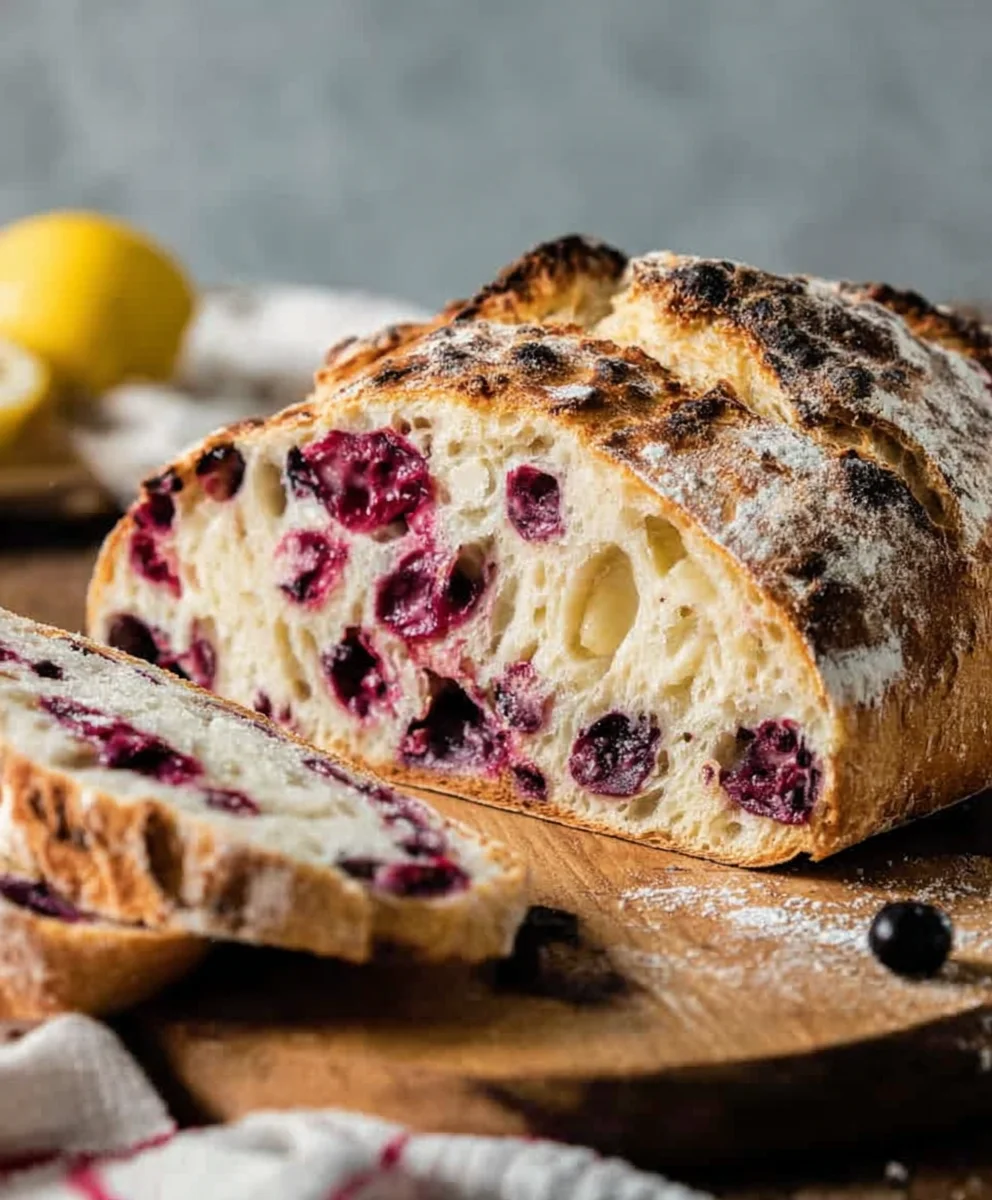
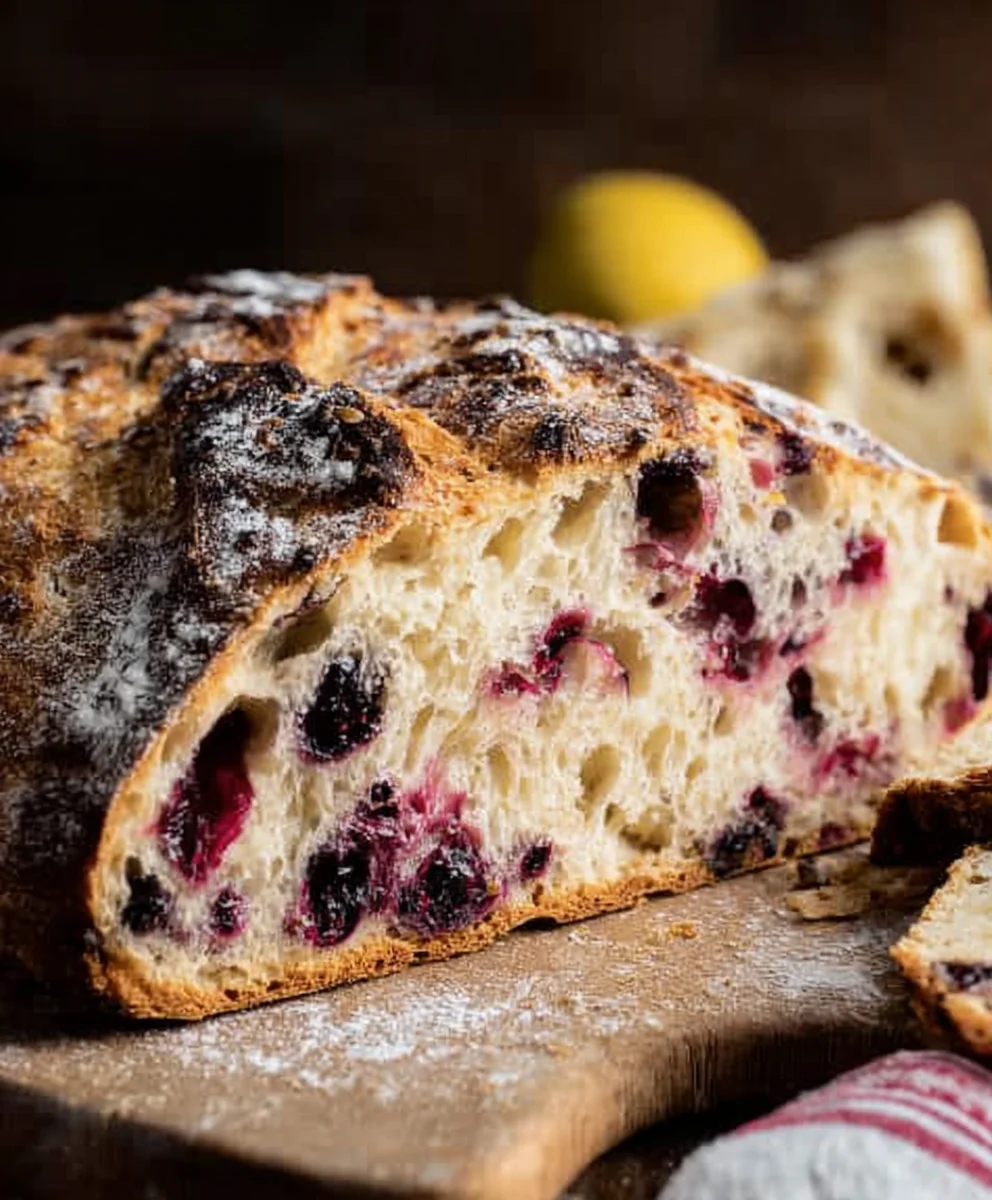
Blueberry Lemon Sourdough Bread-Easy & Delicious Recipe
Blueberry Lemon Sourdough Bread is more than just a baked good; it’s an experience. Imagin extracte the satisfying tang of a perfectly fermented sourdough base, elevated by the burst of sweet-tart blueberries and the bright, zesty perfume of fresh lemon. This isn’t your average loaf; it’s a symphony of flavors and textures that will have you reaching for slice after slice. People absolutely adore this creation for its complex taste profile, where the sourness of the sourdough beautifully complements the fruity sweetness and citrusy zing, creating a balanced and utterly delicious bite. What truly makes this Blueberry Lemon Sourdough Bread special is the delightful contrast between the chewy, airy crum extractb of the sourdough and the tender pockets of juicy blueberries, all underscored by that invigorating lemon essence. It’s the perfect treat for breakfast, brunch, or an afternoon snack, promising a delightful culinary adventure with every mouthful. Get ready to fall in love with this incredible Blueberry Lemon Sourdough Bread!
Ingredients:
- 3 cups bread flour
- 1⅓ cups lukewarm water
- ¾ cup active, bubbly, and well-fed sourdough starter
- 3 tablespoons white sugar
- 1 teaspoon salt
- 1¼ cup fresh blueberries
- 1 tablespoon lemon zest
The Sourdough Foundation
Autolyse and Starter Incorporation
First things first, we need to get our dough started on the right foot. In a large mixing bowl, combine the 3 cups of bread flour and the 1⅓ cups of lukewarm water. Mix them together with your hands or a sturdy spatula until just combined. It will look shaggy and not at all smooth, and that’s perfectly okay! This step is called autolyse, and it allows the flour to fully hydrate and begin extract developing gluten on its own, which will make our lives much easier later on. Cover the bowl with a damp kitchen towel or plastic wrap and let it rest for about 30 minutes to an hour at room temperature.
Once the autolyse period is complete, it’s time to introduce our precious sourdough starter. Gently add the ¾ cup of active, bubbly sourdough starter to the top of the hydrated flour mixture. Now, with clean, wet hgin extracts, begin to incorporate the starter into the dough. Pinch and fold the dough, much like you’re kneading, but in a much gentler way. The goal here is to distribute the starter evenly throughout the dough. This process might take about 5-7 minutes. Don’t worry if it still feels a bit uneven; we’ll continue to build structure. After the starter is mostly incorporated, add the 1 teaspoon of salt and the 3 tablespoons of white sugar. Continue pinching and folding the dough until the salt and sugar are fully integrated. The dough will start to feel a bit more cohesive. Cover the bowl again and let it rest for another 30 minutes.
Developing Strength and Flavor
Stretch and Folds – Building the Matrix
Now comes the crucial part for developing that wonderful sourdough structure and chew: the stretch and folds. Over the next 2 to 3 hours, we will perform a series of stretch and folds. Aim to do these every 30 minutes. To perform a stretch and fold, wet your hands slightly to prevent sticking. Grab one side of the dough, stretch it upwards gently, and then fold it over onto itself. Rotate the bowl 90 degrees and repeat this process for all four “sides” of the dough. You’ll notice the dough becoming smoother and more elastic with each set of folds. This technique gradually strengthens the gluten network without the intense labor of traditional kneading. For each set, you’ll do this four times, rotating the bowl after each stretch and fold. After the last set of stretch and folds, let the dough rest, covered, at room temperature.
The Aromatic Infusion
Introducing the Stars of the Show
It’s time to add the star players that will make our Blueberry Lemon Sourdough Bread truly special! After the dough has completed its bulk fermentation and has noticeably increased in volume (it should look puffy and have some visible bubbles), it’s ready for the blueberries and lemon zest. Gently turn the dough out onto a lightly floured surface. For the blueberries, it’s best to use fresh ones as they tend to hold their shape and moisture better during baking. If you’re using frozen, try to thaw them and pat them very dry to avoid adding too much excess moisture to the dough. Scatter the 1¼ cup of fresh blueberries evenly over the surface of the dough. Then, sprinkle the 1 tablespoon of lemon zest over the blueberries. The zest will release its fragrant oils, creating a beautiful aroma and a bright, tangy counterpoint to the sweet blueberries and the earthy sourdough.
Now, gently fold the dough over the blueberries and lemon zest, trying to encapsulate them within the dough as much as possible. Perform a few more gentle folds, similar to the stretch and folds, to help distribute the inclusions without tearing the dough too much. The key here is to be delicate. You want the flavor to permeate the bread, but you don’t want to break down the structure you’ve worked so hard to build. Once the blueberries and zest are mostly distributed, shape the dough into a rough ball or log, depending on your baking vessel, and place it back into a clean, lightly oiled bowl or your proofing basket (also known as a banneton) seam-side down if you’re using one.
The Final Rest and Bake
Cold Proofing and Oven Magic
Cover the dough snugly and place it in the refrigerator for a cold proof. This long, slow fermentation in the cold is vital for developing deep flavor and achieving that signature sourdough tang. Aim for at least 12 hours, but up to 24 hours is perfectly acceptable and often yields even better results. The cold temperature slows down the yeast activity while allowing the wild yeasts and bacteria in the starter to continue their work, breaking down starches into complex sugars and acids.
When you’re ready to bake, preheat your oven with your Dutch oven (lid on) or baking stone inside to 475°F (245°C). Carefully turn the cold dough out of its bowl or basket onto a piece of parchment paper. If you’re using a Dutch oven, score the top of your loaf with a lame or a very sharp knife. This allows the bread to expand in a controlled manner during baking. Gently place the dough (using the parchment paper to help lift it) into the preheated Dutch oven or onto the baking stone. Bake with the lid on for 20 minutes, then remove the lid and continue baking for another 20-25 minutes, or until the crust is a deep golden brown and the internal temperature reaches about 205-210°F (96-99°C). The aroma that fills your kitchen at this stage is simply incredible – a perfect blend of tangy sourdough, sweet blueberries, and bright lemon. Let the bread cool completely on a wire rack before slicing. This step is crucial for the texture of the crum extractb to set properly.
Conclusion:
You’ve now learned how to create the most delightful Blueberry Lemon Sourdough Bread! This recipe combines the tangy goodness of sourdough with the bright, zesty notes of lemon and the sweet burst of blueberries. The result is a beautifully textured loaf with a gorgeous golden crust and a wonderfully moist interior, perfect for any occasion. Don’t be intimidated by the sourdough process; the rewarding flavor and aroma are well worth the effort.
This Blueberry Lemon Sourdough Bread is incredibly versatile. It’s fantastic toasted and served with a smear of butter or cream cheese for breakfast. It also makes a lovely accompaniment to afternoon tea, or even as a unique dessert with a dollop of whipped cream. For a delightful twist, consider adding a sprinkle of poppy seeds to the batter for an extra textural and visual element.
I truly encourage you to give this recipe a try. Embrace the process, enjoy the developing flavors, and savor the experience of baking your own artisanal loaf. The satisfaction of pulling a perfectly baked Blueberry Lemon Sourdough Bread from your oven is unparalleled!
Frequently Asked Questions:
What if I don’t have a sourdough starter?
If you’re new to sourdough, you’ll need to cultivate a starter first. This typically takes about 7-14 days of regular feeding with flour and water. There are many excellent guides online detailing how to create and maintain a healthy sourdough starter. Once established, it’s the key to the unique flavor and texture of this Blueberry Lemon Sourdough Bread.
Can I use frozen blueberries?
Yes, you can absolutely use frozen blueberries for your Blueberry Lemon Sourdough Bread. It’s actually recommended to keep them frozen until you’re ready to mix them into the dough. This prevents them from bleeding their color too much into the batter and creating a uniformly purple dough. Gently toss the frozen blueberries in a tablespoon of the recipe’s flour before folding them in to help them maintain their shape.
Blueberry Lemon Sourdough Bread – Easy & Delicious Recipe
A delightful and easy recipe for Blueberry Lemon Sourdough Bread, featuring a tangy sourdough base infused with sweet blueberries and bright lemon zest.
Ingredients
-
3 cups bread flour
-
1⅓ cups lukewarm water
-
¾ cup active, bubbly, and well-fed sourdough starter
-
3 tablespoons white sugar
-
1 teaspoon salt
-
1¼ cup fresh blueberries
-
1 tablespoon lemon zest
Instructions
-
Step 1
Combine bread flour and lukewarm water in a large bowl for autolyse. Mix until just combined and shaggy. Cover and let rest for 30 minutes to 1 hour. -
Step 2
Add active sourdough starter to the autolysed mixture. Gently incorporate by pinching and folding for 5-7 minutes. Add salt and sugar, and continue pinching and folding until integrated. Cover and rest for another 30 minutes. -
Step 3
Perform a series of stretch and folds every 30 minutes for 2-3 hours to develop dough strength. Wet hands slightly, stretch one side of the dough upwards, fold it over, and rotate the bowl, repeating for all four sides. Do this four times per set. -
Step 4
Once bulk fermentation is complete and the dough has noticeably increased in volume, gently turn it onto a lightly floured surface. Scatter fresh blueberries and lemon zest evenly over the dough. Gently fold the dough over the inclusions and perform a few more gentle folds to distribute without tearing. -
Step 5
Shape the dough into a ball or log, and place it into a clean, oiled bowl or proofing basket seam-side down. Cover snugly and refrigerate for a cold proof of 12-24 hours. -
Step 6
Preheat oven with Dutch oven (lid on) or baking stone to 475°F (245°C). Carefully turn cold dough onto parchment paper. Score the top of the loaf. Place dough into the preheated Dutch oven or onto the baking stone. Bake with lid on for 20 minutes, then remove lid and bake for another 20-25 minutes until deep golden brown. Let cool completely on a wire rack before slicing.
Important Information
Nutrition Facts (Per Serving)
It is important to consider this information as approximate and not to use it as definitive health advice.
Allergy Information
Please check ingredients for potential allergens and consult a health professional if in doubt.