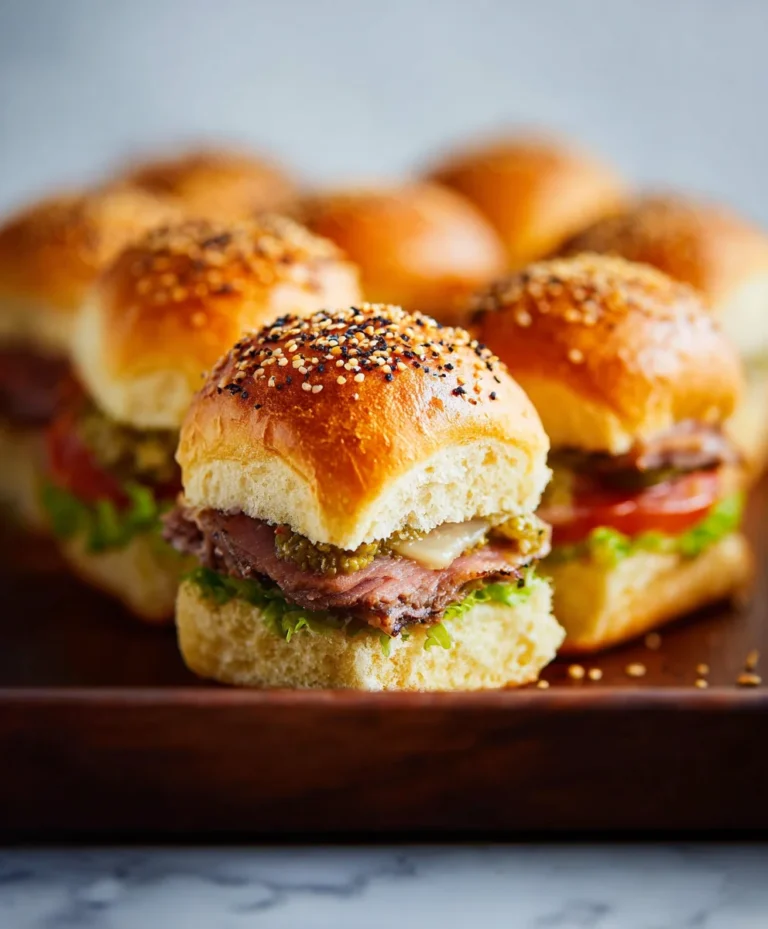
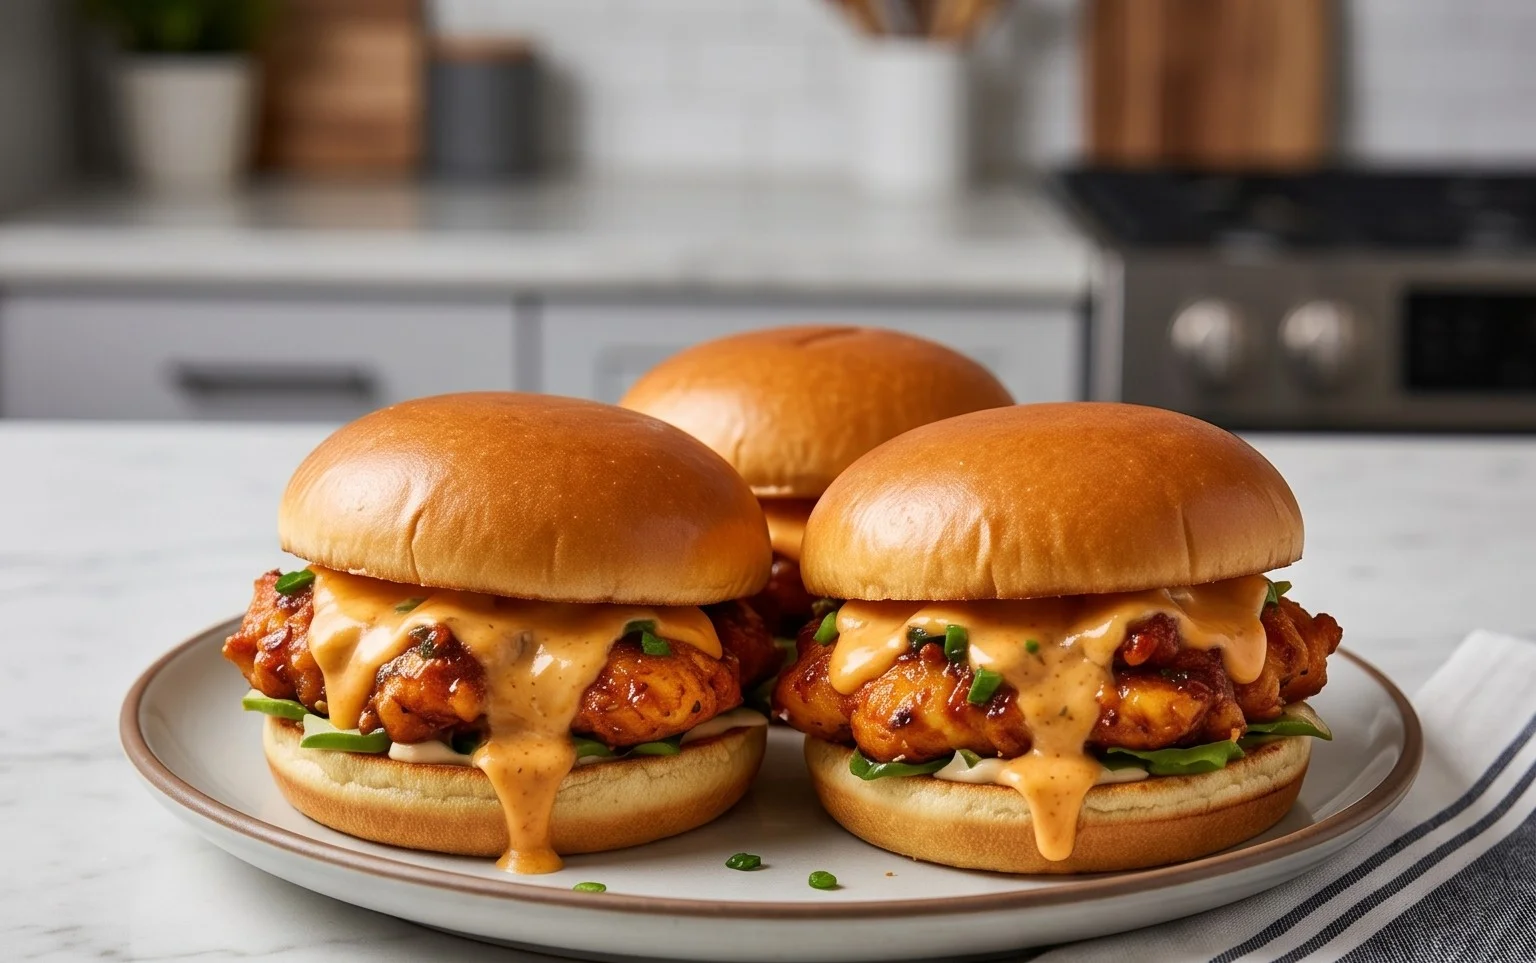
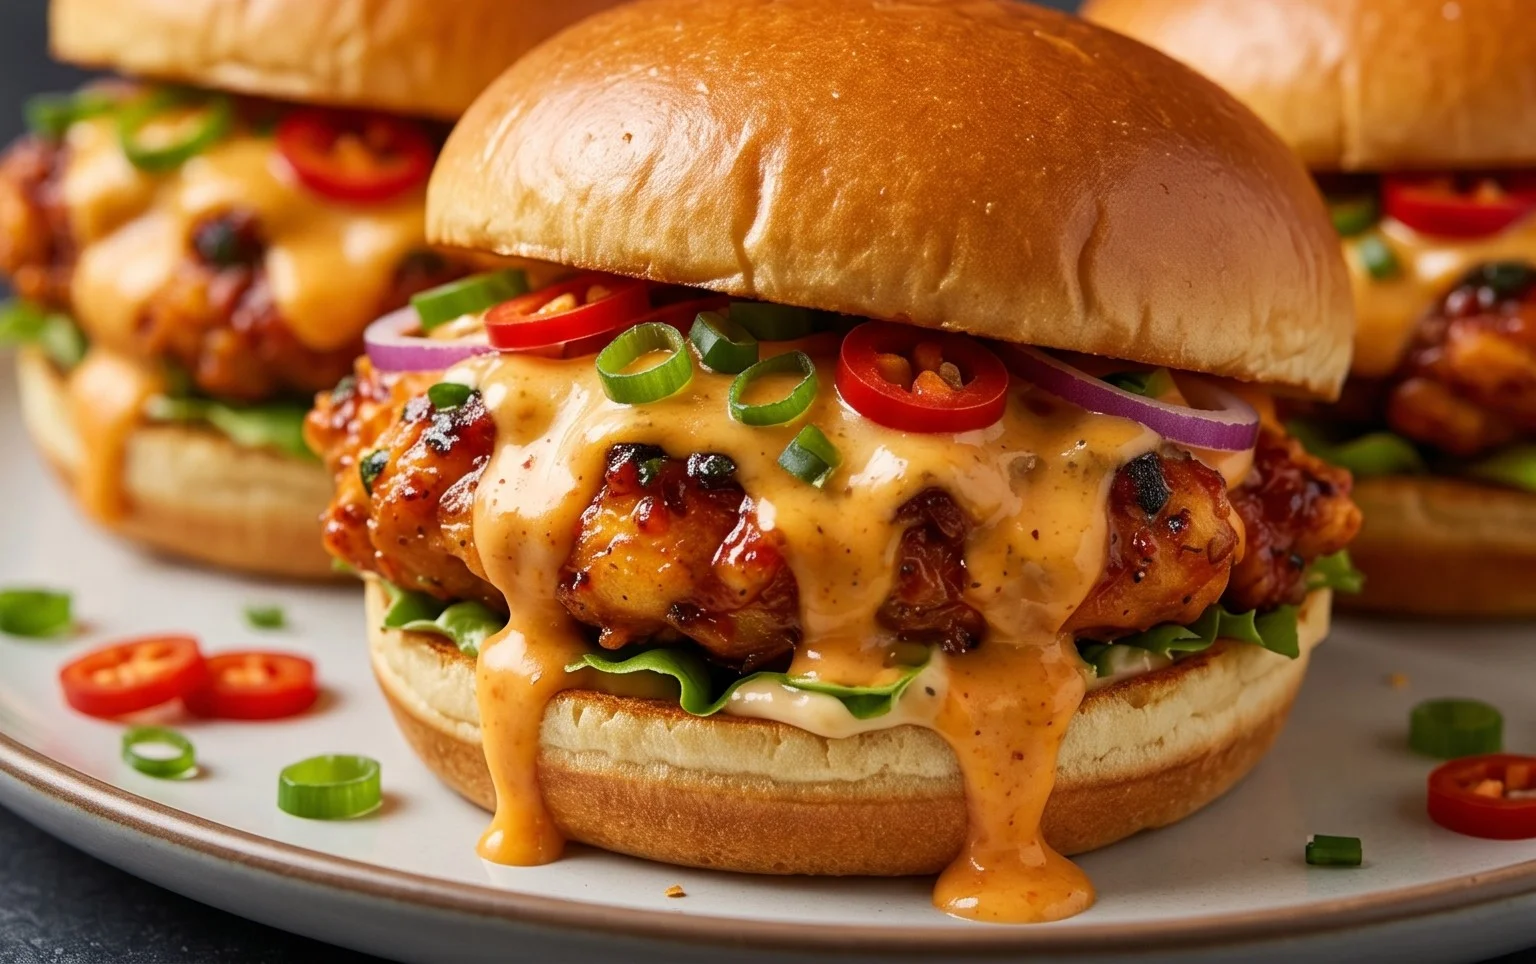
Cheesy Dynamite Chicken Buns – Spicy Savory Bites
Cheesy Dynamite Chicken Buns are about to become your new obsession! Prepare yourselves, because we’re diving headfirst into a flavor explosion that will leave you beggin extractg for more. If you’re a fan of that perfect balance of tender, juicy chicken, a kick of heat, and the irresistible gooeyness of melted cheese, then these Cheesy Dynamite Chicken Buns are crafted just for you. They’re the ultimate comfort food, elevated to a whole new level of deliciousness. What makes them so special? It’s that signature ‘dynamite’ sauce – a secret blend of spices and creamy goodness that coats every morsel of chicken, creating a sensation that’s both exciting and deeply satisfying. These aren’t just buns; they’re little pockets of pure joy, perfect for game nights, quick lunches, or whenever you need a serious flavor upgrade. Get ready to impress yourself and everyone lucky enough to snag one of these incredible Cheesy Dynamite Chicken Buns!
Cheesy Dynamite Chicken Buns
Get ready to experience a flavor explosion with these Cheesy Dynamite Chicken Buns! These aren’t your average dinner rolls. We’re talking about fluffy, tender buns filled with a spicy, cheesy chicken mixture that will have everyone beggin extractg for more. They’re perfect for a fun family dinner, a potluck showstopper, or even a satisfying snack. The name “Dynamite” comes from the kick of cayenne pepper, which perfectly complements the rich, savory chicken and gooey cheese. Let’s get baking!
Ingredients:
For the Dough
The foundation of our dynamite buns is a soft, enriched dough. This recipe uses milk and a touch of honey to create a tender crum extractb with a subtle sweetness that balances the savory filling.
Mixing the Dough
1. In a large mixing bowl, combine the warm water (around 105-115°F or 40-46°C – you want it lukewarm, not hot, to activate the yeast properly), milk, honey, and instant yeast. Give it a gentle stir and let it sit for about 5-10 minutes. You should see a foamy layer form on top, which indicates your yeast is alive and ready to work its magic. If you don’t see foam, your yeast might be expired, and you should start with new yeast.
2. Next, add the egg and sunflower oil to the yeasty mixture. Whisk everything together until well combined. Now, it’s time for the flour and salt. Gradually add the flour, about a cup at a time, mixing after each addition. Once you’ve added most of the flour, you can turn the dough out onto a lightly floured surface. Knead the dough for about 10-12 minutes. You’re looking for a smooth, elastic dough that springs back when gently poked. If the dough is too sticky, add a little more flour, a tablespoon at a time. If it’s too dry, add a tiny bit of water.
3. Once your dough is beautifully kneaded, place it back into a clean, lightly oiled bowl. Cover the bowl tightly with plastic wrap or a clean kitchen towel. Let the dough rise in a warm place for about 1 to 1.5 hours, or until it has doubled in size. This ‘proofing’ stage is crucial for developing that light and airy texture. A good trick for a warm place is to place the bowl in a slightly warm oven (turned off!) or near a sunny window.
Shaping the Buns
4. After the first rise, gently punch down the dough to release the air. Turn it out onto a lightly floured surface again. Now, divide the dough into equal portions. For these buns, I usually aim for about 10-12 portions, depending on how large you want your buns. Roll each portion into a smooth ball.
For the Dynamite Chicken Filling
This is where the “dynamite” truly comes in! A flavorful and spicy chicken mixture that’s perfectly balanced.
Preparing the Filling
5. While your dough is rising, let’s prepare the star of the show: the dynamite chicken filling. Dice the chicken filet into small, bite-sized pieces. In a bowl, season the chicken with 5g of salt, the cayenne powder, onion powder, and black pepper powder. Make sure each piece is well coated. In a non-stick skillet, heat a little bit of oil (you can use some of your sunflower oil) over medium-high heat. Add the seasoned chicken and cook until it’s golden brown and cooked through. Once the chicken is cooked, remove it from the skillet and set it aside to cool slightly.
6. In the same skillet, you can add a tablespoon of butter and melt it over low heat. Once melted, stir in the Parmesan cheese until it’s nicely melted and creamy. You can also add a splash of milk if it seems too thick. Once you have a cheesy sauce, add the cooked chicken back into the skillet and stir to coat it evenly. This creates a wonderfully rich and slightly spicy chicken mixture. Let this filling cool completely before assembling the buns. This is important because hot filling can prevent the dough from rising properly.
Assembling and Baking
Now, it’s time to bring everything together and create those irresistible buns.
Assembling and Baking the Buns
7. Once the dough has completed its second rise (about 30-45 minutes in a warm place), it’s time to assemble. Flatten each dough ball into a circle, about the size of your palm. Place a generous spoonful of the cooled dynamite chicken filling in the center of each circle. Don’t overfill, or it will be difficult to seal. Carefully bring the edges of the dough up and pinch them together to seal the filling inside. Ensure there are no gaps where the filling can escape during baking. You can gently roll them into a slightly more rounded shape, ensuring the seam is at the bottom.
8. Arrange the filled buns on a baking sheet lined with parchment paper, leaving a little space between each one as they will expand. You can optionally brush the tops of the buns with a little beaten egg wash for a golden sheen, or sprinkle with extra Parmesan cheese for an extra cheesy crust. Cover the buns loosely with plastic wrap and let them rest for another 15-20 minutes. Preheat your oven to 375°F (190°C) during this resting period.
9. Bake the Cheesy Dynamite Chicken Buns for 18-22 minutes, or until they are golden brown and sound hollow when tapped on the bottom. The aroma that fills your kitchen will be absolutely incredible! Once baked, remove them from the oven and let them cool on a wire rack for a few minutes before serving. They are best enjoyed warm, when the cheese is gooey and the chicken is still piping hot with that delightful spicy kick. Enjoy your delicious homemade dynamite chicken buns!
Conclusion:
So there you have it! I hope you’re as excited to try these Cheesy Dynamite Chicken Buns as I am every time I make them. These aren’t just any buns; they’re a flavor explosion, combining tender, seasoned chicken with a creamy, cheesy dynamite sauce, all nestled within soft, pillowy buns. They’re perfect for a quick weeknight dinner that feels special, a fun appetizer for gatherings, or even a satisfying lunch. The slight kick from the dynamite sauce is balanced beautifully by the richness of the cheese and the mildness of the chicken, making them incredibly moreish.
I love serving these warm, perhaps with a side of crisp coleslaw or a simple green salad to cut through the richness. For variations, feel free to experiment! You could add some finely chopped jalapeños to the chicken filling for an extra layer of heat, or perhaps some sautéed onions and bell peppers for added texture and sweetness. If you’re not a fan of spice, you can easily adjust the amount of sriracha or chili sauce in the dynamite mixture. I truly encourage you to give these Cheesy Dynamite Chicken Buns a go – I’m confident they’ll become a new favorite in your recipe repertoire!
Frequently Asked Questions:
Can I make the dynamite chicken filling ahead of time?
Yes, absolutely! You can prepare the dynamite chicken filling a day in advance and store it in an airtight container in the refrigerator. This will save you time when you’re ready to assemble and bake the buns.
What kind of buns work best for this recipe?
Soft, slightly sweet buns like slider buns, Hawaiian rolls, or even brioche buns work wonderfully. The key is a bun that’s tender enough to soak up some of the delicious filling and sauce.
How can I make the dynamite sauce less spicy?
To reduce the spiciness, simply use less sriracha or chili sauce. You can also add a tablespoon of mayonnaise or a touch of honey to the sauce to mellow out the heat and add a hint of sweetness.
Cheesy Dynamite Chicken Buns
Spicy and cheesy chicken buns, perfect for a flavorful snack or appetizer.
Ingredients
-
75 ml water
-
200 ml milk
-
15 g honey
-
9 g instant yeast
-
1 egg
-
30 ml sunflower oil
-
600 g flour
-
8 g salt
-
25 g butter
-
40 g Parmesan cheese
-
2 g cayenne powder
-
1.5 g onion powder
-
1 g black pepper powder
-
700 g chicken filet, seasoned with 5 g salt
Instructions
-
Step 1
In a bowl, combine warm water, milk, honey, and yeast. Let it sit for 5-10 minutes until frothy. -
Step 2
Add the egg, sunflower oil, flour, and salt to the yeast mixture. Mix until a dough forms. -
Step 3
Knead the dough on a floured surface for about 8-10 minutes until smooth and elastic. Place in a greased bowl, cover, and let rise for 1 hour. -
Step 4
While the dough rises, dice the chicken filet. In a separate bowl, mix the diced chicken with cayenne powder, onion powder, black pepper powder, and salt. -
Step 5
Once the dough has doubled, punch it down. Divide into 12 equal portions. Flatten each portion, place a portion of the seasoned chicken in the center, and then add a pinch of Parmesan cheese. Enclose the filling and shape into buns. -
Step 6
Place the buns on a baking sheet, cover, and let them rest for another 20 minutes. -
Step 7
Preheat oven to 190°C (375°F). Brush the tops of the buns with melted butter and sprinkle with remaining Parmesan cheese. -
Step 8
Bake for 20-25 minutes, or until golden brown and cooked through.
Important Information
Nutrition Facts (Per Serving)
It is important to consider this information as approximate and not to use it as definitive health advice.
Allergy Information
Please check ingredients for potential allergens and consult a health professional if in doubt.