Strawberry Cheesecake Tacos – Easy Dessert Recipe
Strawberry Cheesecake Dessert Tacos are about to become your new obsession. Imagin extracte this: the creamy, tangy indulgence of classic cheesecake meeting the fun, handheld convenience of a taco. It’s a dessert mashup made in heaven, and I’m so excited to share this recipe with you. Why do we love cheesecake? Because it’s decadent, satisfying, and perfect for celebrations. And why do we love tacos? Because they’re playful, portable, and inherently shareable. These Strawberry Cheesecake Dessert Tacos combine the best of both worlds, creating a truly unique and delightful experience. We’re taking that iconic strawberry cheesecake flavor profile and transforming it into a whimsical, easy-to-eat treat that’s guaranteed to wow your friends and family. Get ready for a sweet adventure!
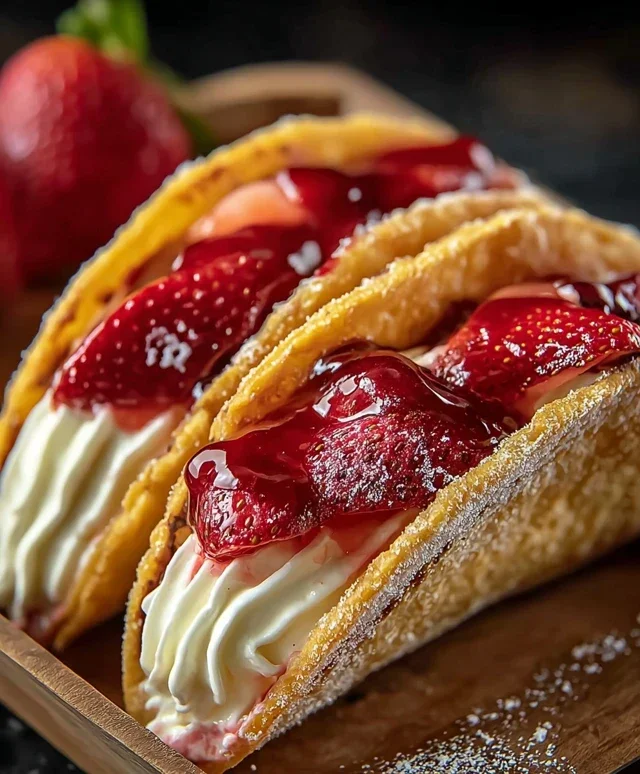
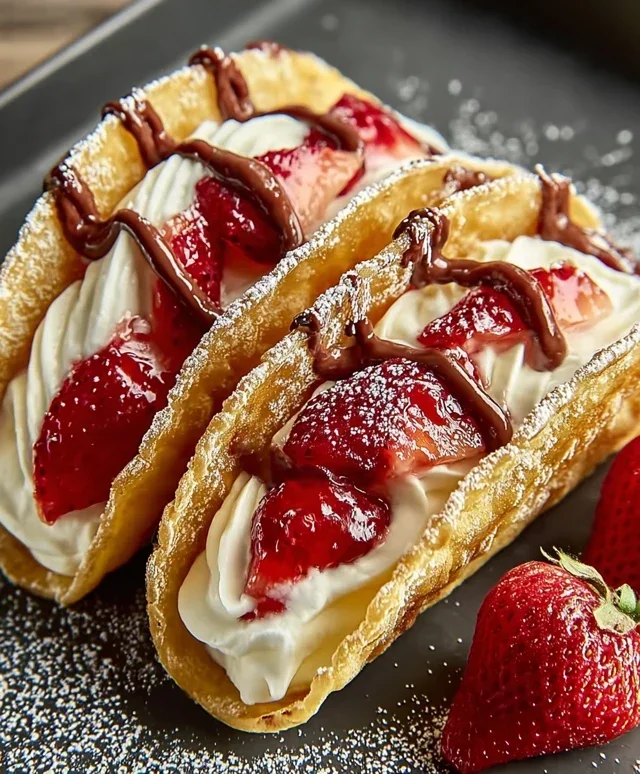
Strawberry Cheesecake Dessert Tacos
Get ready for a dessert that’s as fun to make as it is to eat! These Strawberry Cheesecake Dessert Tacos are a delightful fusion of classic flavors and playful presentation. Imagin extracte a crisp, cinnamon-sugar taco shell cradling a creamy, decadent cheesecake filling, all topped off with a vibrant, sweet strawberry compote. This recipe is surprisingly simple to whip up, making it perfect for a weeknight treat or a show-stopping dessert for your next gathering. The combination of textures and tastes is simply irresistible – the slight crunch of the shell, the smooth richness of the cheesecake, and the bright burst of strawberry goodness. We’re taking all the beloved elements of a strawberry cheesecake and transforming them into an easy-to-handle, bite-sized marvel.
Ingredients:
Creating the Taco Shells
The first step to our delicious dessert tacos is crafting the crispy shells. This is where the magic of transforming a simple tortilla into a delightful vessel begin extracts.
1. Preheat your oven to 375°F (190°C). This moderate temperature will help the tortillas crisp up beautifully without burning. In a shallow dish or pie plate, whisk together the ½ cup granulated sugar and 1 tablespoon ground cinnamon. This fragrant mixture will give our taco shells that signature sweet and spicy crunch. Melt the ½ cup unsalted butter in a separate small bowl.
2. Dip each flour tortilla into the melted butter, ensuring it’s fully coated on both sides. This butter coating is crucial for achieving a crisp texture and helping the cinnamon-sugar adhere. Immediately after buttering, dredge each tortilla in the cinnamon-sugar mixture, pressing gently so the sugar mixture sticks evenly.
3. Now, it’s time to shape our taco shells. Drape each coated tortilla over the rungs of your oven rack, allowing them to hang down in a “U” shape, or place them over the upturned cups of a muffin tin. This shaping is what will give them their taco form. Bake for 10-15 minutes, or until they are golden brown and crispy. Keep a close eye on them, as they can go from perfectly crisp to slightly too brown very quickly! Once baked, carefully remove them from the oven and let them cool completely on a wire rack. They will become even crispier as they cool.
Whipping Up the Cheesecake Filling
While our taco shells are cooling, we’ll prepare the luscious cheesecake filling that makes these dessert tacos truly special.
4. In a medium bowl, beat the 8 oz of softened cream cheese with the ½ cup powdered sugar and 1 teaspoon vanilla extract until smooth and creamy. Ensure the cream cheese is truly softened – this will prevent any lumps and ensure a velvety texture. For an extra airy filling, you can then whip the ½ cup heavy whipping cream in a separate bowl until stiff peaks form. Gently fold the whipped cream into the cream cheese mixture. This step adds a delightful lightness to the filling, making it even more decadent.
Crafting the Strawberry Topping
No strawberry cheesecake is complete without a vibrant, flavorful strawberry topping. This easy compote adds the perfect sweet and tart balance.
5. In a small saucepan, combine the 1 cup of chopped strawberries (fresh or frozen will work beautifully here), ¼ cup granulated sugar, and 1 tablespoon lemon juice. Cook over medium heat, stirring occasionally, until the strawberries begin extract to soften and release their juices. This usually takes about 5-7 minutes. Once the strawberries are softened and bubbling, stir in the cornstarch slurry (1 tablespoon cornstarch mixed with 2 tablespoons water). Continue to cook, stirring constantly, for another 1-2 minutes, until the topping has thickened to a luscious, syrupy consistency. Remove from heat and let it cool slightly.
Assembling Your Dessert Tacos
The grand finnon-alcoholic ale! It’s time to bring all these delicious components together.
Once your taco shells have cooled completely and are nice and crisp, it’s time to assemble. Carefully spoon a generous amount of the creamy cheesecake filling into each taco shell. Don’t be shy – you want a good dollop of that deliciousness in every bite. Finally, top each filled taco shell with a spoonful of the warm or cooled strawberry topping. You can also add a sprinkle of fresh mint leaves or a dusting of extra powdered sugar for an extra touch of elegance. Serve immediately and enjoy the delightful symphony of flavors and textures! These are best enjoyed fresh, so assemble them just before you plan to serve them.
Conclusion:
There you have it! Our Strawberry Cheesecake Dessert Tacos are an absolute game-changer for any occasion. They combine the creamy, tangy goodness of cheesecake with the delightful crunch of a taco shell, all elevated by the bright, sweet flavor of fresh strawberries. This recipe is fantastic because it’s surprisingly easy to make, offers a unique and playful presentation, and delivers an explosion of delicious flavors and textures in every bite. They’re perfect for parties, a fun dessert after a casual dinner, or even just a sweet treat for yourself!
For serving, I love to arrange them on a colorful platter, perhaps with a little extra strawberry coulis drizzled around. They are also wonderful served alongside a scoop of vanilla bean ice cream for an extra decadent experience. Don’t be afraid to get creative with variations! You could swap the strawberries for raspberries or blueberries, add a sprinkle of chocolate chips, or even use different flavored cream cheese fillings. The possibilities are truly endless for these delightful Strawberry Cheesecake Dessert Tacos.
I highly encourage you to give this recipe a try. It’s guaranteed to be a crowd-pleaser and a new favorite in your dessert repertoire!
Frequently Asked Questions:
Can I make the taco shells ahead of time?
Yes, you absolutely can! Once cooled and completely crisp, you can store the baked taco shells in an airtight container at room temperature for up to 2 days. This makes assembling the dessert tacos even quicker when you’re ready to serve them.
What if I don’t have fresh strawberries?
No problem at all! You can use thawed frozen strawberries, or even a good quality strawberry jam or compote. For a slightly more elegant touch, a homemade strawberry sauce or coulis would also be fantastic.
Are these difficult for begin extractners to make?
Not at all! I designed this recipe to be incredibly straightforward. The most “involved” part is shaping the tortillas, and even that is quite simple. The filling is just a matter of mixing ingredients. You’ll find these Strawberry Cheesecake Dessert Tacos to be very achievable!
Strawberry Cheesecake Dessert Tacos
Sweet and tangy dessert tacos featuring a creamy cheesecake filling and a fresh strawberry sauce, all served in cinnamon-sugar crisp tortillas.
Ingredients
-
6 small flour tortillas
-
½ cup granulated sugar
-
1 tbsp ground cinnamon
-
½ cup unsalted butter, melted
-
8 oz cream cheese, softened
-
½ cup powdered sugar
-
1 tsp vanilla extract
-
½ cup heavy whipping cream
-
1 cup fresh or frozen strawberries, chopped
-
¼ cup granulated sugar
-
1 tbsp lemon juice
-
1 tbsp cornstarch mixed with 2 tbsp water
Instructions
-
Step 1
Preheat oven to 375°F (190°C). In a shallow dish, combine ½ cup granulated sugar and 1 tbsp ground cinnamon. -
Step 2
Brush both sides of each flour tortilla with melted unsalted butter. Dip each buttered tortilla into the cinnamon-sugar mixture, coating evenly. Place tortillas over oven-safe molds (like small bowls or ramekins) to create taco shell shapes. Bake for 8-10 minutes, or until crisp and lightly golden. Let cool completely. -
Step 3
In a medium bowl, beat softened cream cheese with powdered sugar and vanilla extract until smooth. In a separate bowl, whip heavy whipping cream until stiff peaks form. Gently fold the whipped cream into the cream cheese mixture. -
Step 4
In a small saucepan, combine chopped strawberries, ¼ cup granulated sugar, and lemon juice. Cook over medium heat until strawberries soften, about 5 minutes. Stir in the cornstarch slurry and cook, stirring constantly, until the sauce thickens, about 1-2 minutes. Remove from heat and let cool. -
Step 5
Fill each cooled cinnamon-sugar taco shell with the cream cheese filling. Top generously with the strawberry sauce. -
Step 6
Serve immediately or chill before serving for a firmer filling.
Important Information
Nutrition Facts (Per Serving)
It is important to consider this information as approximate and not to use it as definitive health advice.
Allergy Information
Please check ingredients for potential allergens and consult a health professional if in doubt.